English
EXTENSION CORDS
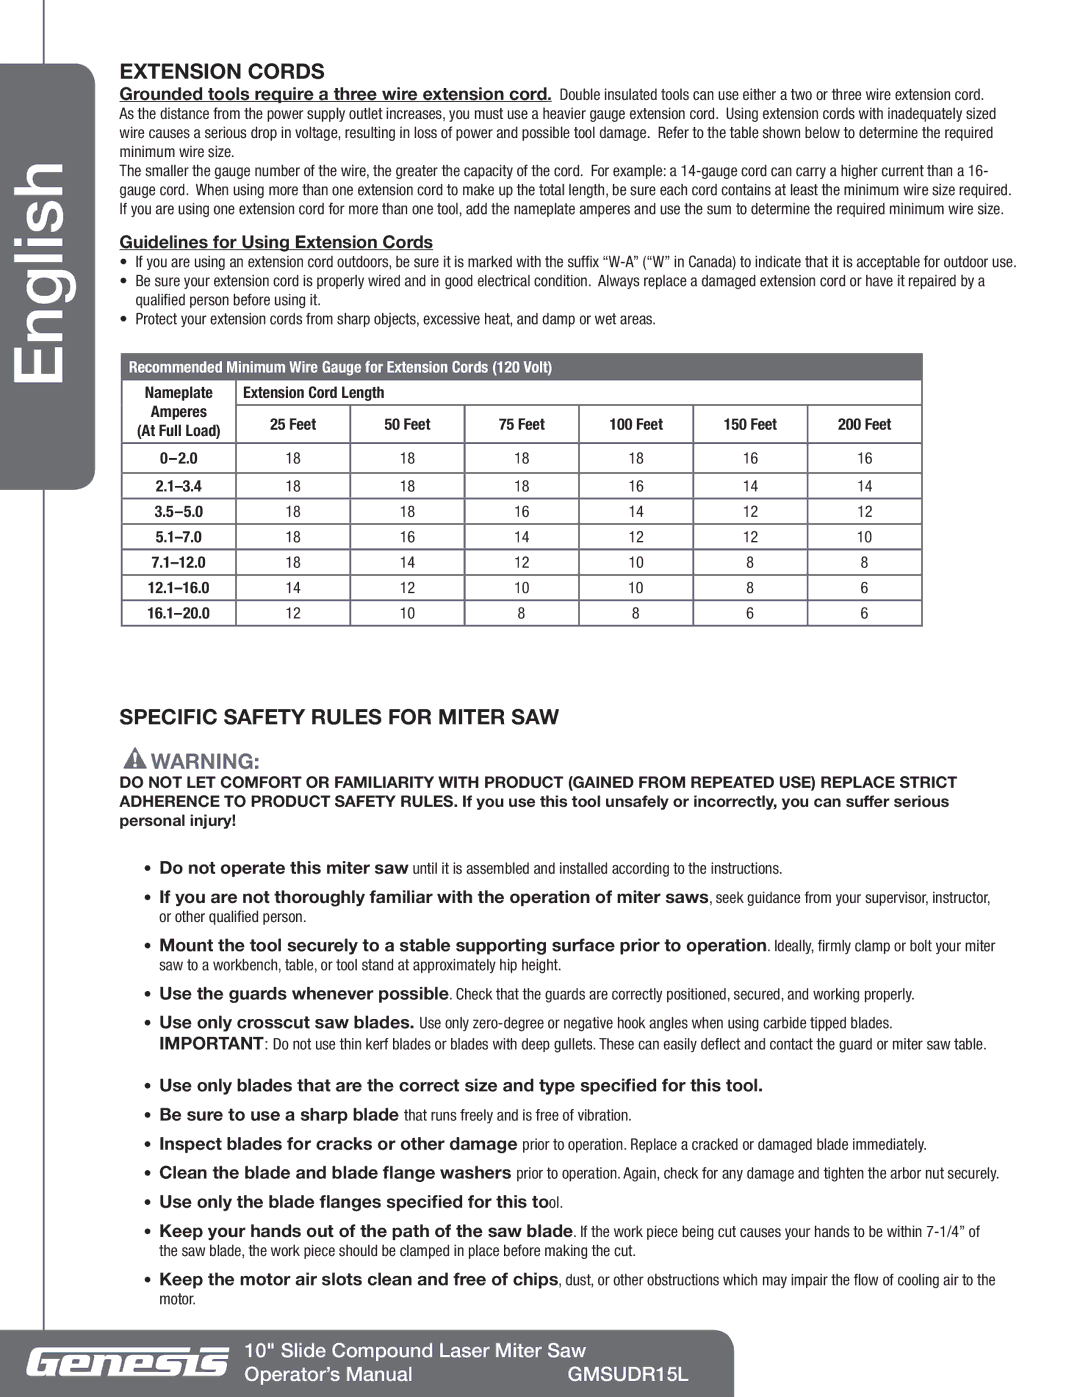
Grounded tools require a three wire extension cord. Double insulated tools can use either a two or three wire extension cord. As the distance from the power supply outlet increases, you must use a heavier gauge extension cord. Using extension cords with inadequately sized wire causes a serious drop in voltage, resulting in loss of power and possible tool damage. Refer to the table shown below to determine the required minimum wire size.
The smaller the gauge number of the wire, the greater the capacity of the cord. For example: a
Guidelines for Using Extension Cords
•If you are using an extension cord outdoors, be sure it is marked with the suffix
•Be sure your extension cord is properly wired and in good electrical condition. Always replace a damaged extension cord or have it repaired by a qualified person before using it.
•Protect your extension cords from sharp objects, excessive heat, and damp or wet areas.
Recommended Minimum Wire Gauge for Extension Cords (120 Volt)
Nameplate | Extension Cord Length |
|
|
|
|
| |
Amperes |
|
|
|
|
|
|
|
25 Feet |
| 50 Feet | 75 Feet | 100 Feet | 150 Feet | 200 Feet | |
(At Full Load) |
| ||||||
|
|
|
|
|
|
| |
|
|
|
|
|
|
|
|
18 |
| 18 | 18 | 18 | 16 | 16 | |
|
|
|
|
|
|
|
|
18 |
| 18 | 18 | 16 | 14 | 14 | |
|
|
|
|
|
|
|
|
18 |
| 18 | 16 | 14 | 12 | 12 | |
|
|
|
|
|
|
|
|
18 |
| 16 | 14 | 12 | 12 | 10 | |
|
|
|
|
|
|
|
|
18 |
| 14 | 12 | 10 | 8 | 8 | |
|
|
|
|
|
|
|
|
14 |
| 12 | 10 | 10 | 8 | 6 | |
|
|
|
|
|
|
|
|
12 |
| 10 | 8 | 8 | 6 | 6 | |
|
|
|
|
|
|
|
|
SPECIFIC SAFETY RULES FOR MITER SAW
![]() Warning:
Warning:
DO NOT LET COMFORT OR FAMILIARITY WITH PRODUCT (GAINED FROM REPEATED USE) REPLACE STRICT ADHERENCE TO PRODUCT SAFETY RULES. If you use this tool unsafely or incorrectly, you can suffer serious personal injury!
•Do not operate this miter saw until it is assembled and installed according to the instructions.
•If you are not thoroughly familiar with the operation of miter saws, seek guidance from your supervisor, instructor, or other qualified person.
•Mount the tool securely to a stable supporting surface prior to operation. Ideally, firmly clamp or bolt your miter saw to a workbench, table, or tool stand at approximately hip height.
•Use the guards whenever possible. Check that the guards are correctly positioned, secured, and working properly.
•Use only crosscut saw blades. Use only
•Use only blades that are the correct size and type specified for this tool.
•Be sure to use a sharp blade that runs freely and is free of vibration.
•Inspect blades for cracks or other damage prior to operation. Replace a cracked or damaged blade immediately.
•Clean the blade and blade flange washers prior to operation. Again, check for any damage and tighten the arbor nut securely.
•Use only the blade flanges specified for this tool.
•Keep your hands out of the path of the saw blade. If the work piece being cut causes your hands to be within
•Keep the motor air slots clean and free of chips, dust, or other obstructions which may impair the flow of cooling air to the motor.
10" Slide Compound Laser Miter Saw
Operator’s Manual | GMSUDR15L |
