IMPORTANT PRECAUTIONS
![]() WARNING : To reduce the risk of serious injury, read the following important precautions before using the weight system accessory.
WARNING : To reduce the risk of serious injury, read the following important precautions before using the weight system accessory.
1.Read all instructions in this manual and in the literature accompanying the weight sys- tem before using the weight system accesso- ry. Use the accessory only as described in the literature.
2.Keep hands and feet away from moving
parts.
3.Make sure that the nylon rope remains on the pulley at all times. If the nylon rope binds while you are exercising, stop and make sure that the nylon rope is on the pulley.
4.If you feel pain or dizziness at any time while exercising, stop immediately and begin cool-
ing down.
![]() WARNING: Before beginning this or any exercise program, consult your physician. This is especially important for persons over the age of 35 or persons with
WARNING: Before beginning this or any exercise program, consult your physician. This is especially important for persons over the age of 35 or persons with
all instructions before using. ICON assumes no responsibility for personal injury or property damage sustained by or through the use of this product.
ASSEMBLY
Thank you for selecting the versatile GOLD’S GYM | ® LEG DEVELOPER weight system accessory. | For your |
benefit, read this manual carefully before using the weight system accessory. |
| |
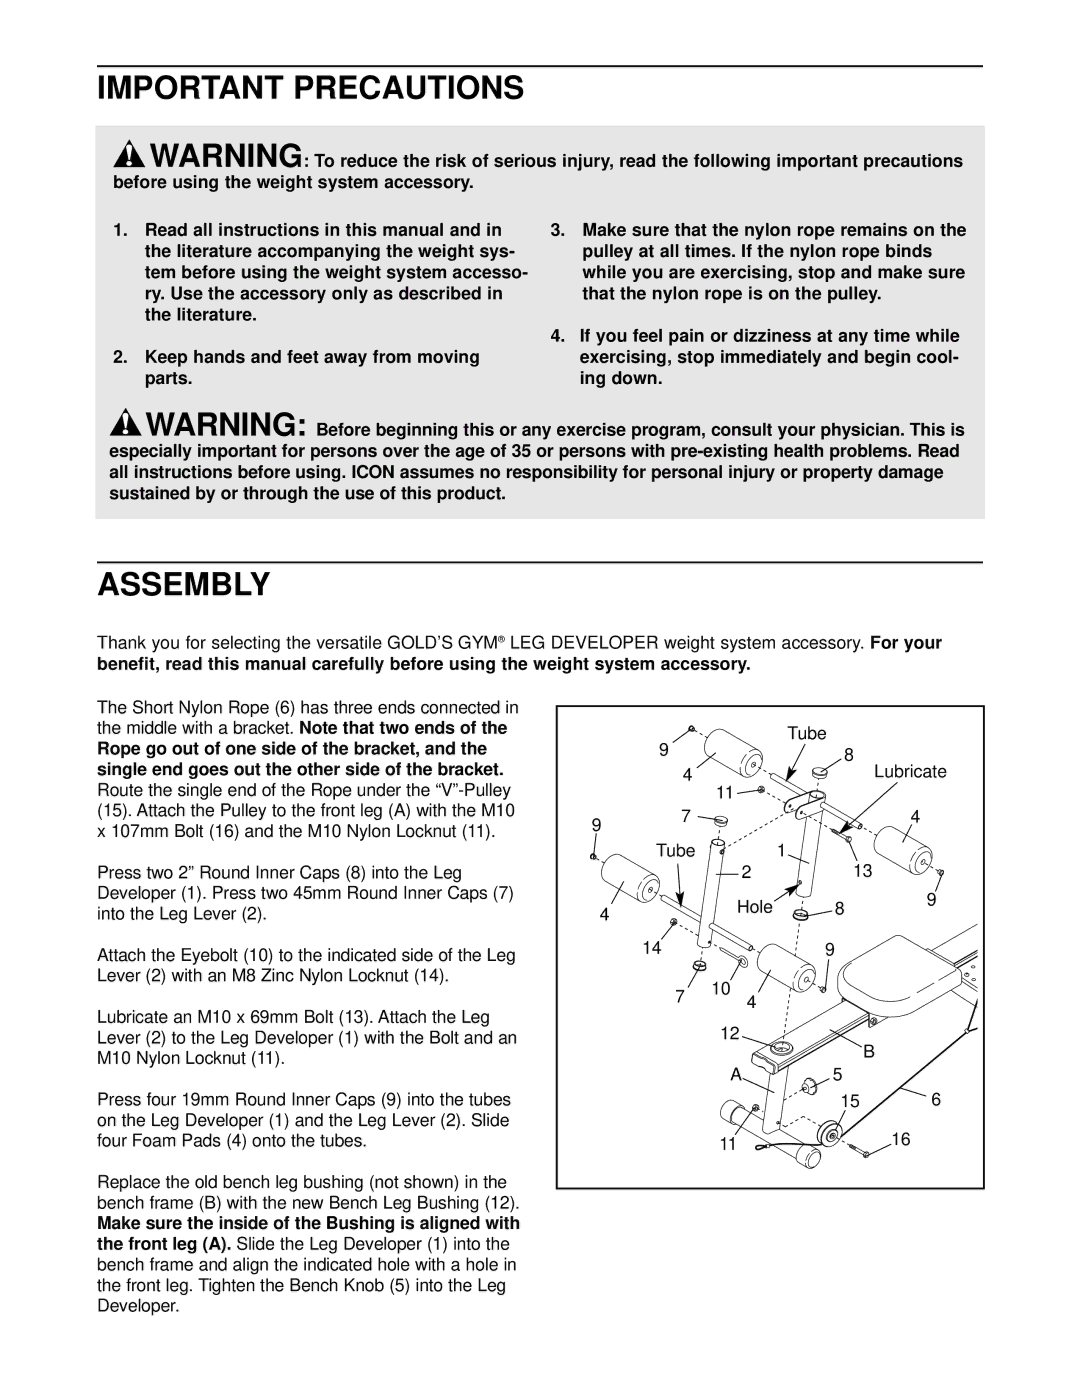
The Short Nylon Rope (6) has three ends connected in
the middle with a bracket. Note that two ends of the
Rope go out of one side of the bracket, and the single end goes out the other side of the bracket. Route the single end of the Rope under the
(15). Attach the Pulley to the front leg (A) with the M10 x 107mm Bolt (16) and the M10 Nylon Locknut (11).
Press two 2” Round Inner Caps (8) into the Leg Developer (1). Press two 45mm Round Inner Caps (7) into the Leg Lever (2).
Attach the Eyebolt (10) to the indicated side of the Leg Lever (2) with an M8 Zinc Nylon Locknut (14).
Lubricate an M10 x 69mm Bolt (13). Attach the Leg Lever (2) to the Leg Developer (1) with the Bolt and an M10 Nylon Locknut (11).
Press four 19mm Round Inner Caps (9) into the tubes
on the Leg Developer (1) and the Leg Lever (2). Slide four Foam Pads (4) onto the tubes.
Replace the old bench leg bushing (not shown) in the bench frame (B) with the new Bench Leg Bushing (12).
Make sure the inside of the Bushing is aligned with the front leg (A). Slide the Leg Developer (1) into the bench frame and align the indicated hole with a hole in
the front leg. Tighten the Bench Knob (5) into the Leg Developer.
|
| 9 |
| Tube |
|
|
|
| 8 | Lubricate | |
|
| 4 | 11 |
| |
|
|
|
|
| |
9 |
| 7 |
|
| 4 |
|
|
|
|
| |
|
| Tube |
| 1 |
|
|
|
| 2 | 13 |
|
| 4 |
| Hole | 8 | 9 |
|
|
| |||
|
|
|
|
| |
|
| 14 |
| 9 |
|
|
| 7 | 10 |
|
|
|
| 4 |
|
| |
|
|
|
|
| |
|
|
| 12 | B |
|
|
|
|
|
| |
|
|
| A | 5 |
|
|
|
|
| 15 | 6 |
|
|
| 11 |
| 16 |
