Installation Manual For Indoor Unit
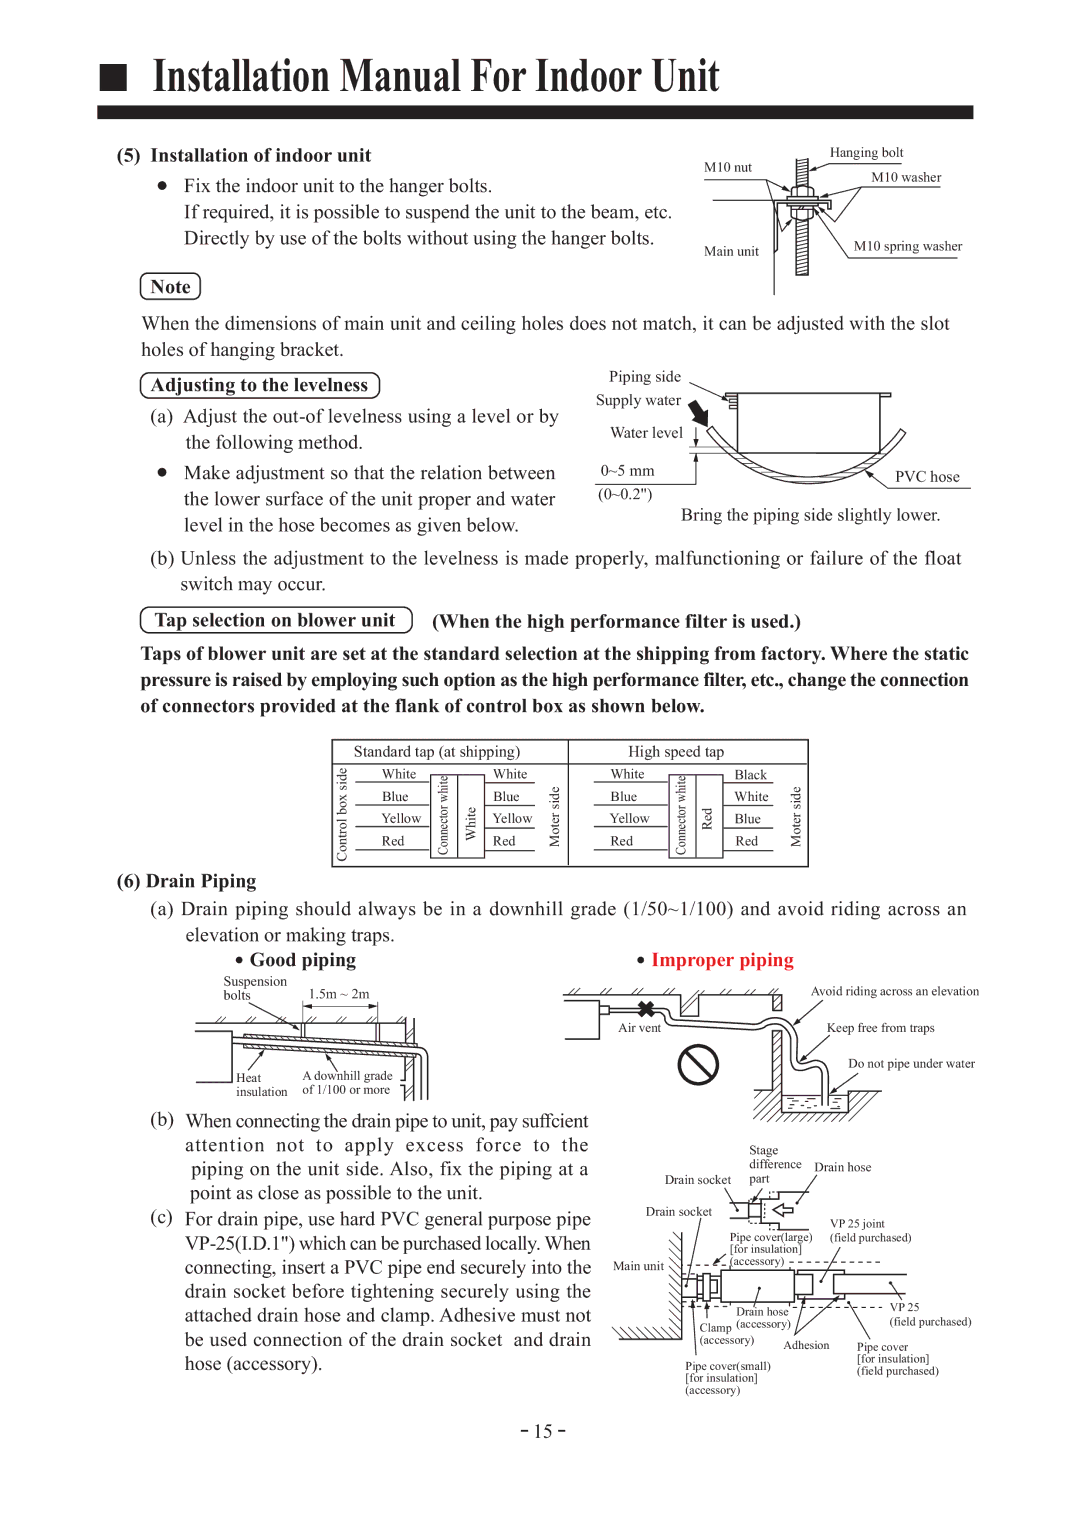
(5) Installation of indoor unit
Fix the indoor unit to the hanger bolts.
If required, it is possible to suspend the unit to the beam, etc. Directly by use of the bolts without using the hanger bolts.
Note
M10 nut
Main unit
Hanging bolt M10 washer
M10 spring washer
When the dimensions of main unit and ceiling holes does not match, it can be adjusted with the slot holes of hanging bracket.
Adjusting to the levelness
(a)Adjust the
Piping side Supply water
Water level
Make adjustment so that the relation between the lower surface of the unit proper and water level in the hose becomes as given below.
0~5 mm | PVC hose | |
(0~0.2") | ||
|
Bring the piping side slightly lower.
(b)Unless the adjustment to the levelness is made properly, malfunctioning or failure of the float switch may occur.
Tap selection on blower unit | (When the high performance filter is used.) |
Taps of blower unit are set at the standard selection at the shipping from factory. Where the static pressure is raised by employing such option as the high performance filter, etc., change the connection of connectors provided at the flank of control box as shown below.
| Standard tap (at shipping) |
|
| High speed tap |
|
|
| ||||||
|
|
|
|
|
|
|
|
|
|
|
|
|
|
Control box side | White |
|
| White |
|
| White |
|
|
| Black |
|
|
Blue | Connector white |
| Blue | Moter side |
| Blue | Connector white |
|
| White | Moter side | ||
Yellow | White | Yellow |
| Yellow | Red |
| Blue | ||||||
Red | Red |
| Red |
| Red | ||||||||
|
|
|
|
|
|
|
|
|
| ||||
|
|
|
|
|
|
|
|
|
|
|
|
| |
|
|
|
|
|
|
|
|
|
|
|
|
|
|
(6)Drain Piping
(a)Drain piping should always be in a downhill grade (1/50~1/100) and avoid riding across an
elevation or making traps.
 Good piping
Suspension | 1.5m ~ 2m |
bolts | |
Heat | A downhill grade |
insulation | of 1/100 or more |
 Improper piping
Avoid riding across an elevation
Air vent | Keep free from traps |
Do not pipe under water
(b)When connecting the drain pipe to unit, pay suffcient attention not to apply excess force to the piping on the unit side. Also, fix the piping at a point as close as possible to the unit.
(c)For drain pipe, use hard PVC general purpose pipe
|
| Stage |
|
|
|
|
| difference | Drain hose | ||
| Drain socket | part |
|
|
|
Drain socket |
|
|
| VP 25 joint | |
| Pipe cover(large) |
| |||
|
| (field purchased) | |||
| [for insulation] |
|
| ||
Main unit | (accessory) |
|
| ||
|
|
|
|
| |
|
| Drain hose |
| VP 25 | |
|
|
| (field purchased) | ||
| Clamp (accessory) |
| |||
| (accessory) | Adhesion | Pipe cover | ||
|
|
| |||
| Pipe cover(small) |
|
| [for insulation] | |
|
|
| (field purchased) | ||
| [for insulation] |
|
| ||
|
|
|
| ||
| (accessory) |
|
|
| |
15