G. Install Metal Roof Flashing

Note: Skip this section if using the RF4-8.

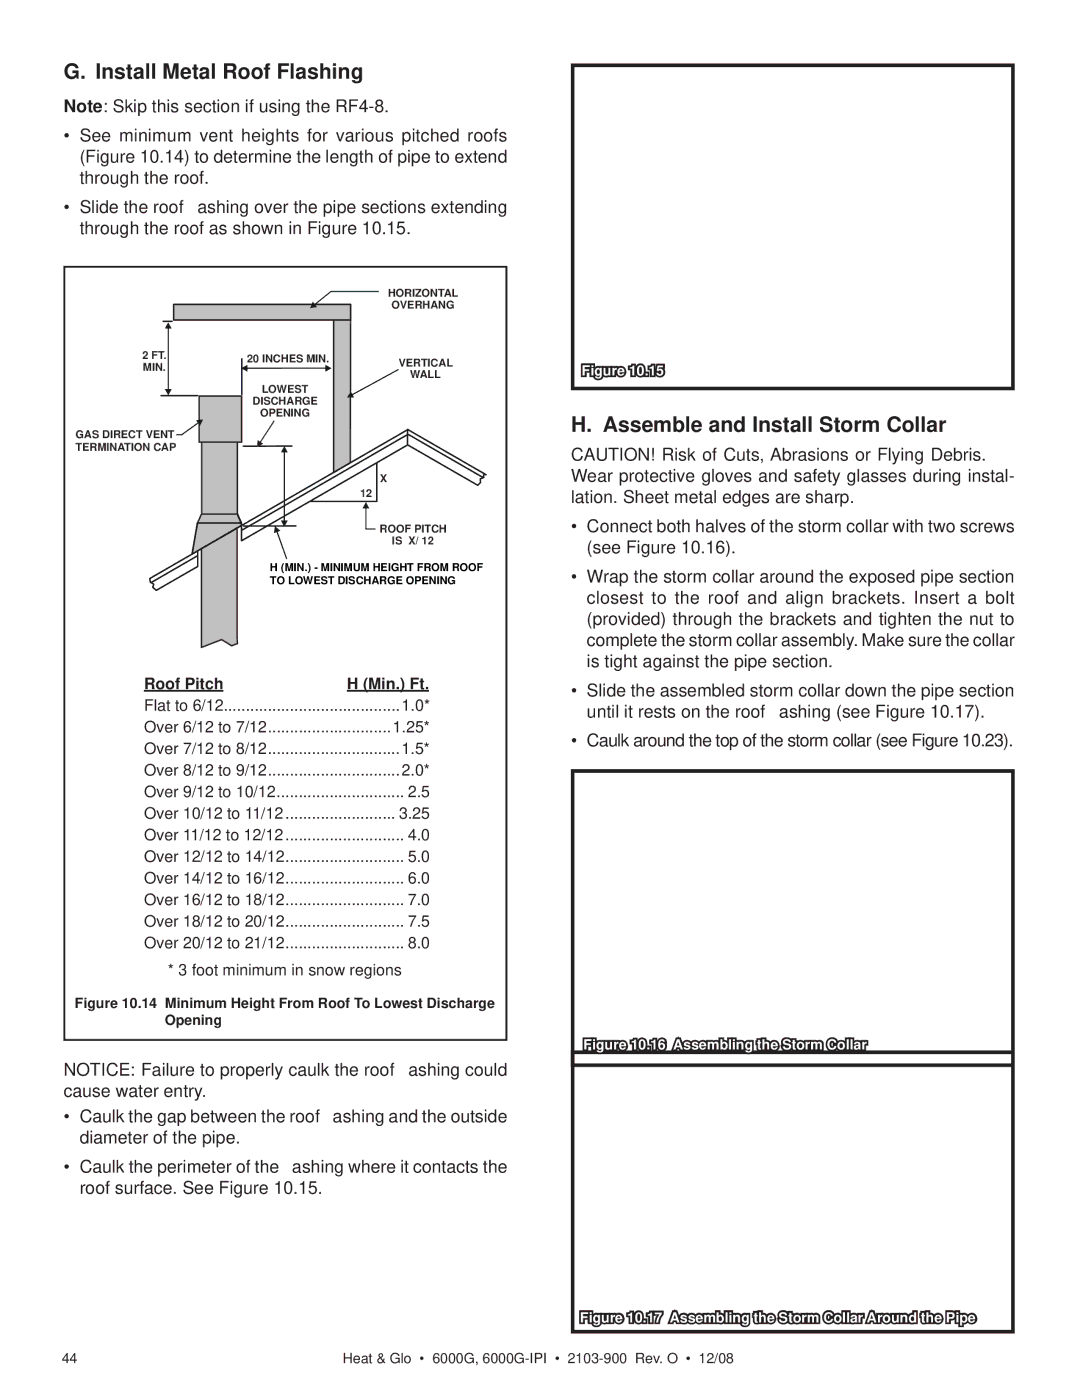
See minimum vent heights for various pitched roofs (Figure 10.14) to determine the length of pipe to extend through the roof.

Slide the roof flashing over the pipe sections extending through the roof as shown in Figure 10.15.


HORIZONTAL


OVERHANG

2 FT.

20 INCHES MIN.

VERTICAL

MIN.


WALL


LOWEST


DISCHARGE


OPENING


GAS DIRECT VENT


TERMINATION CAP


X


12


ROOF PITCH


IS X/ 12


H (MIN.) - MINIMUM HEIGHT FROM ROOF


TO LOWEST DISCHARGE OPENING

Roof Pitch


H (Min.) Ft.

Flat to 6/12........................................1.0*

Over 6/12 to 7/12............................1.25*

Over 7/12 to 8/12..............................1.5*

Over 8/12 to 9/12..............................2.0*

Over 9/12 to 10/12............................. 2.5

Over 10/12 to 11/12 ......................... 3.25

Over 11/12 to 12/12 ........................... 4.0

Over 12/12 to 14/12........................... 5.0

Over 14/12 to 16/12........................... 6.0

Over 16/12 to 18/12........................... 7.0

Over 18/12 to 20/12........................... 7.5

Over 20/12 to 21/12........................... 8.0

* 3 foot minimum in snow regions

Figure 10.14 Minimum Height From Roof To Lowest Discharge

Opening


NOTICE: Failure to properly caulk the roof flashing could cause water entry.

Caulk the gap between the roof flashing and the outside diameter of the pipe.

Caulk the perimeter of the flashing where it contacts the roof surface. See Figure 10.15.

CAULK

Figure 10.15

H. Assemble and Install Storm Collar

CAUTION! Risk of Cuts, Abrasions or Flying Debris. Wear protective gloves and safety glasses during instal- lation. Sheet metal edges are sharp.

Connect both halves of the storm collar with two screws (see Figure 10.16).

Wrap the storm collar around the exposed pipe section closest to the roof and align brackets. Insert a bolt (provided) through the brackets and tighten the nut to complete the storm collar assembly. Make sure the collar is tight against the pipe section.

Slide the assembled storm collar down the pipe section until it rests on the roof flashing (see Figure 10.17).

Caulk around the top of the storm collar (see Figure 10.23).

Figure 10.16 Assembling the Storm Collar

Figure 10.17 Assembling the Storm Collar Around the Pipe

44

Heat & Glo • 6000G, 6000G-IPI2103-900 Rev. O • 12/08

Page 44
Image 44
Hearth and Home Technologies 6000G-IPILP, 6000G-LP Install Metal Roof Flashing, Assemble and Install Storm Collar

6000G-IPI, 6000G-IPILP, 6000G-LP, 6000G specifications

Hearth and Home Technologies offers an impressive range of gas fireplaces, among which the 6000G series stands out for its innovative design and advanced features. This lineup includes models such as the 6000G, 6000G-LP, 6000G-IPILP, and 6000G-IPI, each providing unique advantages tailored to different preferences and home styles.

The 6000G serves as the cornerstone of this series, featuring a contemporary design that can complement modern and traditional interiors alike. It boasts an expansive viewing area, thanks to its large glass front, allowing for an immersive fire experience while offering impressive heat output. The efficient burner system not only ensures high energy efficiency but also creates a realistic flame profile that enhances the ambiance of any room.

For those looking for versatility in fuel type, the 6000G-LP model offers a liquid propane option, making it suitable for homes that might not have access to natural gas. It maintains the same sleek aesthetic and efficiency as the standard 6000G, ensuring that homeowners can enjoy the sophisticated warmth of a gas fireplace regardless of their fuel preferences.

The 6000G-IPILP model introduces the innovative Ignite Pilot, which allows users to ignite their fireplace with ease using a simple switch. This technology provides the ultimate convenience while enhancing safety, as it eliminates the need for a standing pilot light. Compatible with liquid propane, this model ensures that homeowners can enjoy a hassle-free experience, with efficient operation and maintenance.

Lastly, the 6000G-IPI model features an impressive Intermittent Pilot Ignition system. This system not only enhances efficiency by eliminating unnecessary gas consumption when the fireplace is not in use but also ensures a simple and reliable startup process. With this model, homeowners can take comfort in knowing that their fireplace is designed with both efficiency and user-friendliness in mind.

All models in the 6000G series reflect Hearth and Home Technologies' commitment to quality, performance, and innovation. Each unit is built with durable materials and designed to provide long-lasting beauty and exceptional heating performance. With various sizes and styles available, these fireplaces cater to diverse architectural preferences, making them a perfect addition to any home. Whether opting for the standard 6000G or exploring the advanced functionalities of the LP and IPI models, homeowners can be assured that they are investing in a product that marries functionality with aesthetic appeal.