D. Install Attic Insulation Shield

WARNING! Fire Risk. DO NOT allow loose materials or insulation to touch vent. Hearth & Home Technologies Inc. requires the use of an attic shield.

The National Fuel Gas Code ANSI Z223.1 and NFPA 54 requires an attic shield constructed of 26 gauge minimum metal that extends at least 2 in. (51 mm) above insulation.

Attic shields must meet specified clearance and be se- cured in place.

Flat Ceiling Installation

• Remove one shield from box.

NOTICE: Cut previously installed batt insulation to make room for the attic insulation shield.

Wrap shield around pipe if pipe is already installed in


area to be insulated.

Match the three holes in each side and fasten with three


screws to form a tube.

Bend three tabs on the bottom of the shield outward to


allow attachment to the ceiling firestop.

Bend the remaining bottom tabs inward 90º to maintain


the air space between the pipe and the shield. Set the


shield on the ceiling firestop and attach to the firestop.

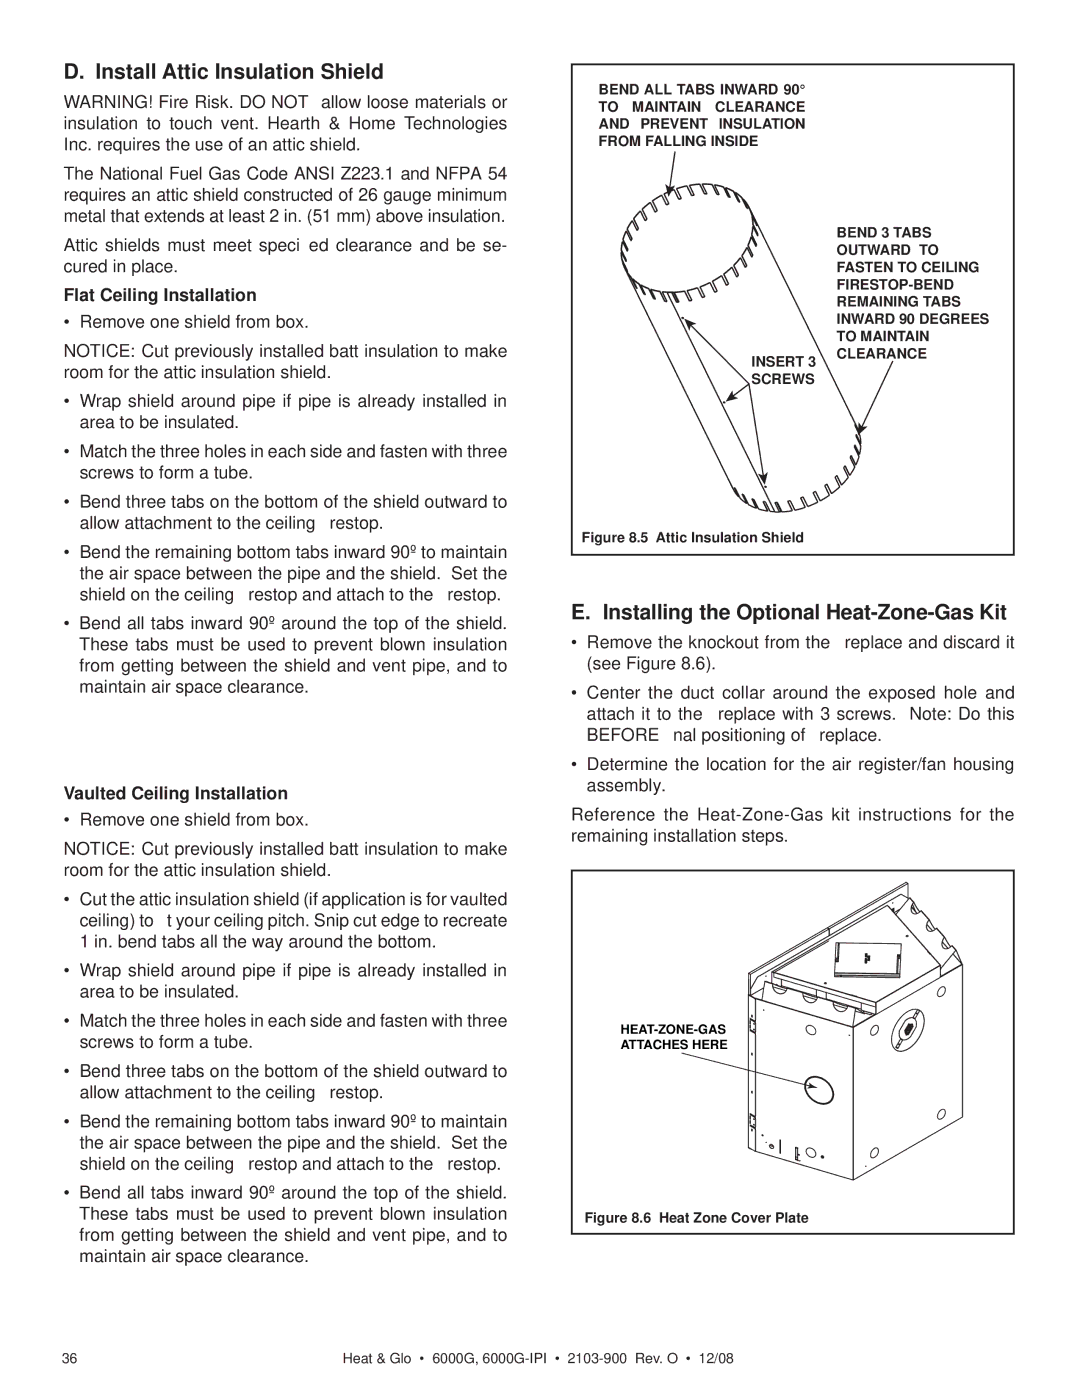
BEND ALL TABS INWARD 90° TO MAINTAIN CLEARANCE AND PREVENT INSULATION FROM FALLING INSIDE

INSERT 3

SCREWS

Figure 8.5 Attic Insulation Shield

BEND 3 TABS

OUTWARD TO FASTEN TO CEILING FIRESTOP-BEND REMAINING TABS INWARD 90 DEGREES TO MAINTAIN CLEARANCE

• Bend all tabs inward 90º around the top of the shield.

These tabs must be used to prevent blown insulation

from getting between the shield and vent pipe, and to

maintain air space clearance.

Vaulted Ceiling Installation

• Remove one shield from box.

NOTICE: Cut previously installed batt insulation to make room for the attic insulation shield.

Cut the attic insulation shield (if application is for vaulted ceiling) to fit your ceiling pitch. Snip cut edge to recreate 1 in. bend tabs all the way around the bottom.

Wrap shield around pipe if pipe is already installed in area to be insulated.

Match the three holes in each side and fasten with three screws to form a tube.

Bend three tabs on the bottom of the shield outward to allow attachment to the ceiling firestop.

Bend the remaining bottom tabs inward 90º to maintain the air space between the pipe and the shield. Set the shield on the ceiling firestop and attach to the firestop.

Bend all tabs inward 90º around the top of the shield. These tabs must be used to prevent blown insulation from getting between the shield and vent pipe, and to maintain air space clearance.

E. Installing the Optional Heat-Zone-Gas Kit

Remove the knockout from the fireplace and discard it (see Figure 8.6).

Center the duct collar around the exposed hole and attach it to the fireplace with 3 screws. Note: Do this BEFORE final positioning of fireplace.

Determine the location for the air register/fan housing assembly.

Reference the Heat-Zone-Gas kit instructions for the remaining installation steps.

HEAT-ZONE-GAS

ATTACHES HERE

Figure 8.6 Heat Zone Cover Plate

36

Heat & Glo • 6000G, 6000G-IPI2103-900 Rev. O • 12/08

Page 36
Image 36
Hearth and Home Technologies 6000G-IPILP Install Attic Insulation Shield, Installing the Optional Heat-Zone-Gas Kit

6000G-IPI, 6000G-IPILP, 6000G-LP, 6000G specifications

Hearth and Home Technologies offers an impressive range of gas fireplaces, among which the 6000G series stands out for its innovative design and advanced features. This lineup includes models such as the 6000G, 6000G-LP, 6000G-IPILP, and 6000G-IPI, each providing unique advantages tailored to different preferences and home styles.

The 6000G serves as the cornerstone of this series, featuring a contemporary design that can complement modern and traditional interiors alike. It boasts an expansive viewing area, thanks to its large glass front, allowing for an immersive fire experience while offering impressive heat output. The efficient burner system not only ensures high energy efficiency but also creates a realistic flame profile that enhances the ambiance of any room.

For those looking for versatility in fuel type, the 6000G-LP model offers a liquid propane option, making it suitable for homes that might not have access to natural gas. It maintains the same sleek aesthetic and efficiency as the standard 6000G, ensuring that homeowners can enjoy the sophisticated warmth of a gas fireplace regardless of their fuel preferences.

The 6000G-IPILP model introduces the innovative Ignite Pilot, which allows users to ignite their fireplace with ease using a simple switch. This technology provides the ultimate convenience while enhancing safety, as it eliminates the need for a standing pilot light. Compatible with liquid propane, this model ensures that homeowners can enjoy a hassle-free experience, with efficient operation and maintenance.

Lastly, the 6000G-IPI model features an impressive Intermittent Pilot Ignition system. This system not only enhances efficiency by eliminating unnecessary gas consumption when the fireplace is not in use but also ensures a simple and reliable startup process. With this model, homeowners can take comfort in knowing that their fireplace is designed with both efficiency and user-friendliness in mind.

All models in the 6000G series reflect Hearth and Home Technologies' commitment to quality, performance, and innovation. Each unit is built with durable materials and designed to provide long-lasting beauty and exceptional heating performance. With various sizes and styles available, these fireplaces cater to diverse architectural preferences, making them a perfect addition to any home. Whether opting for the standard 6000G or exploring the advanced functionalities of the LP and IPI models, homeowners can be assured that they are investing in a product that marries functionality with aesthetic appeal.