2 FT.

20 INCH MIN.

MIN.


LOWEST


DISCHARGE

TERMINATION

OPENING


CAP


HORIZONTAL

OVERHANG

VERTICAL

WALL

X

12

ROOF PITCH IS X/ 12

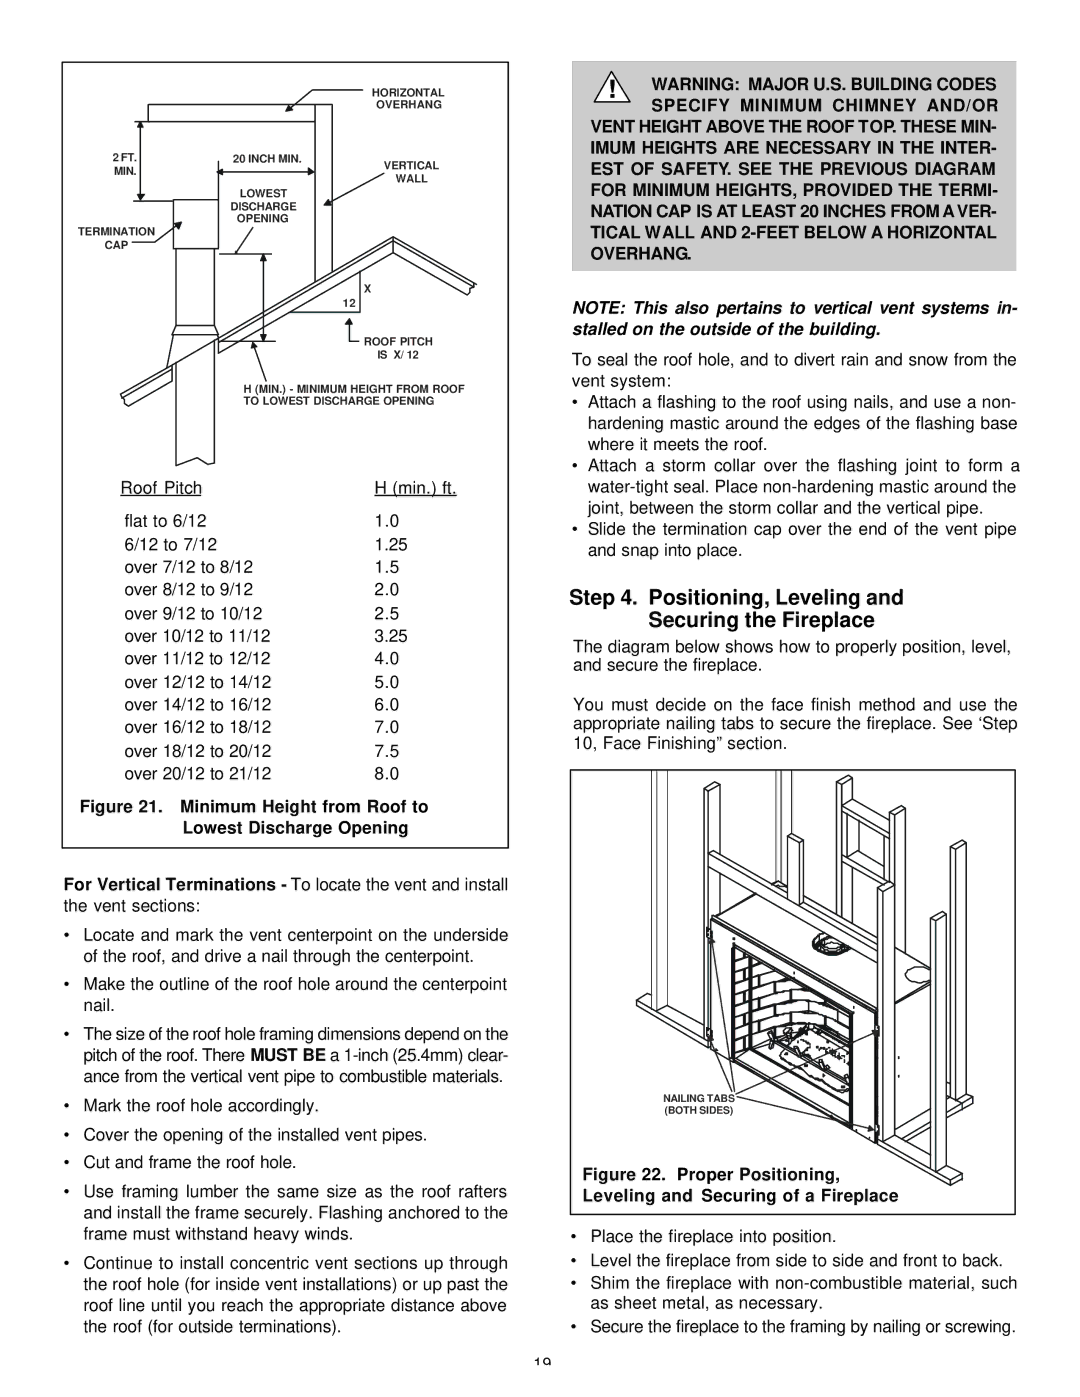
!WARNING: MAJOR U.S. BUILDING CODES SPECIFY MINIMUM CHIMNEY AND/OR

VENT HEIGHT ABOVE THE ROOF TOP. THESE MIN- IMUM HEIGHTS ARE NECESSARY IN THE INTER- EST OF SAFETY. SEE THE PREVIOUS DIAGRAM FOR MINIMUM HEIGHTS, PROVIDED THE TERMI- NATION CAP IS AT LEAST 20 INCHES FROM A VER- TICAL WALL AND 2-FEET BELOW A HORIZONTAL OVERHANG.

NOTE: This also pertains to vertical vent systems in- stalled on the outside of the building.

To seal the roof hole, and to divert rain and snow from the vent system:

H (MIN.) - MINIMUM HEIGHT FROM ROOF

TO LOWEST DISCHARGE OPENING

Roof Pitch

H (min.) ft.

flat to 6/12

1.0

6/12 to 7/12

1.25

over 7/12 to 8/12

1.5

over 8/12 to 9/12

2.0

over 9/12 to 10/12

2.5

over 10/12 to 11/12

3.25

over 11/12 to 12/12

4.0

over 12/12 to 14/12

5.0

over 14/12 to 16/12

6.0

over 16/12 to 18/12

7.0

over 18/12 to 20/12

7.5

over 20/12 to 21/12

8.0

Figure 21. Minimum Height from Roof to Lowest Discharge Opening

For Vertical Terminations - To locate the vent and install the vent sections:

Locate and mark the vent centerpoint on the underside of the roof, and drive a nail through the centerpoint.

Make the outline of the roof hole around the centerpoint nail.

The size of the roof hole framing dimensions depend on the pitch of the roof. There MUST BE a 1-inch (25.4mm) clear- ance from the vertical vent pipe to combustible materials.

Mark the roof hole accordingly.

Cover the opening of the installed vent pipes.

Cut and frame the roof hole.

Use framing lumber the same size as the roof rafters and install the frame securely. Flashing anchored to the frame must withstand heavy winds.

Continue to install concentric vent sections up through the roof hole (for inside vent installations) or up past the roof line until you reach the appropriate distance above the roof (for outside terminations).

Attach a flashing to the roof using nails, and use a non- hardening mastic around the edges of the flashing base where it meets the roof.

Attach a storm collar over the flashing joint to form a water-tight seal. Place non-hardening mastic around the joint, between the storm collar and the vertical pipe.

Slide the termination cap over the end of the vent pipe and snap into place.

Step 4. Positioning, Leveling and

Securing the Fireplace

The diagram below shows how to properly position, level, and secure the fireplace.

You must decide on the face finish method and use the appropriate nailing tabs to secure the fireplace. See ‘Step 10, Face Finishing” section.

NAILING TABS

(BOTH SIDES)

Figure 22. Proper Positioning,

Leveling and Securing of a Fireplace

Place the fireplace into position.

Level the fireplace from side to side and front to back.

Shim the fireplace with non-combustible material, such as sheet metal, as necessary.

Secure the fireplace to the framing by nailing or screwing.

19

Page 19
Image 19
Heat & Glo LifeStyle 36DV manual Positioning, Leveling Securing the Fireplace, Leveling and Securing of a Fireplace

36DV specifications

The Heat & Glo LifeStyle 36DV is a state-of-the-art gas fireplace designed for modern living spaces. This model stands out for its seamless blend of aesthetics, performance, and efficiency. With its sleek design and innovative technologies, the LifeStyle 36DV redefines how people experience warmth and ambiance in their homes.

One of the standout features of the LifeStyle 36DV is its powerful heating capability. This direct vent gas fireplace efficiently circulates warm air throughout the room while maintaining optimal energy usage. With an impressive heating output, it can effectively warm spaces of varying sizes, making it suitable for both large living areas and cozy nooks.

The LifeStyle 36DV is engineered with advanced gas technology. The fireplace utilizes a unique ignition system that ensures reliable starts and consistent performance. This system not only enhances ease of use but also increases safety, minimizing any risks associated with traditional ignition methods.

Additionally, the fireplace is equipped with a dynamic, glass-front design that maximizes the viewing area of the flames. With a variety of media options available, including traditional logs and modern glass media, homeowners can customize the look and feel of their fireplace to match their unique style. The LifeStyle 36DV can serve as a focal point in any room, providing both warmth and visual appeal.

Another noteworthy characteristic of the LifeStyle 36DV is its intuitive control system. With the ability to operate via remote control, wall switch, or smartphone app, adjusting the fireplace's settings has never been easier. Users can effortlessly change the flame height, control fan speed, and set timers, allowing for a personalized experience tailored to individual preferences.

The energy efficiency of the LifeStyle 36DV also cannot be overlooked. This fireplace is designed to meet stringent environmental standards, providing homeowners with a cost-effective heating solution that doesn't compromise on style. By utilizing innovative insulation and venting technology, the LifeStyle 36DV keeps the warmth inside where it belongs.

In summary, the Heat & Glo LifeStyle 36DV is a remarkable gas fireplace offering a perfect combination of modern technology and traditional warmth. With its stylish design, powerful heating capabilities, customizable aesthetics, and user-friendly controls, it stands out as a premier choice for homeowners looking to enhance their living spaces. Whether for cozy family gatherings or romantic evenings, the LifeStyle 36DV provides an inviting atmosphere that is hard to match.