CONNECTION

Terminal Positions

SD MEMORY

CARD h

PUSH-EJECT

P

P


w


OK


INPUT(RGB)


ANT


AUDIO


ertyu


ANALOG RGB

a


PC


INPUT(HDMI)


INPUT INPUT INPUT INPUT

OUTPUT


AUDIO


(AV1)

(AV2)

(AV3)

(AV4)

WOW, SRS and

symbol are trademarks of SRS Labs, Inc.


Y/VIDEO

Y/VIDEO


Licensed by BBE Sound, Inc. under USP5510752 and 5736897.


BBE and BBE symbol are registered trademarks of BBE Sound, Inc.


s


SUB


i

HDMI2


P

P


WOOFER


P

P


HDMI1


PH35814

AUDIO

AUDIO

AUDIO

AUDIO

AUDIO

SERVICE USE ONLY


L

L

L

L

L


o


C

C

C

C


R

R

R

R

R


POWER SWIVEL


A C


q

Connecting Procedure

PH35826


S-VIDEO

INPUT(AV5)

L/MONO

AUDIO VIDEO


R


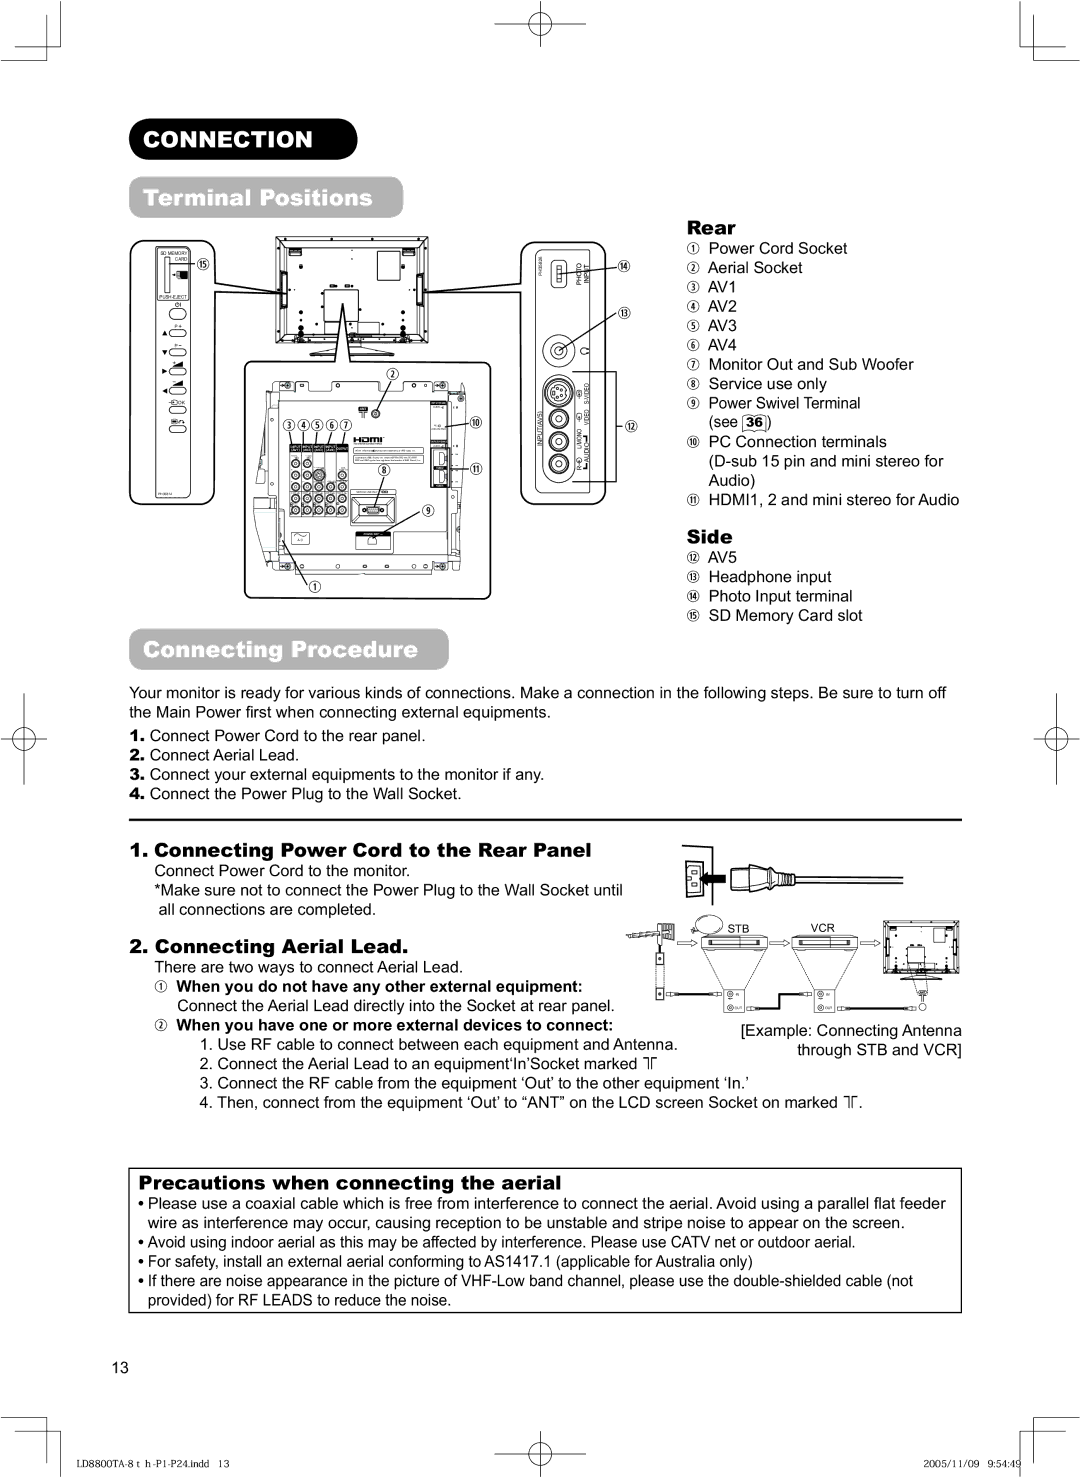
Rear

qPower Cord Socket

g w Aerial Socket

e AV1

fr AV2 t AV3 y AV4

u Monitor Out and Sub Woofer i Service use only

oPower Swivel Terminal

d(see 36 )

aPC Connection terminals (D-sub 15 pin and mini stereo for Audio)

sHDMI1, 2 and mini stereo for Audio

Side

dAV5

fHeadphone input

gPhoto Input terminal

hSD Memory Card slot

Your monitor is ready for various kinds of connections. Make a connection in the following steps. Be sure to turn off the Main Power fi rst when connecting external equipments.

1.Connect Power Cord to the rear panel.

2.Connect Aerial Lead.

3.Connect your external equipments to the monitor if any.

4.Connect the Power Plug to the Wall Socket.

1. Connecting Power Cord to the Rear Panel

Connect Power Cord to the monitor.

*Make sure not to connect the Power Plug to the Wall Socket until all connections are completed.

2. Connecting Aerial Lead.

There are two ways to connect Aerial Lead.

qWhen you do not have any other external equipment: Connect the Aerial Lead directly into the Socket at rear panel.

STB VCR

IN

IN

OUT

OUT

w

When you have one or more external devices to connect:

[Example: Connecting Antenna


1. Use RF cable to connect between each equipment and Antenna.


through STB and VCR]


2.Connect the Aerial Lead to an equipment‘In’Socket marked

3.Connect the RF cable from the equipment ‘Out’ to the other equipment ‘In.’

4.Then, connect from the equipment ‘Out’ to “ANT” on the LCD screen Socket on marked .

Precautions when connecting the aerial

Please use a coaxial cable which is free from interference to connect the aerial. Avoid using a parallel fl at feeder wire as interference may occur, causing reception to be unstable and stripe noise to appear on the screen.

Avoid using indoor aerial as this may be affected by interference. Please use CATV net or outdoor aerial. For safety, install an external aerial conforming to AS1417.1 (applicable for Australia only)

If there are noise appearance in the picture of VHF-Low band channel, please use the double-shielded cable (not provided) for RF LEADS to reduce the noise.

13

LD8800TA-8th-P1-P24.indd 13

2005/11/09 9:54:49


Page 16
Image 16
Hitachi 32LD8800TA, 37LD8800TA user manual Connection, Terminal Positions, Connecting Procedure

37LD8800TA, 32LD8800TA specifications

The Hitachi 37LD8800TA and 32LD8800TA are part of the company's innovative lineup of LCD televisions that blend cutting-edge technology with user-friendly features, offering an exceptional viewing experience for consumers. These models cater to a variety of home entertainment needs, seamlessly integrating advanced technology with reliable performance.

One of the standout features of both models is their high-resolution display. The 37LD8800TA, with a screen size of 37 inches, provides a vivid viewing experience with a resolution that enhances picture clarity and depth. Similarly, the 32LD8800TA, with its 32-inch screen, ensures that even smaller spaces can enjoy sharp and vibrant visuals. These TVs deliver excellent color reproduction and contrast ratios, allowing viewers to appreciate the details and nuances of their favorite films and shows.

Incorporating Hitachi's renowned LCD technology, these models offer rapid response times and wide viewing angles, ensuring that everyone in the room enjoys a consistent watching experience, regardless of their seat. The panels are designed to reduce glare and distortion, making them suitable for various lighting conditions.

Another key feature is the incorporation of advanced sound technology. Both the 37LD8800TA and 32LD8800TA are equipped with enhanced audio systems that provide clear and immersive sound, complementing the visual experience. Users can enjoy deep bass and crisp treble, making movie nights or gaming sessions more engaging.

Connectivity options are abundant, ensuring that these televisions can be easily integrated with other devices. Equipped with multiple HDMI and USB ports, users can connect gaming consoles, Blu-ray players, and streaming devices without hassle. This versatility enables viewers to enjoy a wide range of content, from live television to streamed movies and online gaming.

Smart technology is another integral aspect of these models, providing access to various applications and streaming services. Users can easily navigate through a plethora of entertainment options, turning their living rooms into multimedia hubs.

Overall, the Hitachi 37LD8800TA and 32LD8800TA represent a fine balance of features, technology, and design, making them an excellent choice for anyone looking to enhance their home entertainment experience. With their impressive displays and sound quality, they stand as strong contenders in the LCD television market.