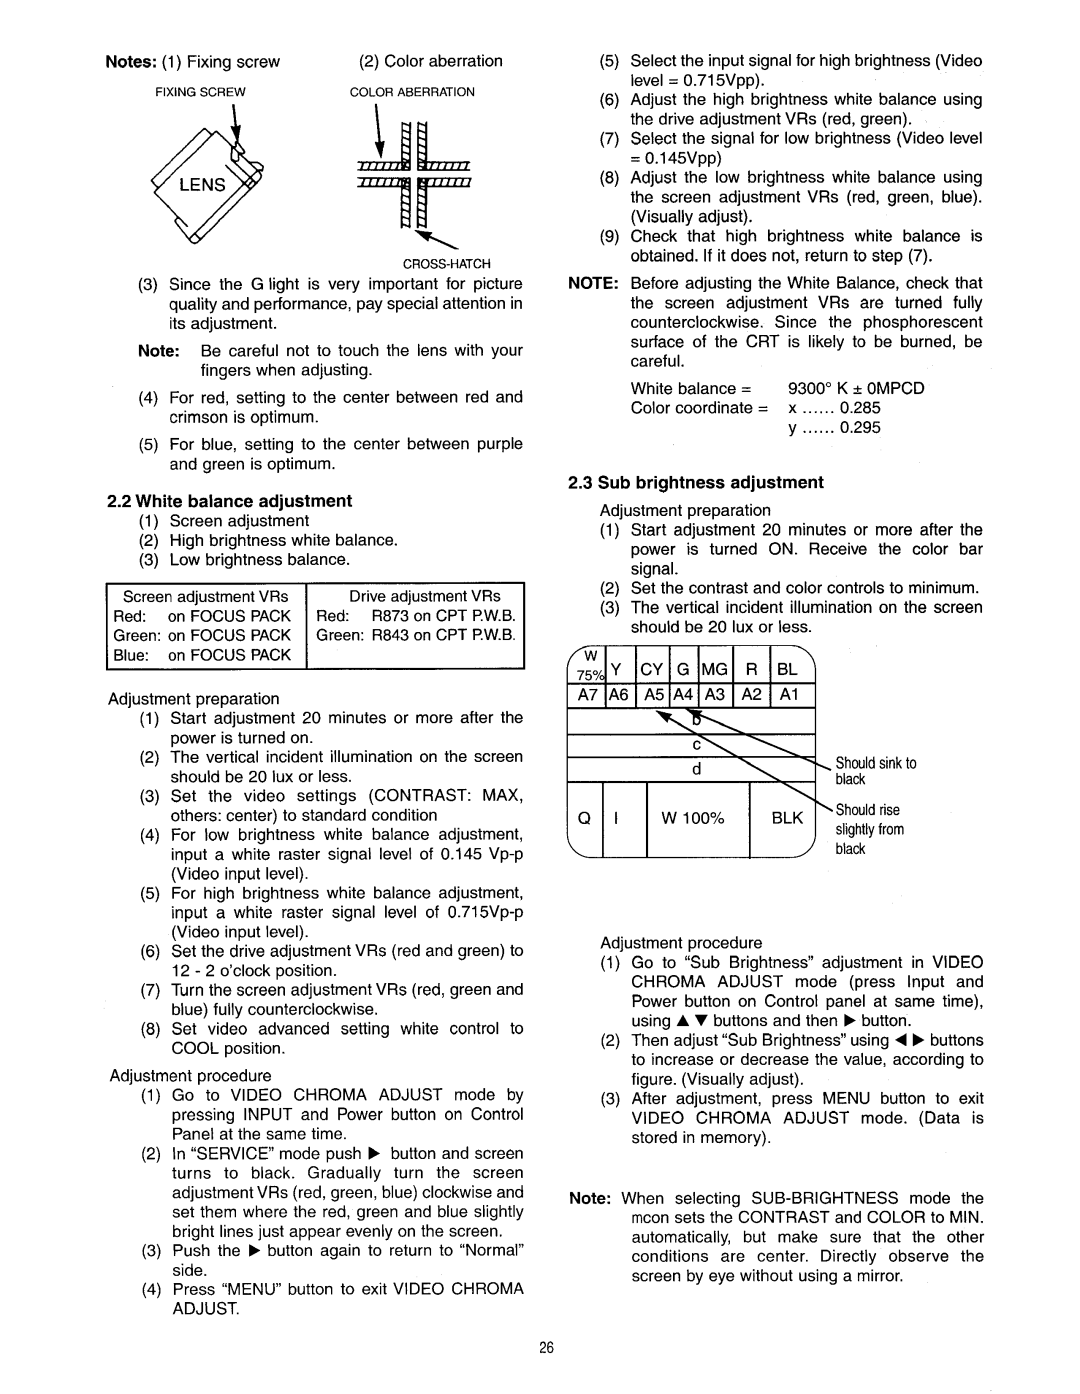
Notes: (1)

Fixing screw

(2)

Color aberration

FIXING

SCREW

COLOR

ABERRATION

CROSS-HATCH

(3)Since the G light is very important for picture

quality and performance, pay special attention in its adjustment.

Note: Be careful not to touch the lens with your fingers when adjusting.

(4)For red, setting to the center between red and crimson is optimum.

(5)For blue, setting to the center between purple and green is optimum.

2.2White balance adjustment

(1)Screen adjustment

(2)High brightness white balance.

(3)Low brightness balance.

Adjustment preparation

(1)Start adjustment 20 minutes or more after the power is turned on.

(2)The vertical incident illumination on the screen should be 20 lux or less.

(3)Set the video settings (CONTRAST: MAX,

others: center) to standard condition

(4)For low brightness white balance adjustment, input a white raster signal level of 0.145 Vp-p (Video input level).

(5)For high brightness white balance adjustment, input a white raster signal level of 0.715Vp-p (Video input level).

(6)Set the drive adjustment VRs (red and green) to 12 - 2 o’clock position.

(7)Turn the screen adjustment VRs (red, green and blue) fully counterclockwise.

(8)Set video advanced setting white control to COOL position.

Adjustment procedure

(1) Go to VIDEO CHROMA ADJUST mode by pressing INPUT and Power button on Control Panel at the same time.

(2)In “SERVICE” mode push b button and screen

turns to black. Gradually turn the screen adjustment VRs (red, green, blue) clockwise and set them where the red, green and blue slightly bright lines just appear evenly on the screen.

(3)Push the b button again to return to “Normal” side.

(4)Press “MENU” button to exit VIDEO CHROMA ADJUST.

(5)Select the input signal for high brightness (Video level = 0.715Vpp).

(6)Adjust the high brightness white balance using the drive adjustment VRs (red, green).

(7)Select the signal for low brightness (Video level = 0.145Vpp)

(8)Adjust the low brightness white balance using

the screen adjustment VRs (red, green, blue). (Visually adjust).

(9)Check that high brightness white balance is obtained. If it does not, return to step (7).

NOTE: Before adjusting the White Balance, check that

the screen adjustment VRs are turned fully

counterclockwise. Since the phosphorescent surface of the CRT is likely to be burned, be careful.

White

balance

=

9300”

K f OMPCD

Color

coordinate

=

x

0.285


Y

0.295

2.3Sub brightness adjustment

Adjustment preparation

(1)Start adjustment 20 minutes or more after the power is turned ON. Receive the color bar signal.

(2)Set the contrast and color controls to minimum.

(3)The vertical incident illumination on the screen should be 20 Iux or less.

\

1

1

1

/

black

Adjustment procedure

(1)Go to “Sub Brightness” adjustment in VIDEO

CHROMA ADJUST mode (press Input and Power button on Control panel at same time), using A v buttons and then b button.

(2)Then adjust “Sub Brightness” using 4 b buttons to increase or decrease the value, according to figure. (Visually adjust).

(3)After adjustment, press MENU button to exit

VIDEO CHROMA ADJUST mode. (Data is stored in memory).

Note: When selecting SUB-BRIGHTNESS mode the

mcon sets the CONTRAST and COLOR to MIN.

automatically, but make sure that the other

conditions are center. Directly observe the screen by eye without using a mirror.

Page 26
Image 26
Hitachi 50SBX78B, 60SBX78B service manual White balance adjustment, Sub brightness adjustment

60SBX78B, 50SBX78B specifications

The Hitachi 50SBX78B and 60SBX78B are advanced plasma televisions that represent the pinnacle of display technology in their respective categories. These models bring together innovative features, cutting-edge technology, and sleek design, ensuring an immersive viewing experience for consumers.

One of the standout characteristics of the Hitachi 50SBX78B and 60SBX78B is their screen size, with the 50-inch model catering to smaller spaces while the 60-inch offers a more cinematic experience. Both models boast impressive Full HD resolution, delivering a crisp and vibrant picture quality that enhances any viewing experience, whether it be movies, sports, or gaming.

The technology behind these televisions includes Hitachi's proprietary image processing technology, which optimizes picture quality by minimizing noise and enhancing color accuracy. This leads to deeper blacks and brighter whites, ensuring that every scene is rendered with stunning detail. The Plasmavision technology further enhances the black levels and contrast ratios, making images pop off the screen.

In addition to superior image quality, both models come equipped with a variety of connectivity options. Multiple HDMI inputs allow users to easily connect various devices such as gaming consoles, Blu-ray players, and streaming devices. The inclusion of USB ports facilitates easy viewing of photos and videos stored on external drives.

Moreover, Hitachi televisions have integrated audio technologies that enhance the overall viewing experience. The built-in speakers provide clear sound, while the digital audio output allows for connection to external sound systems, giving consumers the flexibility to customize their audio experience.

Energy efficiency is also a notable feature of the Hitachi 50SBX78B and 60SBX78B models. They are designed to consume less power than traditional televisions, aligning with the growing demand for environmentally friendly electronics. This not only reduces electricity bills but also minimizes the carbon footprint.

The sleek and modern design of these plasma televisions makes them an attractive addition to any home décor. The slim bezel offers a larger screen-to-body ratio, maximizing the viewing area while maintaining an elegant appearance.

In summary, the Hitachi 50SBX78B and 60SBX78B offer a compelling package of features, technologies, and characteristics that cater to the needs of modern viewers. With superior image quality, versatile connectivity, and energy efficiency, these televisions are designed to deliver an exceptional home entertainment experience.