Manuals
/
Hitachi
/
Computer Equipment
/
Projector
Hitachi
CP-X608
user manual
Specifications
Models:
CP-X608
1
72
72
Download
72 pages
46.21 Kb
65
66
67
68
69
70
71
72
Troubleshooting
Specification
Selecting an input signal
Password
Default Gateway
Laser Indicator 14
Connecting your devices
Maintenance
Factory Reset
Setting up
Page 72
Image 72
Specifications
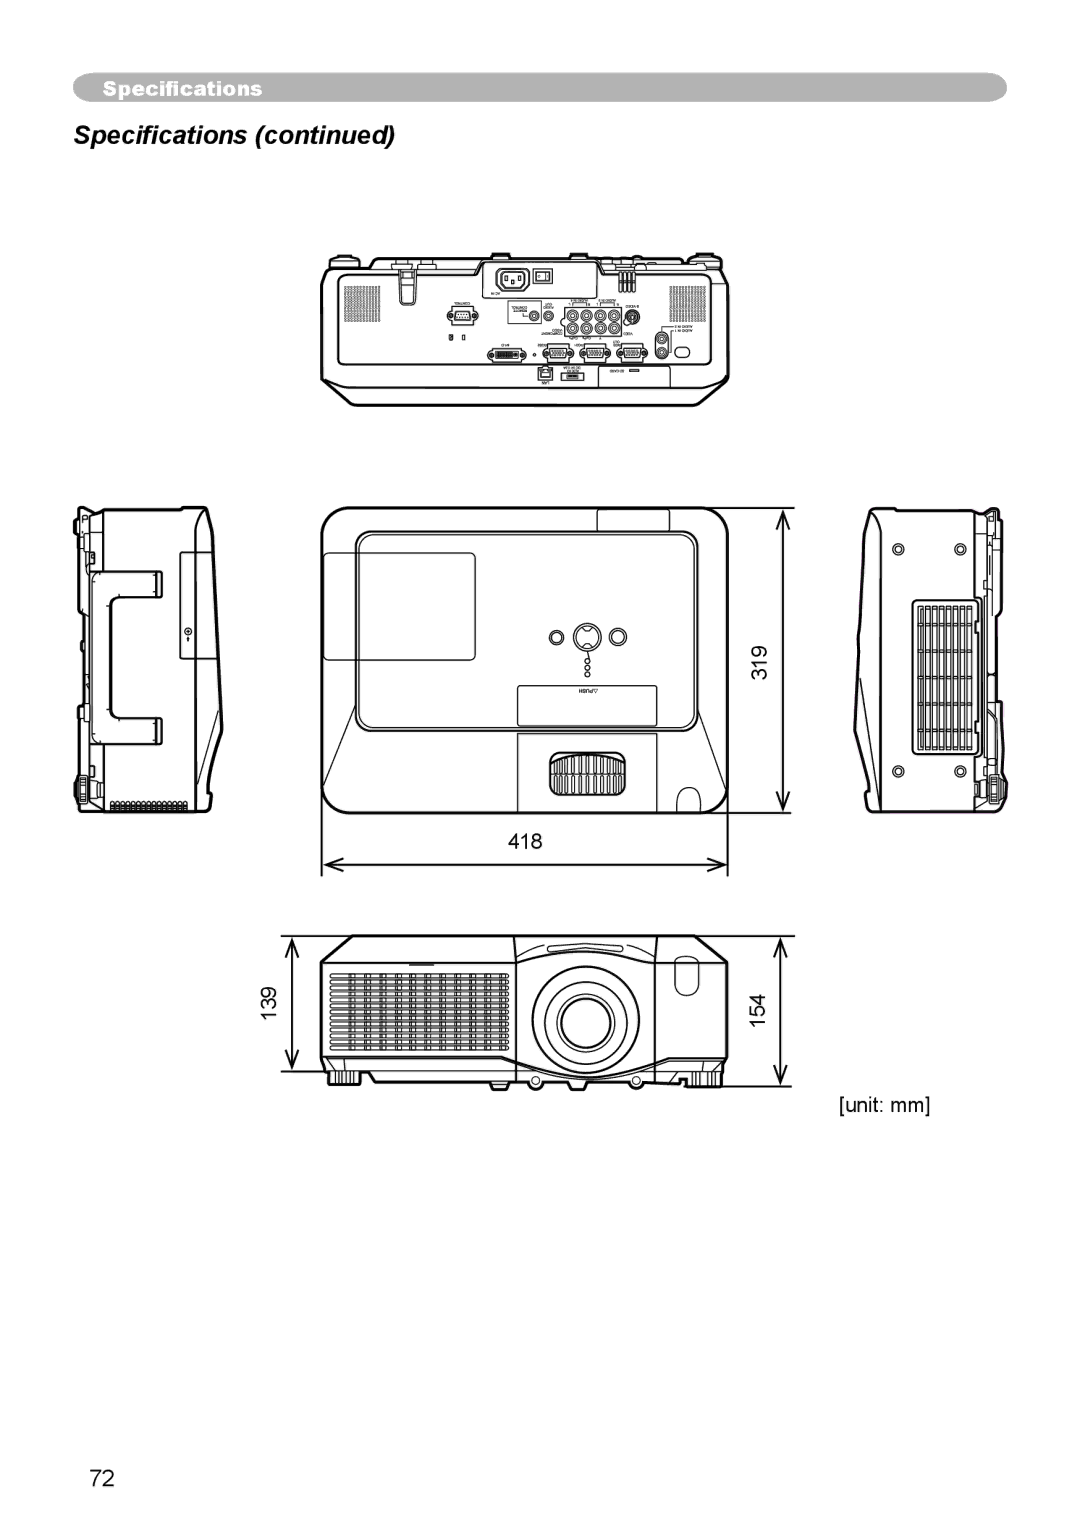
Specifications (continued)
319
418
139
154
[unit: mm]
72
Page 71
Page 72
Page 72
Image 72
Page 71
Page 72
Contents
About this manual
Thank you for purchasing this projector
Trademark acknowledgment
Content
Contents of package
Fastening the lens cover
Part names
Projector
HOT!4
HOT
Control panel
Rear panel
Component
10 11 15 16
Remote control
Laser Indicator 14
Back Remote control
Laser pointer 14 It is a beam outlet
Setting up
Arrangement
On a horizontal surface
Suspended from the ceiling
Down
Adjusting the projectors elevator
Using the security bar and slot
Security bar Anti-theft chain or wire Security slot
Foot
Connecting your devices
Signal source Remote control Speakers
VCR/DVD player
Connecting your devices
About Plug-and-Play capability
Insert the Wireless Memory Network card
Inserting an SD card and USB memory
USB
AUX I/O port SD card slot Angled corner
How to use the slot cover lock
Connecting power supply
AC inlet Connector of the power cord to the outlet
Remote control
Laser Indicator
Laser pointer
Putting batteries
About the remote control signal
Changing the frequency of remote control signal
Front and top sensors
Back sensor
Using as a wired remote control
Using as a simple PC mouse & keyboard
Power on/off
Turning on the power
Turning off the power
STANDBY/ON button Power indicator
Adjusting the volume
Selecting an input signal
Operating
Temporarily muting the sound
Searching an input signal
Selecting an input signal
Selecting an aspect ratio
Adjusting the zoom and focus
Adjusting the lens shift
Using the automatic adjustment feature
For a video signal or s-video signal
Adjusting the position
Correcting the keystone distortions
Use the cursor buttons / to select Auto or
Using the magnify feature
Press the on button of Magnify on the remote control
Freezing the screen
Magnify indication will appear on the screen
Temporarily blanking the screen
Using the menu function
Easy Menu
Advanced Menu
Enter button
Easy Menu
Easy Menu
Picture Menu
Gamma
Using the / buttons switches the color temperature mode
Picture Menu
Custom and then pressing the button or
Color Temp
Active Iris
LOAD1, LOAD2, LOAD3, LOAD4
MY Memory
SAVE1, SAVE2, SAVE3, SAVE4
Image Menu
Over Scan
Position
Phase
Auto Adjust
Image Menu
Size
Input Menu
Progressive
3D-YCS
Color Space
Input Menu
Component
M1-D
Frame Lock
RGB
Resolution
Custom Resolution BOX
Setup Menu
Setup Menu
Audio Menu
Using the /// buttons adjusts the menu position
Using the / buttons switches the mode for the blank screen
Screen Menu
Or keep no operation for about 10 seconds
Screen Menu
Start UP
Capturing error has occurred. Please try again
MyScreen registration is finished
No Input is Detected
Sync is OUT of Range
Message
Source Name
Option Menu
Turn on Turn OFF
Auto Search
Auto on
Option Menu
Auto OFF
Lamp Time
Service
MY Button
FAN Speed
Ghost
Filter Message
Lens Type
Factory Reset
KEY Lock
Remote Receiv
Remote Freq
Using Security Features
Inputting the Password
Changing the Password
Security
Using the MyScreen Password Function
Description If you have forgotten your Password
Turning on the MyScreen Password
Setting the Password
Using the PIN Lock Function
Turning the Password off
Security
Registering the PIN Code
Description Security
Turning Off the PIN Lock Function
If you have forgotten your PIN Code
Using the Transition Detector Function
Setting the Transition Detector Password
Turning On the Transition Detector Function
Setting the Transition Detector off
BOX
Live Mode
MIU Menu
PC-LESS
Presentation
Setup
MIU Menu
Default Gateway
IP Address
Subnet Mask
Time Difference
Network Mode
Mode
Encryption
Speed
Remove ALL, Remove SD CARD, Remove USB
Maintenance
Case of replacement by yourself
Lamp
Type number = DT00771 Replacing the lamp
Lamp warning
Lamp
Type number = MU03642 Cleaning the air filter
Air filter
Air filter
Internal clock battery
Take the old battery out
Will come up. Remove the battery Put a new battery
Page
Troubleshooting
There is no input signal
Internal temperature is rising
Related messages
Regarding the indicator lamps
Regarding the indicator lamps
Electrical power cord is not plugged
Power switch is not set to the on position
Signal cables are not correctly connected
Signal source does not correctly work
Volume is adjusted to an extremely low level
Audio setting is not correct
Color settings are not correctly adjusted
Color Space setting is not suitable
Not properly adjusted
Either the focus and/or horizontal phase settings are
Whisper function is working
Lamp is approaching the end of its product Lifetime
Warranty and after-service
Specification
Specifications
Top
Page
Image
Contents