DVD Recorder DVD Recorder with Video Cassette Recorder
Getting Started
Important Safeguards
Precaution
MP3 CD-R/RW
DVD-RAM Disc Playback and Recording
Protection
Contents
Editing
Recording
Reference
General Features
Using a DVD-R
Using a DVD-RAM
Using a DVD-RW
Before Reading
When using a DVD-R disc
When using a DVD-RW disc in VR Mode
When using a DVD-RW disc in Video Mode
Creating a playlist DVD-RAM/-RW in VR mode
Front Panel
Description
Front Panel Display
Tour of the Remote Control
Rear Panel
Numeric Buttons Cancel Button P Button
Timer Button
TV Power Button TV Input Button
Play Button = Reverse Button Manual Skip Button
Connecting & Setting Up
Quick Overview
Method 1 Antenna + DVD Recorder VCR + TV No Cable box
Accessories
Unpacking
Method 2 Antenna + Cable box +
Video, Component Video and Progressive Output Modes
Jack
Connect a video yellow cable between the Video
Method 2 Connecting to an S-video input jack
This connection will use your TV’s speakers
Connecting the Audio Cable
Method 1 Connecting to your TV
Played on the TV screen
Front L speaker
Connecting External Devices
You can also use the Line in 2 jacks on the front
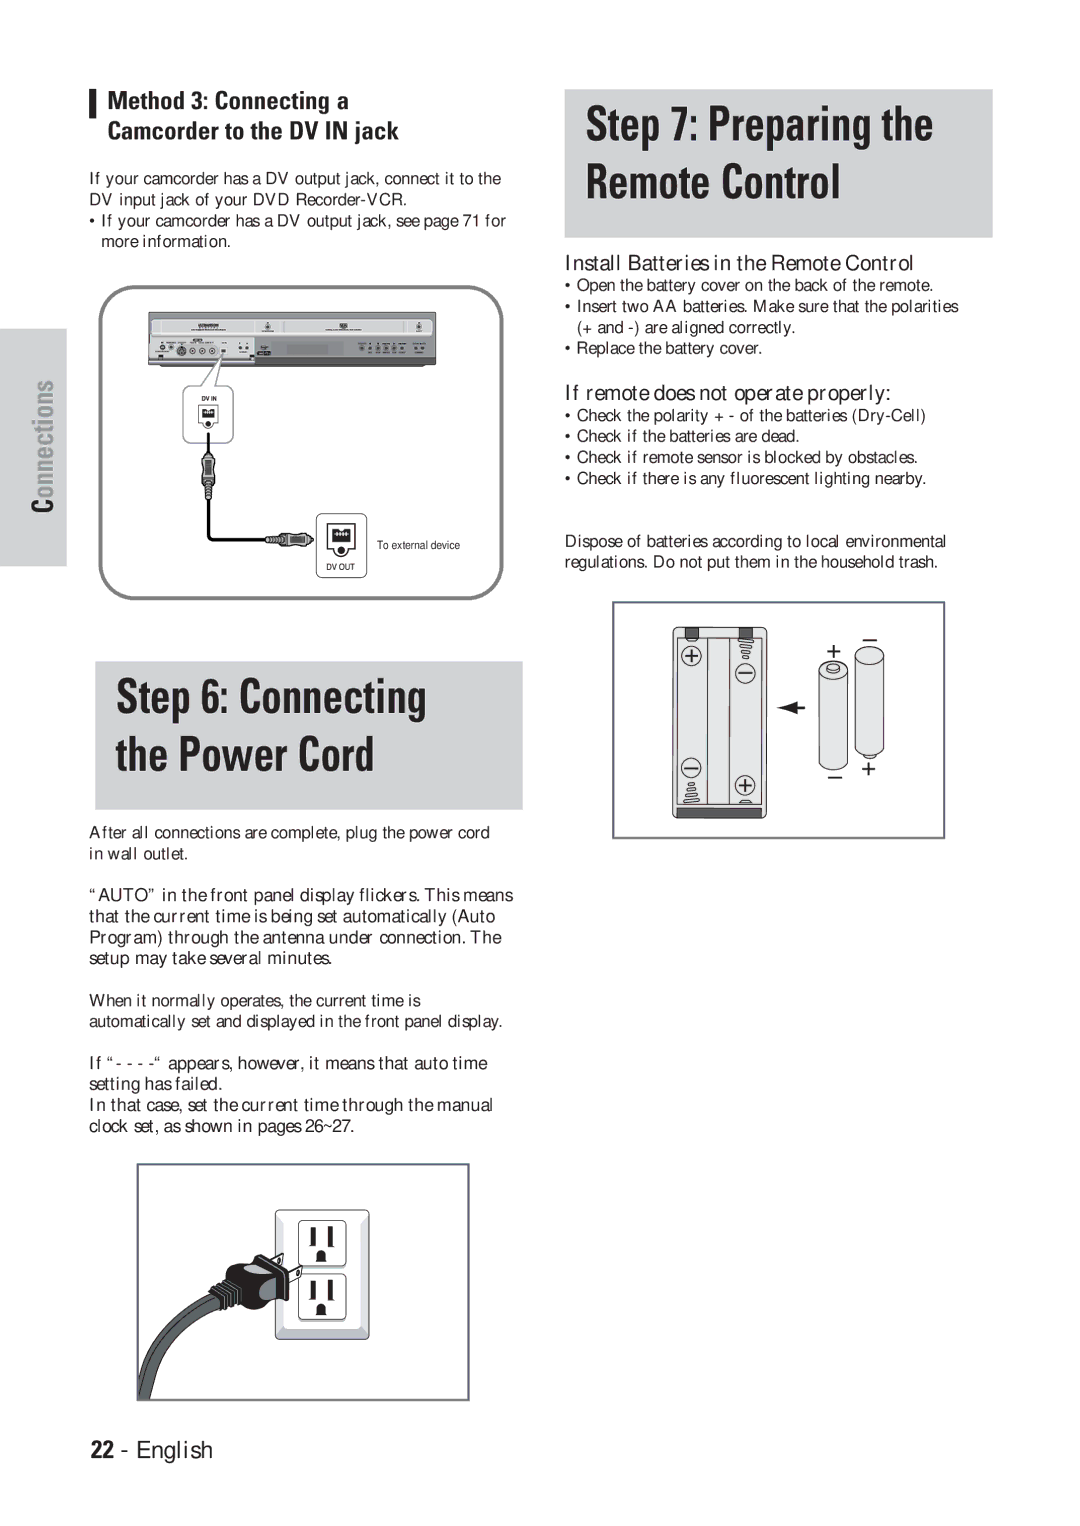
Install Batteries in the Remote Control
Connecting the Power Cord
Method 3 Connecting a Camcorder to the DV in jack
If remote does not operate properly
Setting the Remote Control
Follow the instructions below
Direction Buttons
On-Screen Menu Navigation
Main Menu Button
Enter Button
Auto Clock Set
Clock Data CH
Time Zone
Manual Clock Set
Daylight Saving
Select Channel Set
Channel Set
Set the Clock
Select Antenna/Cable TV
Setting Up Language Features
Select Language using 34buttons, then press
Digital Output
Setting Up the Audio Options
Dynamic Compression
Setting Up the Display Video Options
Display Video Options
Select Rating Level you want using 34buttons
Setting Up the Parental Control
Remote
About Change in Password
Run Auto channel memory
Select Channel Add/Delete
Channel Add/Delete
Select Channel to Add/Delete
Select the guide channel you want
Select Guide Channel Setup
Add/Delete Channel
To set
Select System
VCR Setting
Select VCR
Select Auto Play
Select Auto Repeat Select System
Video Input
Select Video Input
Set Front Display
Front Display
1button to select from the following options
Disc types that can be played
Before Playing
Region code DVD-Video only
Read the following information before playing a disc
Discs that cannot be played
To protect a DVD-RAM disc from damage, use a cartridge
Playing a Disc
Skipping Chapters or Tracks
Slow Motion Play Step Motion Play
Searching through a Chapter or Track
Slow Motion Play DVD-VIDEO/DVD-RAM/DVD RW/ DVD-R
Manual Skip
Skipping 30 seconds forward and playing manual skip
What’s a chapter?
About Functions button
What’s a track?
What’s a title?
Using Repeat Play For Audio CD/MP3
Using Repeat Play For DVD-VIDEO/DVD-RAM/DVD
Repeat Play
To find the desired scene
For DVD-VIDEO/DVD-RAM/ DVD- RW/DVD-R
To return to normal playback
21buttons, then press the Enter button
Selecting the subtitle language
Virtual Surround
Selecting the Subtitle & Audio Language
Use 34button to select Subtitle and use
Use 34to select Angle and use 21button to
Angle
Selecting the Audio language
Select the desired camera angle
Setting a marker
Using Markers Bookmarks
Playing Back a Marker
Use 34buttons to select Zoom, and then press
Canceling a Marker
Zooming-In
Enter button
Then press the Enter button
For DVD-VIDEO disc
Some discs may not support the title menu func
Select a track song
Audio CD Cdda Screen Elements
Play back the selected track song
Select Play Option Mode using the 21buttons
Play Option Mode
To change repeat mode
Select a desired play option using the 34buttons
To Program Tracks
Repeat Mode will be highlighted
Select Play Option using the 21buttons
Press the Functions button
Slide show can begin, the photo
Use the 21buttons to select clips menu and then
Returns to the Album screen
Insert a photo CD Jpeg into the disc tray
Buttons on the Remote
Switching between the P in P and main screens
Using P in P
Deactivating P in P
Insert VHS Tape
Adjust Tracking Manually
Playing the VCR Tracking
Play Tape
VHS Playback
Scan and play
Variable Search System
End search
Go to 00000 stop
This section shows various DVD and VCR recording Methods
Before Recording
Recordable discs
This recorder can record on the following discs
Recording Format
Concerning copy control signals
With Cprm VR mode Video mode DVD-R Ver.2.0
Unrecordable pictures
Press the Enter or the 1button
Press the 34buttons to select Timer Rec., and then
Guides and magazines
Press the 34buttons to select VCR Plus+ Record
Follows
Pausing / Resuming
Select the recording speed quality
Main # SAP # Mono
Using the Timer button
Making One Touch Recording OTR
Set timer recording option
Press the Enter button
Editing Timer Record List
Editing the settings for a timer recording
Deleting a Timer Recording Entry
DVD Recorder-VCR will turn off
Press the Power button
Satellite Link Recording
Use the 34buttons to choose VCR or DVD
Recording From External Devices
During recording
Recording through DV jack
Basic VCR Recording
Features
Record Speed
Dubbinglist
If you want to dub from
Dubbinglist, choose Edit
DVD to VCR
Start position
VCR to DVD
Select VCR DVD to dub from VCR to DVD
For immediate dubbing one-button dubbing
To dub Dubbinglist, select
You want to dub from
Dubbing
Viewing the Menu Functions for a Disc
No Disc
Dubbing
Disc Manager
Disc Navigation Title refers to a recorded video
Viewing Disc Navigation Screen title list
Record List edit items
List to help you select a title
Playing a Disc Navigation Entry
Follow these directions to rename a Disc Navigation entry
Press the Enter button Rename screen is displayed
To edit the title of a recorded program
Deleting a Disc Navigation Entry
Protection menu
Message ‘Title Protection’
Locking a Disc Navigation Entry
You will be prompted with the confirmation
Press the 21buttons to select On, and then press
MENU/DISC Navigation button on the remote
Deleting any Section of Disc Navigation Entry
Entry once it is deleted
Control
Not be restored. will be displayed
Button to return to the Disc Navigation screen
To stop playback
Use the 34buttons to choose Time Navi.,
Information necessary for playing a
Using Disc Navigation. Since only
Make Scene screen is displayed
Desired scene is included in a playlist
Displayed on the End window
Press the Enter button to select END point
Image and time at the end point are
Press the Enter button to confirm
Renaming Playlist Entries
Playing Playlist Entries
Edit Scene screen is displayed
Editing Scene for a Playlist Entry
Playing a Selected Scene
Want to play, and then press the Enter button
Modifying a Scene Replacing a Scene
Moving a Scene Changing the Position of a Scene
Adding a Scene
Deleting a Scene from the Playlist
From the Playlist
Deleting a Playlist Entry
Editing Disc Name
Disc Manager
Disc Protection
Message Do you want to format disc?
Formatting a DVD-RAM/DVD-RW Disc
Press the 34button to select Disc Manager,
You want to continue?
You will be prompted with the confirmation
Delete All Titles
Message Do you want to delete all titles?
Cartridge Protect Info DVD-RAM
Finalizing a disc
You will be prompted with the message ‘Do you
Unfinalizing a disc V/VR mode
Press the 34button to select Disc Unfinalize,
Unfinalized. Do you want to continue?’
Finalize Unfinalize Mark
DVD-RW can be finalized or unfinalized in VR mode
Operation Same as Additional DVD-Video
Operation
Reference
Logo is displayed for a
While when the power
Timer recording does
Turns on
Troubleshooting
Problems and Solutions VCR
Heads
Specifications
Audio Output
Conexión del cable de antena
Método 1 Conexión a una toma de entrada de vídeo
Modos de vídeo S, vídeo de componentes, y salida progresiva
Método 2 Conexión a una toma de entrada de vídeo S
Seleccione Ajuste de Canales
Seleccione Configurac
Abra Menú
Ejecute Memoria Automática de
Cambie CH DE TV
Ajuste de los canales guía
Ajustar.Seleccione el canal guía que desee
Colocación de un marcador
Inserción del videocasete VHS
Marcación con un disco
Reproducción desde un marcador
Reproducción del videocasete
Seguimiento
Funciones especiales de reproducción de la videograbadora
Presione los botones 34para
Presione el botón Power
Presione el botón Main Menu
Seleccionar Grab. Temp. y después
Contemplación con
Elementos de edición de la lista de grabación
Reproducción con Navegación de disco
Home Electronics Division
Canada
Valid
Hitachi
Hitachi