Wall Mounting
Wall Mounting
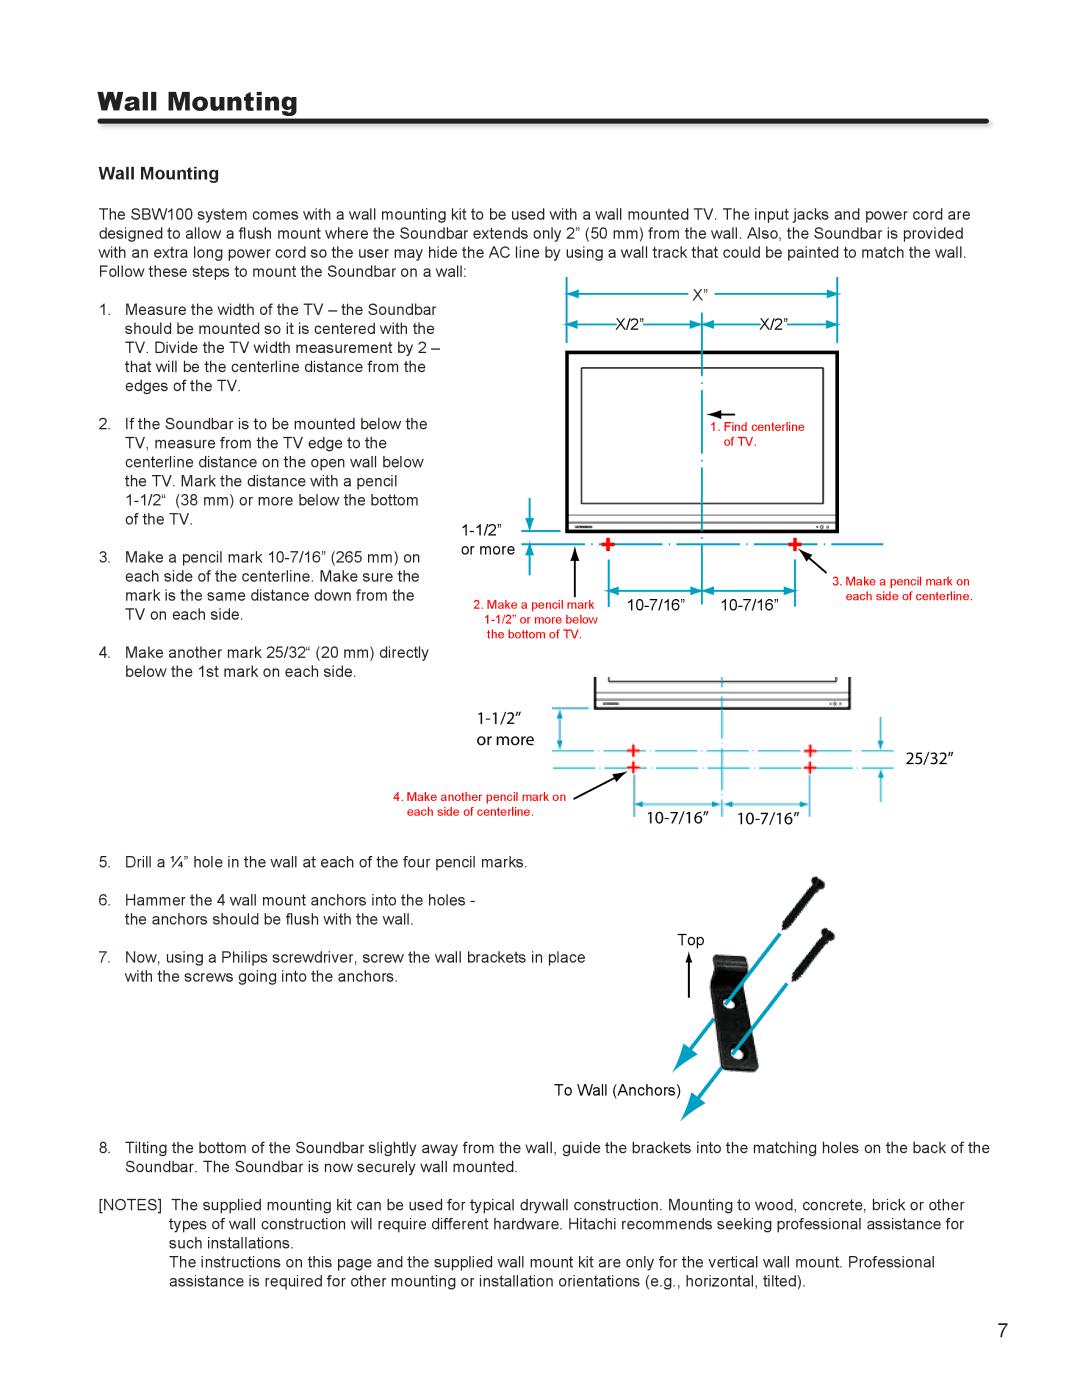
The SBW100 system comes with a wall mounting kit to be used with a wall mounted TV. The input jacks and power cord are designed to allow a flush mount where the Soundbar extends only 2” (50 mm) from the wall. Also, the Soundbar is provided with an extra long power cord so the user may hide the AC line by using a wall track that could be painted to match the wall. Follow these steps to mount the Soundbar on a wall:
|
|
|
|
|
|
|
|
|
|
|
|
|
|
|
|
|
|
|
|
|
|
|
| |
1. Measure the width of the TV – the Soundbar |
|
|
|
|
|
|
|
|
|
| X” |
|
|
|
|
|
|
|
|
|
|
| ||
|
|
|
|
|
|
|
|
|
|
|
|
|
|
|
|
|
|
|
|
| ||||
|
|
|
|
|
|
|
|
|
|
|
|
|
|
|
|
|
|
|
|
|
|
|
| |
should be mounted so it is centered with the |
|
|
|
|
|
|
|
| X/2” |
|
|
|
|
|
|
| X/2” |
|
|
|
|
|
|
|
|
|
|
|
|
|
|
|
|
|
|
|
|
|
|
|
|
|
|
|
| ||||
|
|
|
|
|
|
|
|
|
|
|
|
|
|
|
|
|
|
|
|
|
|
| ||
|
|
|
|
|
|
|
|
|
|
|
|
|
|
|
|
|
|
|
|
|
|
| ||
TV. Divide the TV width measurement by 2 – |
|
|
|
|
|
|
|
|
|
|
|
|
|
|
|
|
|
|
|
|
|
|
|
|
that will be the centerline distance from the |
|
|
|
|
|
|
|
|
|
|
|
|
|
|
|
|
|
|
|
|
|
|
|
|
edges of the TV. |
|
|
|
|
|
|
|
|
|
|
|
|
|
|
|
|
|
|
|
|
|
|
|
|
2. If the Soundbar is to be mounted below the |
|
|
|
|
|
|
|
|
|
|
|
|
|
|
|
| ||||||||
|
|
|
|
|
|
|
|
|
|
| 1. Find centerline |
|
| |||||||||||
TV, measure from the TV edge to the |
|
|
|
|
|
|
|
|
|
|
|
|
|
| of TV. |
|
| |||||||
centerline distance on the open wall below |
|
|
|
|
|
|
|
|
|
|
|
|
|
|
|
|
|
|
|
|
|
|
|
|
the TV. Mark the distance with a pencil |
|
|
|
|
|
|
|
|
|
|
|
|
|
|
|
|
|
|
|
|
|
|
|
|
|
|
|
|
|
|
|
|
|
|
|
|
|
|
|
|
|
|
|
|
|
|
|
| |
|
|
|
|
|
|
|
|
|
|
|
|
|
|
|
|
|
|
|
|
|
|
|
| |
of the TV. |
|
|
|
|
|
|
|
|
|
|
|
|
|
|
|
|
|
|
|
|
|
|
|
|
|
|
|
|
|
|
|
|
|
|
|
|
|
|
|
|
|
|
|
|
|
| |||
|
|
|
|
|
|
|
|
|
|
|
|
|
|
|
|
|
|
|
|
|
|
| ||
3. Make a pencil mark | or more |
|
|
|
|
|
|
|
|
|
|
|
|
|
|
|
|
|
|
|
|
|
| |
|
|
|
|
|
|
|
|
|
|
|
|
|
|
|
|
|
|
|
|
|
|
|
| |
each side of the centerline. Make sure the |
|
|
|
|
|
|
|
|
|
|
|
|
|
|
|
|
|
|
|
|
|
| 3. Make a pencil mark on | |
|
|
|
|
|
|
|
|
|
|
|
|
|
|
|
|
|
|
|
|
|
| |||
mark is the same distance down from the |
|
|
|
|
|
|
|
|
|
|
|
|
|
|
|
|
|
|
|
|
|
|
| each side of centerline. |
|
|
|
|
|
|
|
|
|
|
|
|
| ||||||||||||
2. Make a pencil mark |
|
|
|
|
|
|
|
| ||||||||||||||||
TV on each side. |
|
|
|
|
|
|
|
|
| |||||||||||||||
|
|
|
|
|
|
|
|
|
|
|
|
|
|
|
|
|
|
| ||||||
the bottom of TV.
4.Make another mark 25/32“ (20 mm) directly below the 1st mark on each side.
1-1/2” or more
4. Make another pencil mark on each side of centerline.
5.Drill a ¼” hole in the wall at each of the four pencil marks.
6.Hammer the 4 wall mount anchors into the holes - the anchors should be flush with the wall.
7.Now, using a Philips screwdriver, screw the wall brackets in place with the screws going into the anchors.
25/32”
10-7/16” 10-7/16”
Top
To Wall (Anchors)
8.Tilting the bottom of the Soundbar slightly away from the wall, guide the brackets into the matching holes on the back of the Soundbar. The Soundbar is now securely wall mounted.
[NOTES] The supplied mounting kit can be used for typical drywall construction. Mounting to wood, concrete, brick or other types of wall construction will require different hardware. Hitachi recommends seeking professional assistance for such installations.
The instructions on this page and the supplied wall mount kit are only for the vertical wall mount. Professional assistance is required for other mounting or installation orientations (e.g., horizontal, tilted).
7