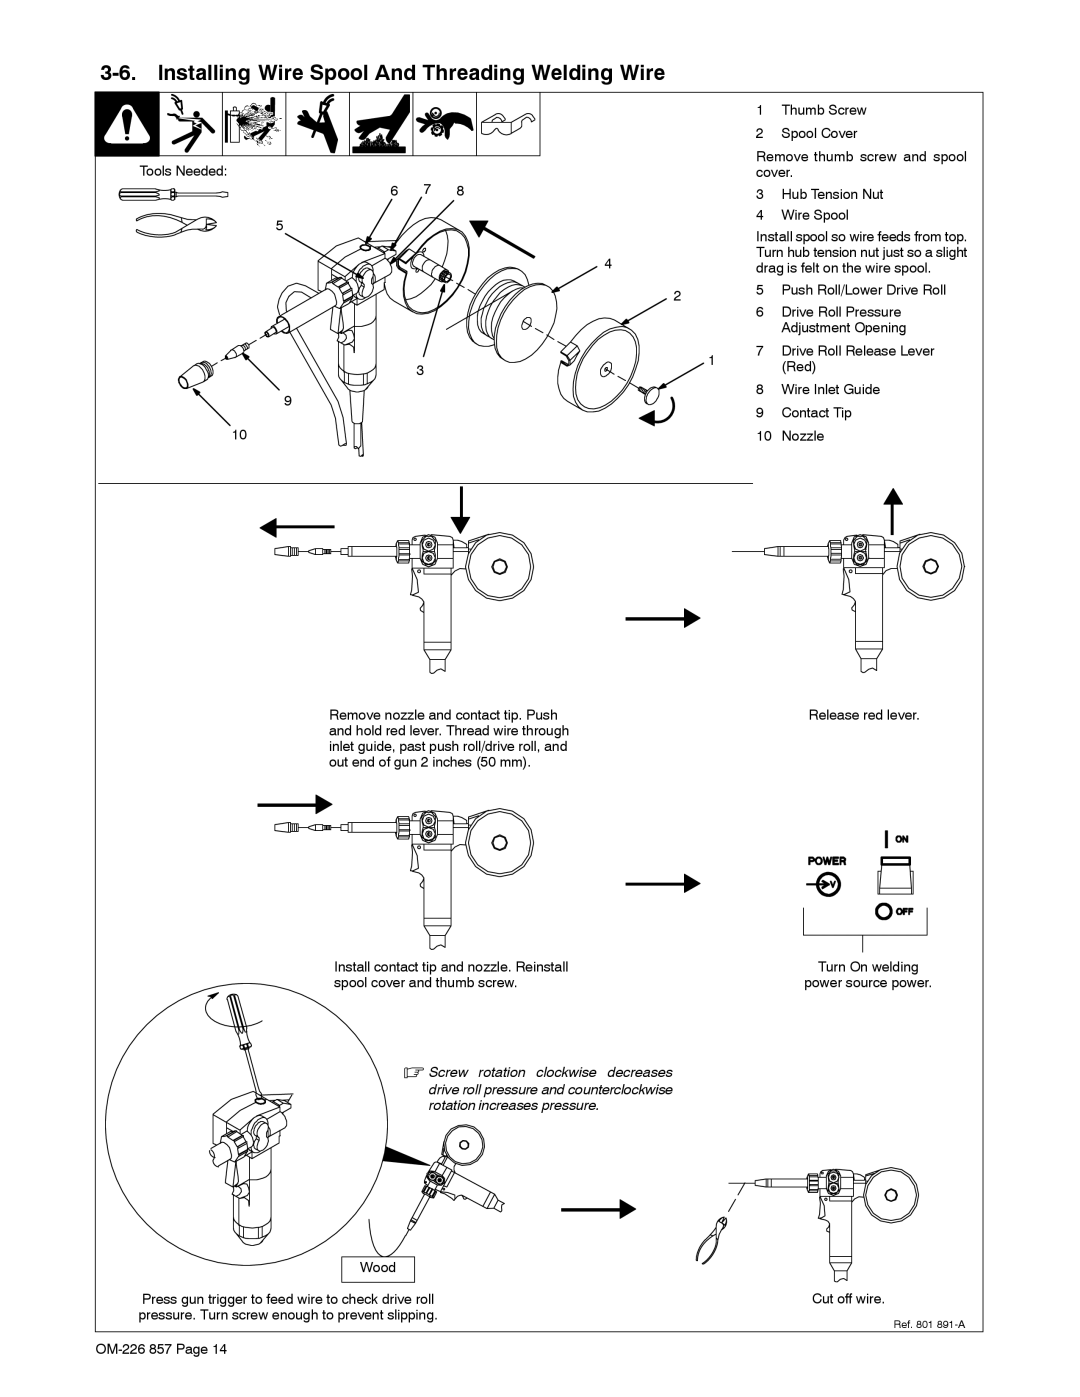
3-6. Installing Wire Spool And Threading Welding Wire
|
|
|
|
| 1 | Thumb Screw |
|
|
|
|
| 2 | Spool Cover |
Tools Needed: |
|
|
|
| Remove thumb screw and spool | |
7 |
|
|
| cover. | ||
6 | 8 |
|
| 3 | Hub Tension Nut | |
5 |
|
|
|
| 4 | Wire Spool |
|
|
|
| Install spool so wire feeds from top. | ||
|
|
|
|
| ||
|
| 4 |
|
| Turn hub tension nut just so a slight | |
|
|
|
| drag is felt on the wire spool. | ||
|
|
| 2 |
| 5 | Push Roll/Lower Drive Roll |
|
|
|
| 6 | Drive Roll Pressure | |
|
|
|
|
| ||
|
|
|
|
|
| Adjustment Opening |
|
|
|
| 1 | 7 | Drive Roll Release Lever |
| 3 |
|
|
| (Red) | |
|
|
|
|
| ||
9 |
|
|
|
| 8 | Wire Inlet Guide |
|
|
|
| 9 | Contact Tip | |
|
|
|
|
| ||
10 |
|
|
|
| 10 | Nozzle |
Remove nozzle and contact tip. Push | Release red lever. |
| ||||||||
and hold red lever. Thread wire through |
|
|
|
|
|
|
|
| ||
inlet guide, past push roll/drive roll, and |
|
|
|
|
|
|
|
| ||
out end of gun 2 inches (50 mm). |
|
|
|
|
|
|
|
| ||
|
|
|
|
|
|
|
|
|
|
|
|
|
|
|
|
|
|
|
|
|
|
|
|
|
|
|
|
|
|
|
|
|
|
|
|
|
|
|
|
|
|
|
|
|
|
|
|
|
|
|
|
|
|
|
|
|
|
|
|
|
|
|
|
|
|
|
|
|
|
|
|
|
|
|
|
|
|
|
|
|
|
|
|
|
|
|
|
Install contact tip and nozzle. Reinstall | Turn On welding |
spool cover and thumb screw. | power source power. |
.Screw rotation clockwise decreases
drive roll pressure and counterclockwise rotation increases pressure.
Wood |
|
Press gun trigger to feed wire to check drive roll | Cut off wire. |
pressure. Turn screw enough to prevent slipping. | Ref. 801 |
|
