INTRODUCTION IMPORTANT
PRECAUTIONS
ASSEMBLY
BEFORE
YOU BEGIN
ELLIPTICAL
OPERATION
CONDITIONING TROUBLESHOOTING HORIZON
GUIDELINES & MAINTENANCE WARRANTY
12
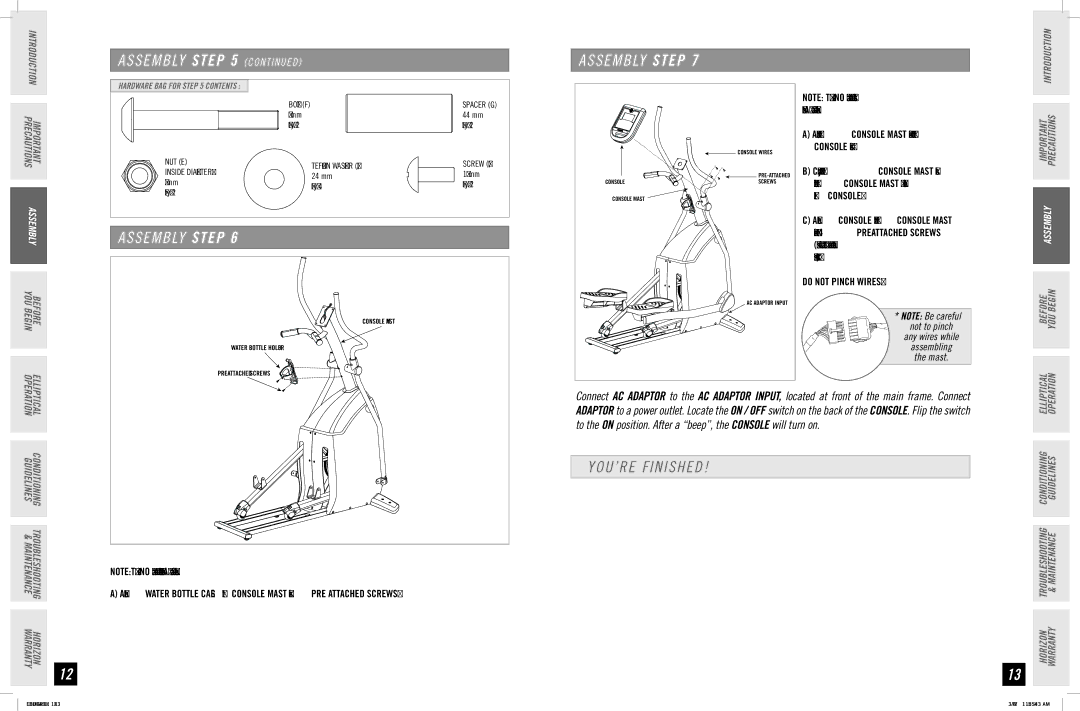
ASSEMBLY STEP 5 ( C O N T I N U E D )
HARDWARE BAG FOR STEP 5 CONTENTS : |
|
|
| BOLT (F) | SPACER (G) |
| 60 mm | 44 mm |
| Qty: 2 | Qty: 2 |
NUT (E) | TEFLON WASHER (H) | SCREW (L) |
INSIDE DIAMETER: | 24 mm | 10 mm |
8 mm | Qty: 4 | Qty: 2 |
Qty: 2 |
|
|
ASSEMBLY STEP 6
CONSOLE MAST |
WATER BOTTLE HOLDER |
NOTE: There is NO hardware bag for this step. All hardware is
A)Attach WATER BOTTLE CAGE to CONSOLE MAST using PRE ATTACHED SCREWS.
A S S E M B LY STEP 7 |
|
|
|
| NOTE: There is NO hardware bag for this |
|
| step. All hardware is |
|
| A) Attach the CONSOLE MAST wires to the |
| CONSOLE WIRES | CONSOLE wires . |
|
| |
| B) Carefully tuck the CONSOLE MAST wires | |
CONSOLE | SCREWS | into the CONSOLE MAST before attaching |
| ||
CONSOLE MAST |
| the CONSOLE. |
|
| C) Attach CONSOLE to the CONSOLE MAST |
|
| using the 4 |
|
| (screws will have to be removed from the |
|
| console first). |
|
| DO NOT PINCH WIRES! |
| AC ADAPTOR INPUT |
|
|
| * Note: Be careful |
|
| not to pinch |
|
| any wires while |
|
| assembling |
|
| the mast. |
Connect AC ADAPTOR to the AC ADAPTOR INPUT, located at front of the main frame. Connect ADAPTOR to a power outlet. Locate the ON / OFF switch on the back of the CONSOLE. Flip the switch to the ON position. After a “beep”, the CONSOLE will turn on.
YOU’RE FINISHED!
13
IMPORTANT PRECAUTIONS INTRODUCTION
ASSEMBLY
BEFORE YOU BEGIN
ELLIPTICAL OPERATION
HORIZON TROUBLESHOOTING CONDITIONING WARRANTY & MAINTENANCE GUIDELINES
3/29/07 11:55:43 AM |