INTRODUCTION

TENSIONING­

THE RUNNING BELT


The running belt has been properly adjusted at the


factory before it was shipped. At times the belt can


move off-center during shipment.


PRECAUTIONS

CAUTION: Running belt should NOT be moving during


IMPORTANT

tensioning. Over-tightening the running belt can


cause excessive wear on the treadmill as well as its

components. Never over-tighten the belt.


If you can feel a slipping sensation when running on the


treadmill, the running belt must be tightened. In most

ASSEMBLY

cases, the belt has stretched from use, causing the

and tension both the rear roller bolts using the


belt to slip. This is a normal and common adjustment.


To eliminate this slipping, turn the treadmill off


supplied Allen wrench, turning them 1/4 TURN to the


right as shown. Turn the treadmill on and check for


slipping. Repeat if necessary, but NEVER TURN the

YOU

roller bolts more than 1/4 turn at a time. Belt is properly


BEFORE

tensioned when the slipping sensation is gone.

BEGIN


TREADMILL OPERATION


CONDITIONING

Belt is too far to the right side


GUIDELINES


TROUBLESHOOTING


&


MAINTENANCE

Belt is too far to the left side


CENTERING THE RUNNING BELT

The running belt has been properly adjusted at the factory before it was shipped. At times the belt can move off-center during shipment. Before operating the treadmill, make sure the belt is centered and remains centered to maintain smooth operation.

CAUTION: Do not run belt faster than 1/2 mph while centering. Keep fingers, hair and clothing away from belt at all times.

If the running belt is too far to the right side:

With the treadmill running at 1/2 mph, turn the right adjustment bolt clockwise 1/4 turn at a time (using the supplied Allen wrench). Check the belt alignment. Allow belt to run a full cycle to gauge if more adjustment is needed. Repeat if necessary, until the belt remains centered during use.

If the running belt is too far to the left side:

With the treadmill running at 1/2 mph, turn the right adjustment bolt counter-clockwise 1/4 turn at a time (using the supplied Allen wrench). Check the belt alignment. Allow belt to run a full cycle to gauge if more adjustment is needed. Repeat if necessary, until the belt remains centered during use.

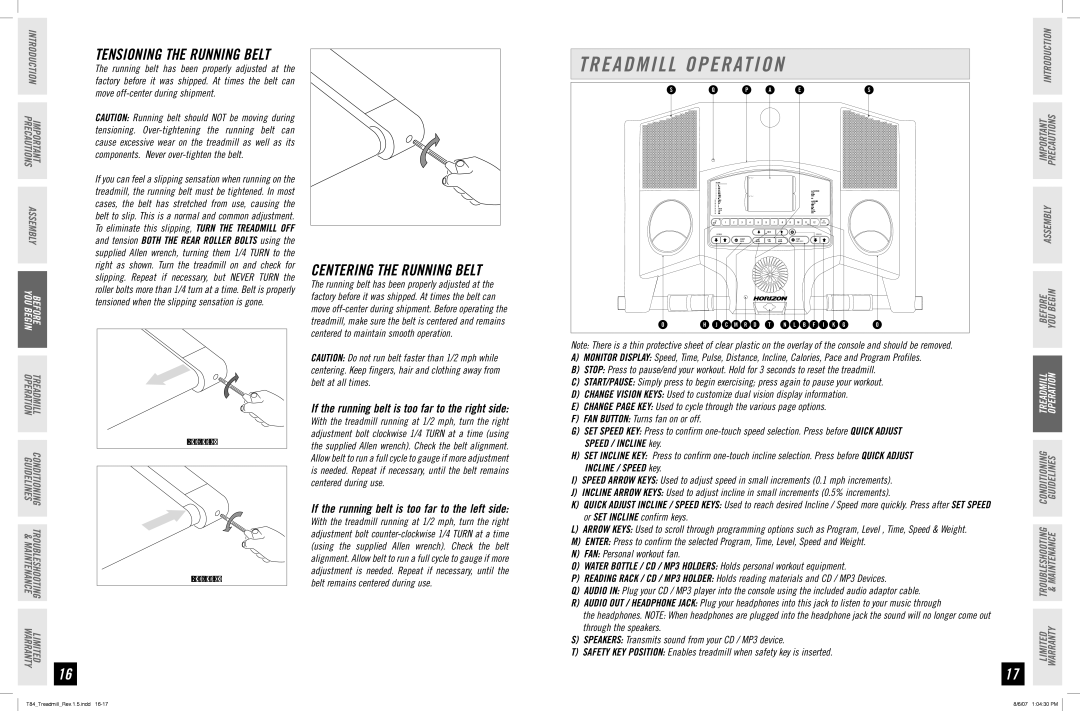
TREADMILL OPERATION

SQP A ES


7


PROGRAMS


*


4


1

Manual


*


0


2

Intervals 1


/


3

Intervals 2


4

Intervals 3


CAUTION!

5

Golf 9-Hole


6

Golf 18-Hole


Consult a physician before using this


equipment. Stop exercising if you feel

7

Weight Loss 1


pain, faint, dizzy or short of breath.

8

Weight Loss 2


7


9

Foothills


For consumer use only.

10

Rolling Hills


*


WARNING!

11

Mountain Climb


4


12

Pacer


*


Attach safety key clip to clothing


0


before starting. To avoid injury, stand

13

5K


/


on the side rails before starting

14

10K


treadmill. Read and follow all

15

THR Zone 1


instructions before operating. Keep

16

THR Zone 2


children away from this equipment.

17

Custom 1


Remove safety key when not in use


and store out of reach of children.

18

Custom 2


SET

1


2

3

4

5

6

7

8

9

10

11

12

SET

INCLINE


SPEED


ENTER


I N C L I N E


S P E E D


START


CHANGE


CHANGE

CHANGE


STOP


PAUSE


VISION 1


PAGE

VISION 2


HOLD TO RESET


OH J C M R D T N L B F I K GO

Note: There is a thin protective sheet of clear plastic on the overlay of the console and should be removed.

A)Monitor Display: Speed, Time, Pulse, Distance, Incline, Calories, Pace and Program Profiles.

B)Stop: Press to pause/end your workout. Hold for 3 seconds to reset the treadmill.

C)START/PAUSE: Simply press to begin exercising; press again to pause your workout.

D)CHANGE VISION KEYS: Used to customize dual vision display information.

E)CHANGE PAGE KEY: Used to cycle through the various page options.

F)Fan Button: Turns fan on or off.

G)SET SPEED KEY: Press to confirm one-touch speed selection. Press before QUICK ADJUST SPEED / INCLINE key.

H)SET INCLINE Key: Press to confirm one-touch incline selection. Press before QUICK ADJUST INCLINE / SPEED key.

I)Speed ARROW Keys: Used to adjust speed in small increments (0.1 mph increments).

J)Incline ARROW Keys: Used to adjust incline in small increments (0.5% increments).

K)Quick adjust Incline / SPEED Keys: Used to reach desired Incline / Speed more quickly. Press after SET SPEED or SET INCLINE confirm keys.

L)ARROW KEYS: Used to scroll through programming options such as Program, Level , Time, Speed & Weight.

M)ENTER: Press to confirm the selected Program, Time, Level, Speed and Weight.

N)Fan: Personal workout fan.

O)Water Bottle / CD / MP3 holders: Holds personal workout equipment.

P)Reading Rack / CD / MP3 HOLDER: Holds reading materials and CD / MP3 Devices.

Q)AUDIO IN: Plug your CD / MP3 player into the console using the included audio adaptor cable.

R)AUDIO OUT / HEADPHONE JACK: Plug your headphones into this jack to listen to your music through

IMPORTANT PRECAUTIONS INTRODUCTION

ASSEMBLY

BEFORE YOU BEGIN

TREADMILL OPERATION

TROUBLESHOOTING CONDITIONING & MAINTENANCE GUIDELINES

LIMITED WARRANTY

16

the headphones. NOTE: When headphones are plugged into the headphone jack the sound will no longer come out through the speakers.

S)SPEAKERS: Transmits sound from your CD / MP3 device.

T)Safety Key Position: Enables treadmill when safety key is inserted.

17

LIMITED WARRANTY

T84_Treadmill_Rev.1.5.indd 16-17

8/6/07 1:04:30 PM

Page 9
Image 9
Horizon Fitness T84 manual Treadmill Operation

T84 specifications

The Horizon Fitness T84 is a treadmill that embodies the ideal combination of performance, durability, and modern technology, appealing to both novice and seasoned fitness enthusiasts. Built to withstand the rigors of daily use, the T84 sets itself apart with its robust structure and advanced features, making it a valuable addition to any home gym.

One of the standout features of the T84 is its powerful 2.5 HP continuous duty motor, designed to deliver consistent performance no matter the workout intensity. This motor supports a top speed of 10 mph, accommodating everything from brisk walking to intense running sessions. The treadmill also offers an impressive incline range, reaching up to 10%, which allows users to enhance their fitness routine and simulate outdoor running conditions.

The T84 is designed with a spacious 20-inch by 55-inch running surface, providing ample room for users of varying heights and stride lengths. This feature, coupled with a well-cushioned deck, helps reduce the impact on joints, making workouts comfortable and less strenuous. This cushioning system is crucial for preventing injuries, especially during long training sessions.

In terms of technology, the Horizon Fitness T84 is equipped with a clear and easy-to-use console featuring a large LCD display. This display offers real-time feedback on key workout metrics such as time, distance, speed, calories burned, and heart rate. The treadmill is also compatible with Bluetooth, allowing users to connect their devices for fitness apps and music while working out.

The T84 treadmill includes a variety of workout programs tailored to different fitness levels and goals. Whether users are looking to lose weight, build endurance, or simply maintain a healthy lifestyle, the T84's built-in programs provide diverse options to keep workouts engaging and effective. Additionally, the device features quick keys for speed and incline adjustments, enabling users to customize their workouts seamlessly.

Safety features are also prioritized in the T84, with a safety key that immediately stops the machine if needed, as well as sturdy handrails for added stability. The treadmill’s foldable design is another highlight, making it easy to store and saving valuable space when not in use.

In summary, the Horizon Fitness T84 treadmill combines a sturdy design, powerful motor, advanced technology, and a variety of features tailored to enhance the workout experience. For individuals seeking a reliable and effective treadmill for their home fitness routine, the T84 is a commendable choice that promises both performance and comfort.