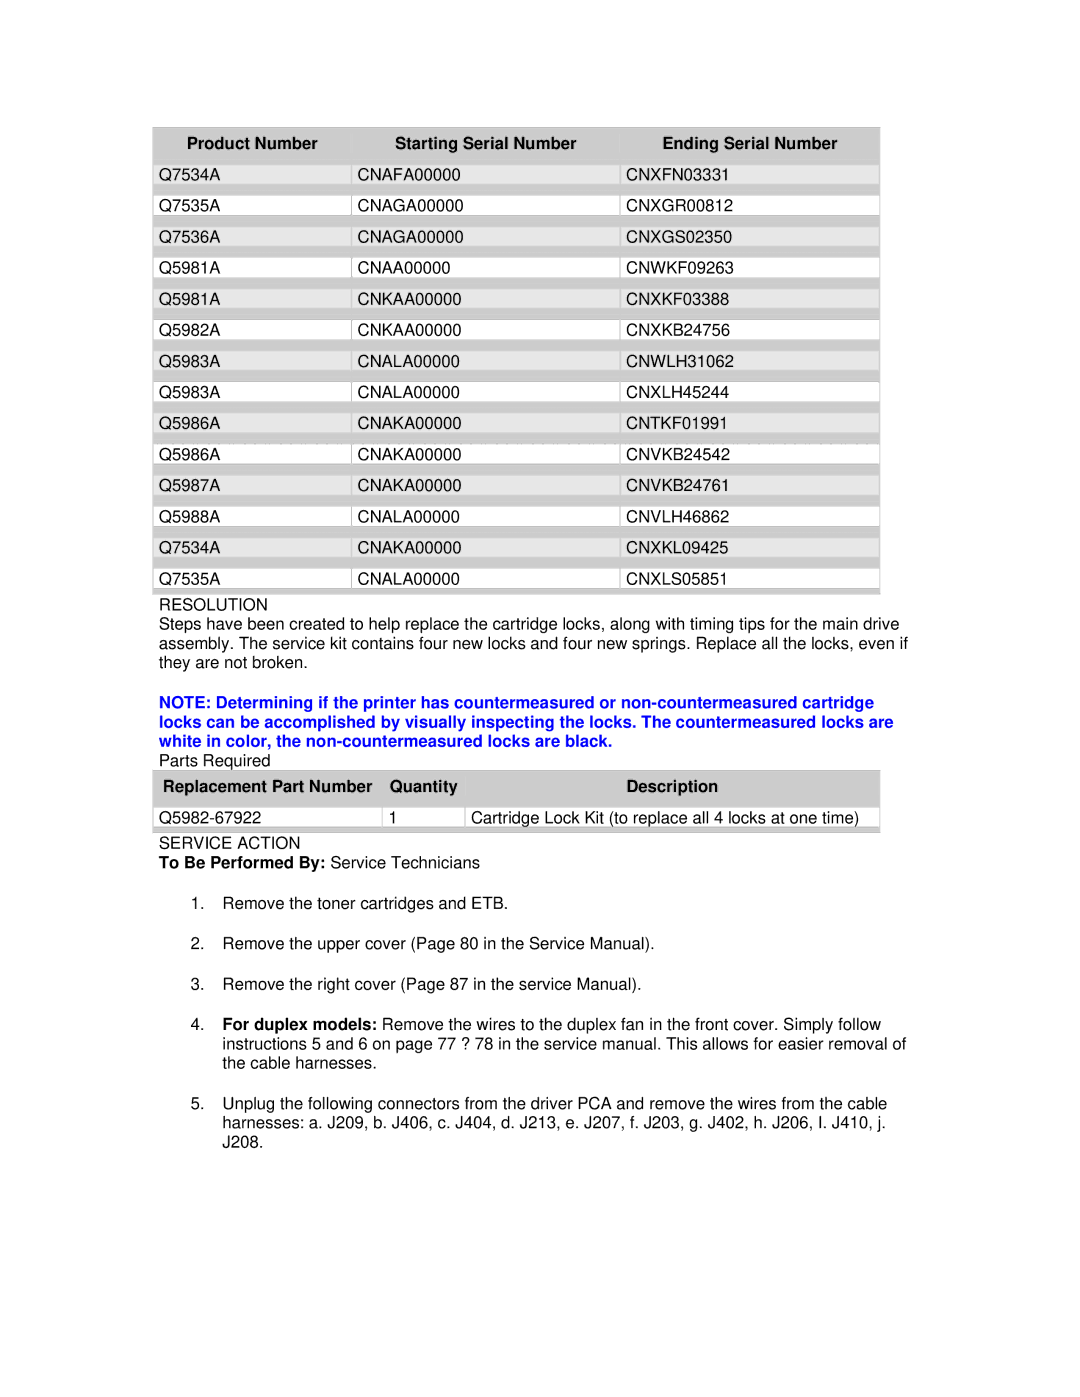
| Product Number |
| Starting Serial Number |
| Ending Serial Number |
|
|
| |||
|
|
|
|
|
|
| Q7534A |
| CNAFA00000 |
| CNXFN03331 |
|
|
|
|
|
|
| Q7535A |
| CNAGA00000 |
| CNXGR00812 |
|
|
|
|
|
|
| Q7536A |
| CNAGA00000 |
| CNXGS02350 |
|
|
|
|
|
|
| Q5981A |
| CNAA00000 |
| CNWKF09263 |
|
|
|
|
|
|
| Q5981A |
| CNKAA00000 |
| CNXKF03388 |
|
|
|
|
|
|
| Q5982A |
| CNKAA00000 |
| CNXKB24756 |
|
|
|
|
|
|
| Q5983A |
| CNALA00000 |
| CNWLH31062 |
|
|
|
|
|
|
| Q5983A |
| CNALA00000 |
| CNXLH45244 |
|
|
|
|
|
|
| Q5986A |
| CNAKA00000 |
| CNTKF01991 |
|
|
|
|
|
|
| Q5986A |
| CNAKA00000 |
| CNVKB24542 |
|
|
|
|
|
|
| Q5987A |
| CNAKA00000 |
| CNVKB24761 |
|
|
|
|
|
|
| Q5988A |
| CNALA00000 |
| CNVLH46862 |
|
|
|
|
|
|
| Q7534A |
| CNAKA00000 |
| CNXKL09425 |
|
|
|
|
|
|
| Q7535A |
| CNALA00000 |
| CNXLS05851 |
|
|
|
|
|
|
RESOLUTION
Steps have been created to help replace the cartridge locks, along with timing tips for the main drive assembly. The service kit contains four new locks and four new springs. Replace all the locks, even if they are not broken.
NOTE: Determining if the printer has countermeasured or
Parts Required
| Replacement Part Number |
|
| Quantity |
|
| Description |
|
|
|
|
|
|
| |||
|
|
|
|
|
| |||
| 1 |
|
| Cartridge Lock Kit (to replace all 4 locks at one time) | ||||
|
|
|
|
|
|
|
|
|
SERVICE ACTION
To Be Performed By: Service Technicians
1.Remove the toner cartridges and ETB.
2.Remove the upper cover (Page 80 in the Service Manual).
3.Remove the right cover (Page 87 in the service Manual).
4.For duplex models: Remove the wires to the duplex fan in the front cover. Simply follow instructions 5 and 6 on page 77 ? 78 in the service manual. This allows for easier removal of the cable harnesses.
5.Unplug the following connectors from the driver PCA and remove the wires from the cable harnesses: a. J209, b. J406, c. J404, d. J213, e. J207, f. J203, g. J402, h. J206, I. J410, j. J208.
