Officejet
Page
Contents
Use the printer
Where’s the user guide?
Are only available on certain Models
Use the control panel
Fax
Set up fax
Finding fax setup information
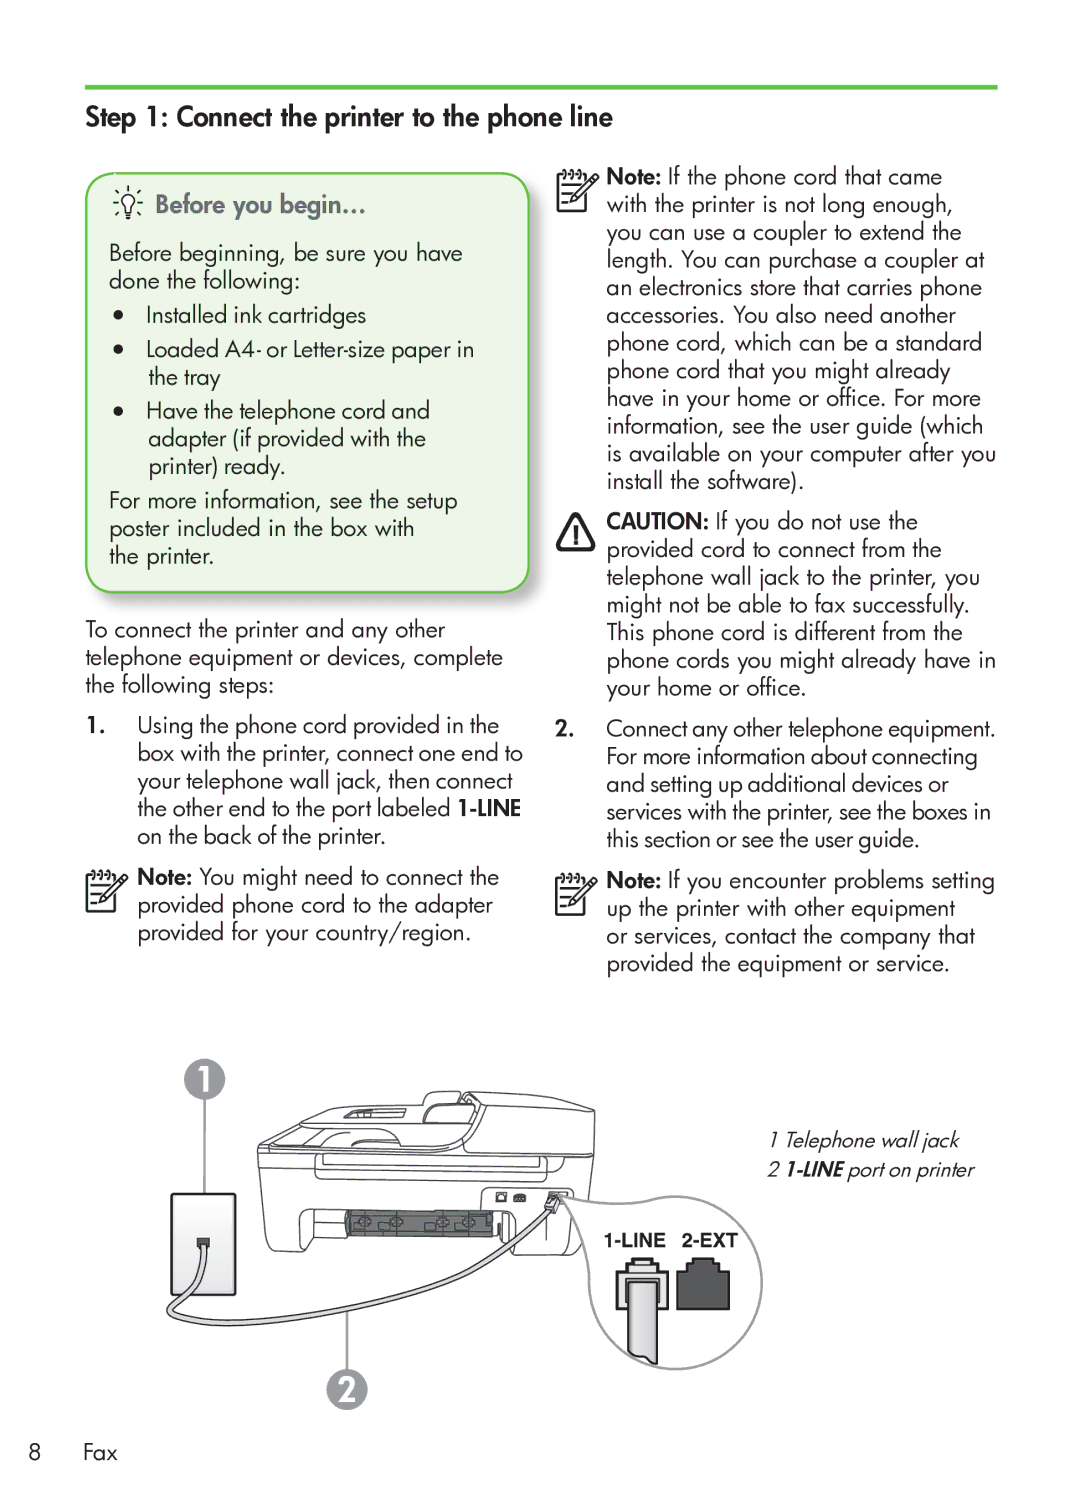
Connect the printer to the phone line
Before you begin…
What is a distinctive ring service?
Connecting to a DSL/ADSL line
Test fax setup
Connecting additional equipment
Configure fax settings
Where can I change fax settings?
Page
Use fax
Send a fax
Learn more
Send a fax from the printer
Send a fax from a computer
Send a fax manually
Receive a fax automatically
Faxes and your voice mail service
Receive faxes
Receive a fax manually
Reprint received faxes from memory
Setup button Then press OK
Working with reports and logs
Receive faxes to your computer
To print a report On the printer’s control panel, press
Fax over Internet Protocol FoIP
To clear the fax log
Install software for your printer
What is my network name and passkey?
Windows
Mac OS
Test the wireless connection
Connecting without a wireless router
Problems installing the software
Solve setup problems
Problems setting up the printer
Problems setting up fax
Check the list of possible problems
Printer is having problems sending and receiving faxes
Run the fax test
Printer can send faxes but cannot receive faxes
Printer cannot send faxes but can receive faxes
After resolving the problems…
Wireless 802.11 setup problems
Make sure the wireless 802.11 light is turned on
Check the wireless signal strength
Restart components of the wireless network
Run the Wireless Network Test
Reducing interference
Run the Network Diagnostic Tool Windows
Embedded Web server
To open the EWS
Hewlett-Packard limited warranty statement
Page
Sisukord
Printeri kasutamine
Kus on kasutusjuhend?
Näitab, milline režiim
Juhtpaneeli kasutamine
Faks
Faksi seadistamine
Samm ühendage printer telefoniliiniga
Enne alustamist
Mida kujutab endast eristava helina teenus?
DSL/ADSL-liiniga ühendamine
Samm testige faksiseadistust
Lisaseadmete ühendamine
Samm konfigureerige faksisätteid
Kuidas saab muuta faksisätteid?
Valige suvand Fax Speed
Faksi kasutamine
Faksi saatmine
Lisateavet
Faksi saatmine printerist
Faksi saatmine arvutist
Faksi käsitsi saatmine
Faksi automaatne vastuvõtmine
Fakside vastuvõtmine
Faksid ja kõnepostiteenus
Faksi käsitsi vastuvõtmine
Mälusolevate fakside korduvprintimine
Aruande printimine
Logide ja aruannete kasutamine
Fakside vastuvõtmine arvutisse
Faksilogi tühjendamine
Samm installige oma printeri tarkvara
Mis on mu võrgunimi ja parool?
Windows
Traadita ühenduse loomine ruuterita
Probleemid tarkvara installimisel
Probleemid printeri seadistamisel
Probleemid faksi seadistamisel
Samm käivitage faksitest
Samm vaadake üle võimalike probleemide loend
Printeril on probleeme fakside saatmise ja vastuvõtmisega
Printeriga saab fakse saata, kuid ei saa fakse vastu võtta
Printeriga ei saa fakse saata, kuid saab fakse vastu võtta
Pärast probleemide Lahendamist
Probleemid traadita ühenduse 802.11 seadistamisel
Samm veenduge, et traadita ühenduse 802.11 märgutuli põleb
Häirete vähendamine
Samm kontrollige traadita ühenduse signaali tugevust
Samm taaskäivitage traadita võrgu komponendid
Samm käivitage Wireless Network Test Traadita võrgu test
Sisseehitatud veebiserver
EWS-i avamine
Hewlett-Packardi piiratud garantii avaldus
Page
Turinys
Spausdintuvo naudojimas
Kur yra vartotojo vadovas?
Įrenginio įjungimas ir išjungimas
Valdymo skydelio naudojimas
„Fax siųsti faksogramą
Fakso sąranka
Žingsnis Prijunkite spausdintuvą prie telefono linijos
Prieš pradėdami
Kas yra skiriamojo skambėjimo paslauga?
Jungimas prie DSL / Adsl linijos
Žingsnis Fakso sąrankos tikrinimas
Papildomos įrangos jungimas
Žingsnis Fakso nuostatų konfigūravimas
Kur galiu keisti fakso nuostatas?
Page
Fakso naudojimas
Faksogramos siuntimas
Sužinokite daugiau
Faksogramos siuntimas iš spausdintuvo
Faksogramos siuntimas iš kompiuterio
Rankinis faksogramų siuntimas
Automatinis faksogramų gavimas
Faksogramų gavimas
Faksogramos ir balso pašto paslauga
Faksogramų priėmimas neautomatiniu būdu
Gautų faksogramų pakartotinis spausdinimas iš atminties
Darbas su ataskaitomis ir žurnalais
Faksogramų priėmimas į kompiuterį
Faksogramos per internetą protokolu „FoIP
Fakso žurnalo trynimas
Žingsnis spausdintuvo programinės įrangos diegimas
Koks mano tinklo pavadinimas ir slaptažodis?
„Windows
Jungimas nenaudojant belaidžio maršrutizatoriaus
„Mac operacinė sistema
Žingsnis belaidžio ryšio tikrinimas
Programinės įrangos diegimo problemos
Sąrankos problemų sprendimas
Spausdintuvo nustatymo problemos
Fakso nustatymo problemos
Žingsnis galimų problemų sąrašo tikrinimas
Yra problemų spausdintuvu siunčiant ir gaunant faksogramas
Žingsnis fakso bandymas
Spausdintuvu galima siųsti, bet negalima priimti faksogramų
Spausdintuvu galima priimti, bet negalima siųsti faksogramų
Belaidžio ryšio 802.11 sąrankos problemos
Baigę spręsti problemas
Trikdžių mažinimas
Žingsnis Tikrinkite belaidžio ryšio signalo stiprumą
Žingsnis Belaidžio tinklo bandymas
Žingsnis Paleiskite tinklo diagnostikos priemonę „Windows
Integruotasis tinklo serveris
EWS atidarymas
„Hewlett-Packard ribota garantija
Page
Saturs
Printera izmantošana
Kur atrodama lietotāja rokasgrāmata?
Latvisk
Vadības paneļa izmantošana
Kur atrodama informācija par faksa uzstādīšanu
Fakss
Faksa uzstādīšana
Darbība pievienojiet printeri tālruņa līnijai
Pirms sākat darbu
Ko nozīmē dažādu zvanu signālu pakalpojums?
Pieslēgšana DSL/ADSL līnijai
Darbība faksa iestatījumu pārbaude
Papildu aprīkojuma pievienošana
Darbība faksa iestatījumu konfigurēšana
Kur iespējams mainīt faksa iestatījumus?
Fax Settings Faksa iestatījumi, un pēc
Faksa lietošana
Faksa ziņojuma sūtīšana
Uzziniet vairāk
Faksa ziņojuma sūtīšana no printera
Faksa ziņojumu sūtīšana no datora
Noklikšķiniet Print Drukāt vai OK Labi
Manuāla faksa ziņojumu sūtīšana
Faksa ziņojumu saņemšana
Automātiska faksa ziņojumu saņemšana
Manuāla faksa ziņojumu saņemšana
Atkārtota faksa ziņojumu drukāšana no atmiņas
Lai izdrukātu atskaiti
Darbs ar atskaitēm un žurnāliem
Faksu saņemšana datorā
Fakss caur Interneta Protokolu FoIP
Faksa žurnāla iztīrīšana
Darbība printera programmatūras instalēšana
Kāds ir mans tīkla nosaukums un parole?
Allow vienmēr pieļaut/atļaut. Ja šī
Darbība bezvadu savienojuma pārbaude
Pieslēgšana, neizmantojot bezvadu maršrutētāju
Problēmas, instalējot programmatūru
Novērsiet uzstādīšanas problēmas
Printera uzstādīšanas problēmas
Faksa uzstādīšanas problēmas
Darbība faksa pārbaudes palaišana
Darbība pārbaudiet iespējamo problēmu sarakstu
Printeris nevar nosūtīt un saņemt faksa ziņojumus
Printeris var nosūtīt faksa ziņojumus, bet nevar tos saņemt
Printeris nevar nosūtīt faksa ziņojumus, bet var tos saņemt
Bezvadu savienojuma 802.11 uzstādīšanas problēmas
Pēc problēmu atrisināšanas
Traucējumu samazināšana
Darbība pārbaudiet bezvadu signāla stiprumu
Darbība restartējiet bezvadu tīkla komponentes
Latvisk
Iegultais tīmekļa serveris
EWS atvēršana
Hewlett-Packard paziņojums par ierobežotu garantiju
Page
Page
CB867-90022* *CB867-90022

 Before you begin…