ASSEMBLY

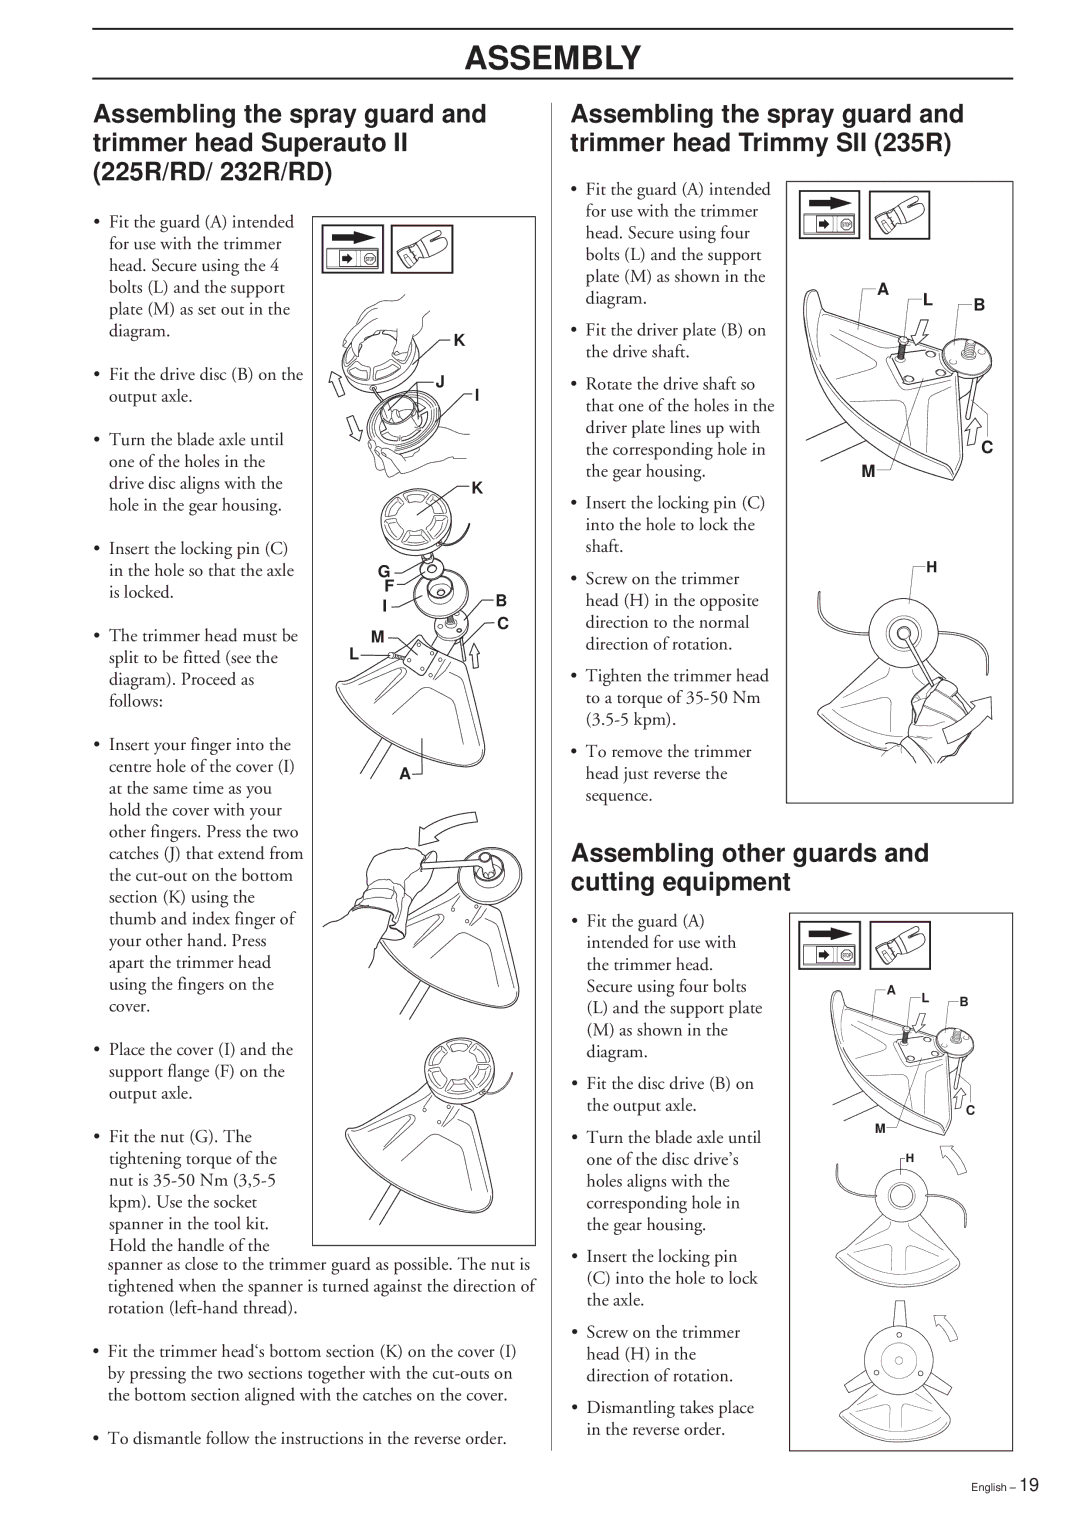
Assembling the spray guard and trimmer head Superauto II (225R/RD/ 232R/RD)

Assembling the spray guard and trimmer head Trimmy SII (235R)

Fit the guard (A) intended


for use with the trimmer


head. Secure using the 4


bolts (L) and the support


plate (M) as set out in the


diagram.


K


Fit the drive disc (B) on the


J


output axle.


I

Turn the blade axle until


one of the holes in the


drive disc aligns with the


K


hole in the gear housing.


Insert the locking pin (C)


in the hole so that the axle

G


is locked.

F

B


I


C

• The trimmer head must be

M


split to be fitted (see the

L


diagram). Proceed as


follows:


Insert your finger into the


centre hole of the cover (I)


A


at the same time as you


hold the cover with your


other fingers. Press the two


Fit the guard (A) intended for use with the trimmer head. Secure using four bolts (L) and the support plate (M) as shown in the diagram.

Fit the driver plate (B) on the drive shaft.

Rotate the drive shaft so that one of the holes in the driver plate lines up with the corresponding hole in the gear housing.

Insert the locking pin (C) into the hole to lock the shaft.

Screw on the trimmer head (H) in the opposite direction to the normal direction of rotation.

Tighten the trimmer head to a torque of 35-50 Nm (3.5-5 kpm).

To remove the trimmer head just reverse the sequence.

A

L

B


C

M


H


catches (J) that extend from

the cut-out on the bottom

section (K) using the

Assembling other guards and cutting equipment

thumb and index finger of

your other hand. Press

apart the trimmer head

using the fingers on the

cover.

Place the cover (I) and the support flange (F) on the output axle.

Fit the nut (G). The tightening torque of the nut is 35-50 Nm (3,5-5 kpm). Use the socket spanner in the tool kit.

Hold the handle of the

spanner as close to the trimmer guard as possible. The nut is tightened when the spanner is turned against the direction of rotation (left-hand thread).

Fit the trimmer head‘s bottom section (K) on the cover (I) by pressing the two sections together with the cut-outs on the bottom section aligned with the catches on the cover.

To dismantle follow the instructions in the reverse order.

Fit the guard (A) intended for use with the trimmer head. Secure using four bolts

(L)and the support plate

(M)as shown in the diagram.

Fit the disc drive (B) on the output axle.

Turn the blade axle until one of the disc drive’s holes aligns with the corresponding hole in the gear housing.

Insert the locking pin

(C)into the hole to lock the axle.

Screw on the trimmer head (H) in the direction of rotation.

Dismantling takes place in the reverse order.

A

L

B


C

M


H


English – 19

Page 19
Image 19
Husqvarna 225R, 225RD, 225RJ, 232R, 232RD, 235R, 232R, 235R, 235FR manual Assembling other guards and cutting equipment

232R, 235R, 235FR, 225R, 225RD, 225RJ, 232R, 232RD, 235R specifications

Husqvarna, renowned for its expertise in outdoor power equipment, offers a range of robust strimmers that cater to both professional and homeowner needs. Among these are the models 225R, 225RD, 225RJ, 232R, 232RD, 235R, and 235FR. Each of these strimmers boasts unique features, advanced technologies, and characteristics that make them stand out in the competitive landscape.

The Husqvarna 225R is designed for residential use, featuring a lightweight design that ensures ease of maneuverability. Its Smart Start technology allows for quick starting with minimal resistance, making it user-friendly for amateurs and seasoned users alike. The model is powered by a reliable two-stroke engine which strikes an optimal balance between power and fuel efficiency.

The 225RD variant adds versatility with its dual-line cutting system, perfect for tackling thicker grass and weeds. This model also integrates an ergonomic handle, reducing fatigue during extended use and enhancing overall comfort.

Moving on, the 225RJ version is equipped with an adjustable cutting width, allowing users to adapt to various tasks. The reinforced trimmer head ensures durability while the low emissions technology adheres to environmental standards, making it a sustainable choice for the eco-conscious consumer.

The Husqvarna 232R builds on the strengths of its predecessor with increased power output, making it suitable for demanding landscaping tasks. Its robust build quality and sturdy materials enable it to withstand rigorous use, catering perfectly to landscaping professionals.

The 232RD model features a heavier-duty cutting head that facilitates tough weed clearance, ideal for larger properties. Additionally, it maintains a comfortable grip, aiding precision in operation.

The 235R introduces improved fuel efficiency, reducing the environmental impact without sacrificing performance. The easy-to-adjust harness and balance system distribute weight evenly, allowing for prolonged use without discomfort.

Lastly, the 235FR is designed for commercial use, featuring a high-capacity engine that maximizes output efficiency. The frame design allows for operation on steep terrains, ensuring versatility in applications, while the anti-vibration technology minimizes strain on the user’s hands, making long hours of operation more bearable.

In summary, Husqvarna’s lineup of strimmers — the 225R, 225RD, 225RJ, 232R, 232RD, 235R, and 235FR — represents an excellent amalgamation of power, user comfort, and eco-friendliness. Each model is tailored to meet specific needs, whether for homeowners or professionals, ensuring that superior cutting performance and reliability remain at the forefront of outdoor maintenance tasks.