SERVICE AND ADJUSTMENTS

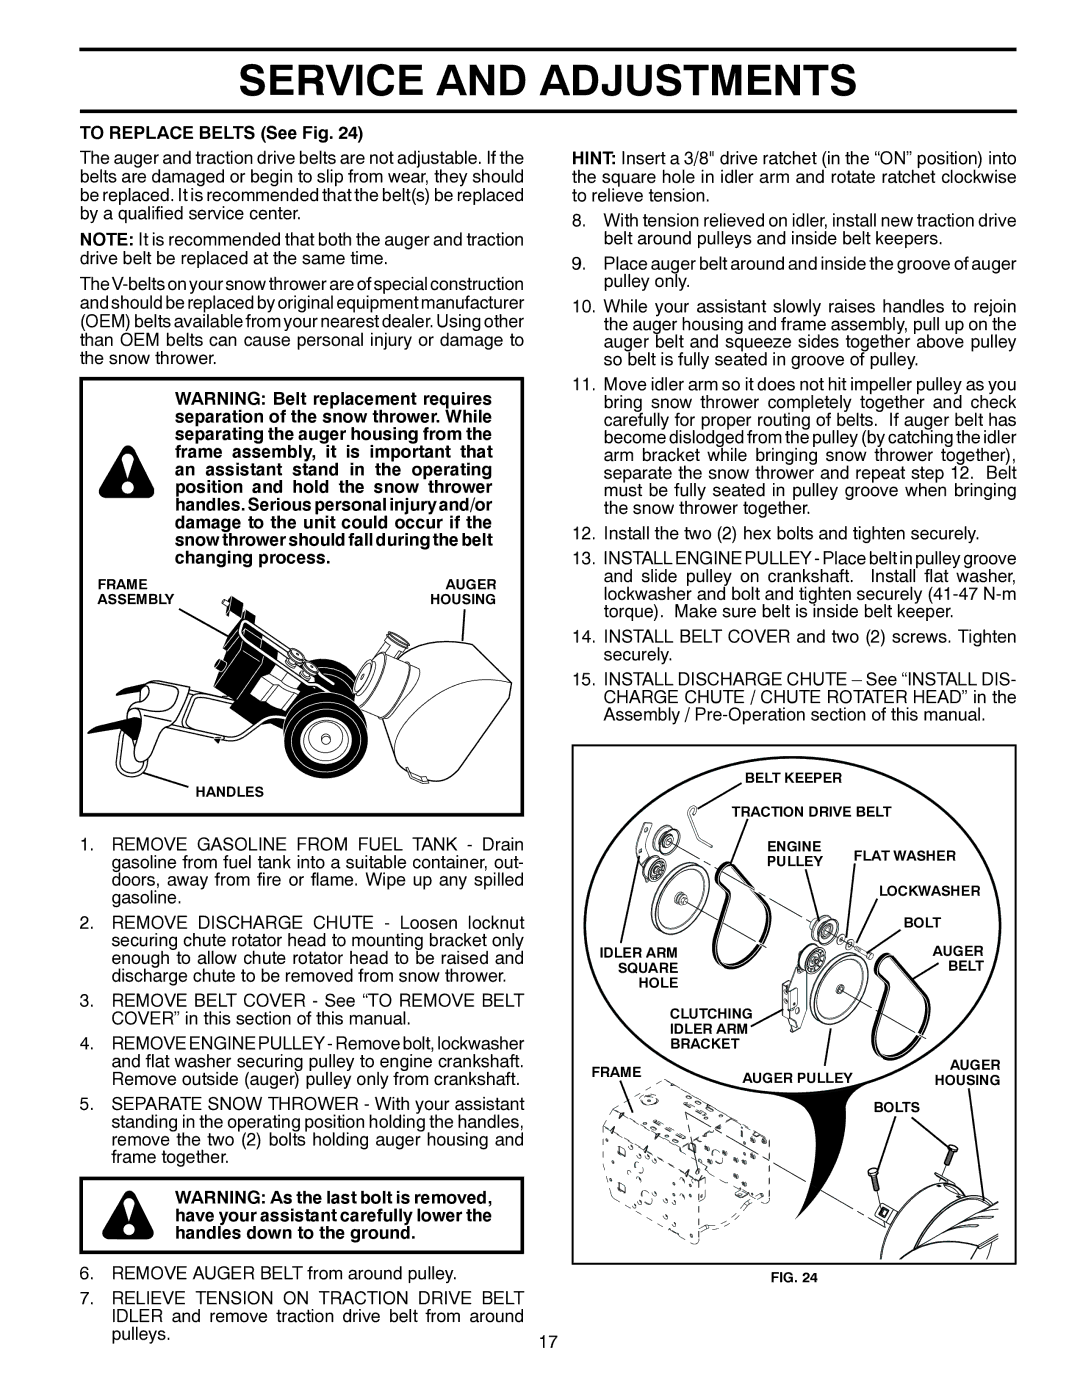
TO REPLACE BELTS (See Fig. 24)

The auger and traction drive belts are not adjustable. If the belts are damaged or begin to slip from wear, they should be replaced. It is recommended that the belt(s) be replaced by a qualified service center.

NOTE: It is recommended that both the auger and traction drive belt be replaced at the same time.

The V-belts on your snow thrower are of special construction and should be replaced by original equipment manufacturer (OEM) belts available from your nearest dealer. Using other than OEM belts can cause personal injury or damage to the snow thrower.

WARNING: Belt replacement requires separation of the snow thrower. While separating the auger housing from the frame assembly, it is important that an assistant stand in the operating position and hold the snow thrower handles. Serious personal injury and/or damage to the unit could occur if the snow thrower should fall during the belt changing process.

FRAME

AUGER

ASSEMBLY

HOUSING

HANDLES

1.REMOVE GASOLINE FROM FUEL TANK - Drain gasoline from fuel tank into a suitable container, out- doors, away from fire or flame. Wipe up any spilled gasoline.

2.REMOVE DISCHARGE CHUTE - Loosen locknut securing chute rotator head to mounting bracket only enough to allow chute rotator head to be raised and discharge chute to be removed from snow thrower.

3.REMOVE BELT COVER - See “TO REMOVE BELT COVER” in this section of this manual.

4.REMOVE ENGINE PULLEY - Remove bolt, lockwasher and flat washer securing pulley to engine crankshaft. Remove outside (auger) pulley only from crankshaft.

5.SEPARATE SNOW THROWER - With your assistant standing in the operating position holding the handles, remove the two (2) bolts holding auger housing and frame together.

WARNING: As the last bolt is removed, have your assistant carefully lower the handles down to the ground.

6. REMOVE AUGER BELT from around pulley.

HINT: Insert a 3/8" drive ratchet (in the “ON” position) into the square hole in idler arm and rotate ratchet clockwise to relieve tension.

8.With tension relieved on idler, install new traction drive belt around pulleys and inside belt keepers.

9.Place auger belt around and inside the groove of auger pulley only.

10.While your assistant slowly raises handles to rejoin the auger housing and frame assembly, pull up on the auger belt and squeeze sides together above pulley so belt is fully seated in groove of pulley.

11.Move idler arm so it does not hit impeller pulley as you bring snow thrower completely together and check carefully for proper routing of belts. If auger belt has become dislodged from the pulley (by catching the idler arm bracket while bringing snow thrower together), separate the snow thrower and repeat step 12. Belt must be fully seated in pulley groove when bringing the snow thrower together.

12.Install the two (2) hex bolts and tighten securely.

13.INSTALL ENGINE PULLEY - Place belt in pulley groove and slide pulley on crankshaft. Install flat washer, lockwasher and bolt and tighten securely (41-47 N-m torque). Make sure belt is inside belt keeper.

14.INSTALL BELT COVER and two (2) screws. Tighten securely.

15.INSTALL DISCHARGE CHUTE – See “INSTALL DIS- CHARGE CHUTE / CHUTE ROTATER HEAD” in the Assembly / Pre-Operation section of this manual.


BELT KEEPER


TRACTION DRIVE BELT


ENGINE

FLAT WASHER


PULLEY


LOCKWASHER


BOLT

IDLER ARM

AUGER

SQUARE

BELT

HOLE


CLUTCHING


IDLER ARM


BRACKET


FRAME

AUGER PULLEY

AUGER

HOUSING


BOLTS

FIG. 24

7.RELIEVE TENSION ON TRACTION DRIVE BELT IDLER and remove traction drive belt from around

pulleys.17

Page 17
Image 17
Husqvarna 924SB-XLS owner manual To Replace Belts See Fig

924SB-XLS specifications

The Husqvarna 924SB-XLS is a robust and highly efficient snow blower designed for homeowners and professionals who need to tackle heavy snowfall with ease. Built with power, durability, and user-friendly features, this machine ensures effective snow removal across various surfaces.

One of the standout features of the Husqvarna 924SB-XLS is its powerful engine, equipped with a reliable 243cc 2-cycle motor. This engine delivers a significant amount of torque, enabling the snow blower to handle even the most stubborn, packed snow. The engine is designed for easy starting, and its high-performance design ensures that the blower can operate efficiently in extremely cold conditions.

The snow blower features a durable and robust auger system, which is capable of clearing a path 24 inches wide and up to 23 inches deep. The heavy-duty auger, combined with its powerful intake, helps efficiently break up and transport the snow through the discharge chute. Additionally, the stainless steel construction of the auger enhances its longevity, making it resistant to wear and tear over time.

An important aspect of the Husqvarna 924SB-XLS is its four-way adjustable discharge chute, which allows users to direct the expelled snow precisely where they want it. This feature is particularly useful for managing snow piles and optimizing clearing efficiency. The chute can be easily adjusted from the operator’s position, ensuring minimal interruption during operation.

The snow blower is equipped with features designed for user comfort and ease of operation. The handlebar is ergonomically designed and height-adjustable, allowing operators of different sizes to work comfortably. Furthermore, the oversized tires provide excellent traction on slippery surfaces, making it easier to maneuver through deep snow.

The Husqvarna 924SB-XLS also includes a built-in electric starter, allowing for hassle-free starting on colder days. With its powerful performance, user-friendly features, and durable construction, the Husqvarna 924SB-XLS is an excellent choice for anyone in need of a high-performance snow blower. Its combination of technology and engineering makes it a reliable tool for efficiently managing winter weather challenges. Whether for residential use or small commercial jobs, this snow blower offers reliability you can count on.