2


16


24


23


26


17


25


13

15

13


14


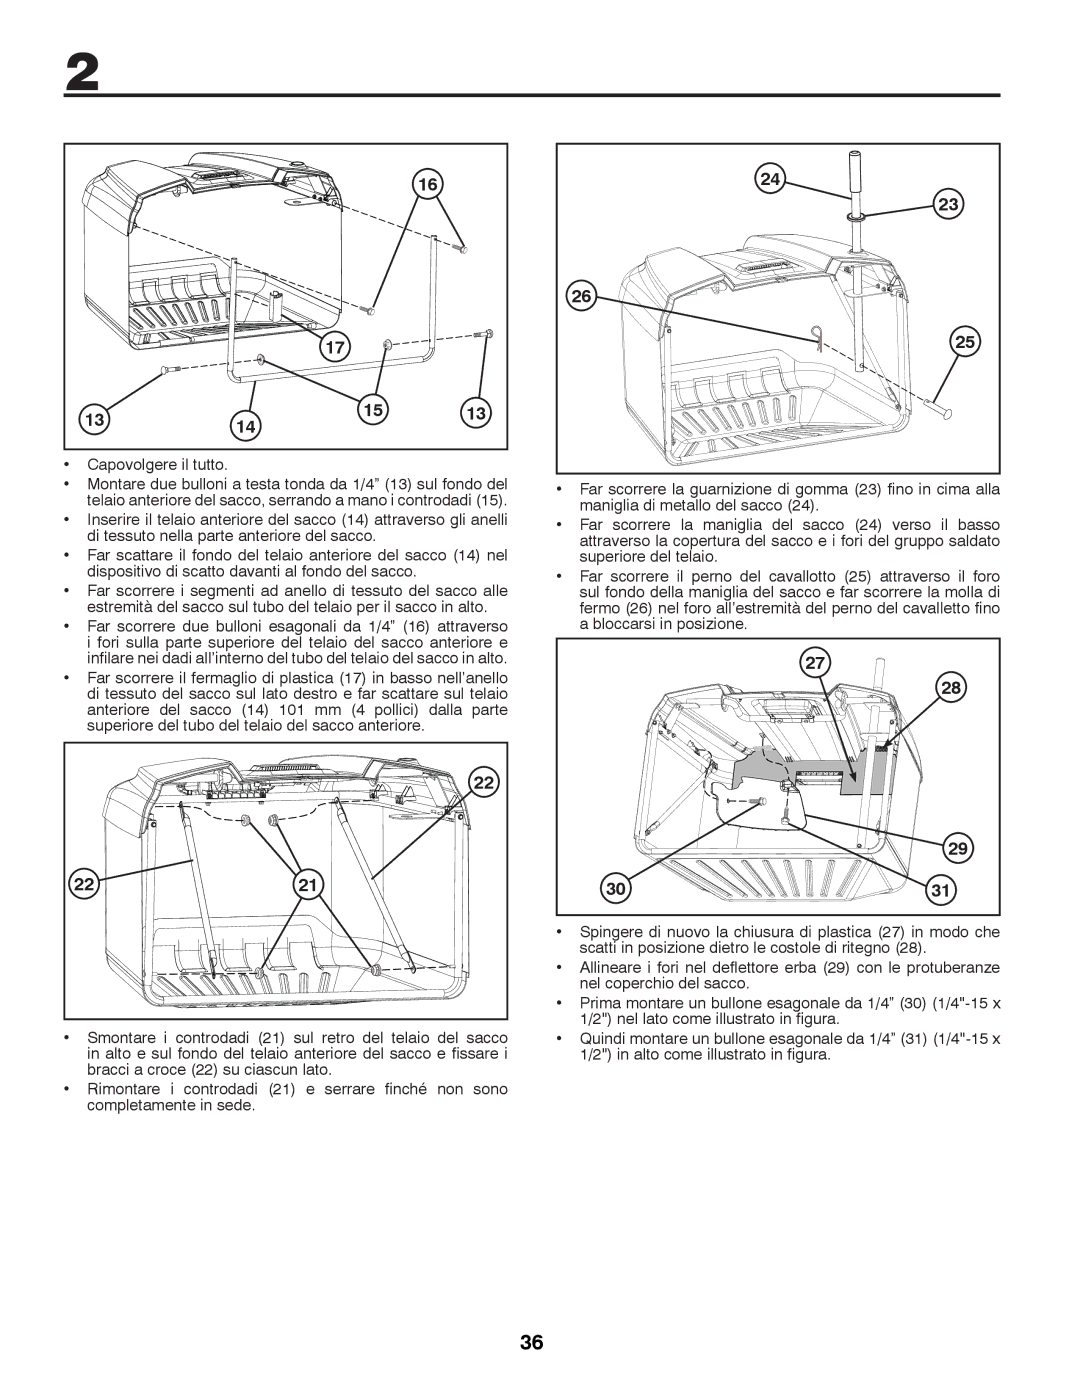
Capovolgere il tutto.


• Montare due bulloni a testa tonda da 1/4” (13) sul fondo del

• Far scorrere la guarnizione di gomma (23) fino in cima alla


telaio anteriore del sacco, serrando a mano i controdadi (15).


maniglia di metallo del sacco (24).


• Inserire il telaio anteriore del sacco (14) attraverso gli anelli


Far scorrere la maniglia del sacco (24) verso il basso


di tessuto nella parte anteriore del sacco.


attraverso la copertura del sacco e i fori del gruppo saldato

• Far scattare il fondo del telaio anteriore del sacco (14) nel


superiore del telaio.


dispositivo di scatto davanti al fondo del sacco.


Far scorrere il perno del cavallotto (25) attraverso il foro

• Far scorrere i segmenti ad anello di tessuto del sacco alle


sul fondo della maniglia del sacco e far scorrere la molla di


estremità del sacco sul tubo del telaio per il sacco in alto.


fermo (26) nel foro all’estremità del perno del cavalletto fino

• Far scorrere due bulloni esagonali da 1/4” (16) attraverso


a bloccarsi in posizione.


i fori sulla parte superiore del telaio del sacco anteriore e


infilare nei dadi all’interno del tubo del telaio del sacco in alto.


27


• Far scorrere il fermaglio di plastica (17) in basso nell’anello


28


di tessuto del sacco sul lato destro e far scattare sul telaio


anteriore del sacco (14) 101 mm (4 pollici) dalla parte


superiore del tubo del telaio del sacco anteriore.


22


29


22

21


30

31


• Spingere di nuovo la chiusura di plastica (27) in modo che


scatti in posizione dietro le costole di ritegno (28).


• Allineare i fori nel deflettore erba (29) con le protuberanze


nel coperchio del sacco.


• Prima montare un bullone esagonale da 1/4” (30) (1/4"-15 x

• Smontare i controdadi (21) sul retro del telaio del sacco


1/2") nel lato come illustrato in figura.


Quindi montare un bullone esagonale da 1/4” (31) (1/4"-15 x


in alto e sul fondo del telaio anteriore del sacco e fissare i


1/2") in alto come illustrato in figura.


bracci a croce (22) su ciascun lato.


Rimontare i controdadi (21) e serrare finché non sono completamente in sede.

36

Page 36
Image 36
Husqvarna CTH126 instruction manual Estremità del sacco sul tubo del telaio per il sacco in alto

CTH126 specifications

The Husqvarna CTH126 is a highly regarded ride-on lawn mower designed for homeowners who require efficiency, comfort, and reliability in their mowing tasks. This powerful machine combines innovative features with a user-friendly design, making it an excellent choice for maintaining medium to large-sized lawns.

One of the standout characteristics of the CTH126 is its robust engine. Powered by a reliable and efficient 540cc Briggs & Stratton gasoline engine, it delivers ample torque and power, ensuring that the mower can handle tough grass and varied terrains. The engine's design enhances fuel efficiency and reduces emissions, making it an environmentally friendly option for lawn care.

The cutting deck of the Husqvarna CTH126 is another notable feature. With a 42-inch cutting width, it allows for faster mowing sessions, covering larger areas in less time. The deck is made from durable materials to withstand the rigors of frequent use, and it includes a cutting height adjustment feature, allowing users to easily change the height of the cut from 1.5 to 4 inches, ensuring optimal results for various lawn types and conditions.

One of the technologies that sets the CTH126 apart is its ergonomic seating and controls. The riding mower is designed with comfort in mind, featuring an adjustable seat that accommodates operators of different sizes. The intuitive dashboard layout includes easy-to-reach controls for throttle, choke, and blade engagement, allowing users to focus on mowing without distraction.

Moreover, the Husqvarna CTH126 is equipped with a tight turning radius, enhancing its maneuverability. This feature allows the mower to navigate obstacles such as flower beds and trees effortlessly, making it easier to achieve a clean and well-manicured lawn. The mower's front suspension system further contributes to a smooth ride, reducing operator fatigue during longer mowing sessions.

In terms of maintenance, the Husqvarna CTH126 is designed for ease of access, making routine checks and service hassle-free. With features like a removable deck for cleaning and a built-in battery charger, owners can keep their mower in top shape with minimal effort.

Overall, the Husqvarna CTH126 combines powerful performance, user-friendly design, and innovative technologies to provide an exceptional lawn mowing experience, making it a solid investment for homeowners dedicated to maintaining pristine outdoor spaces.