40mm

2

1

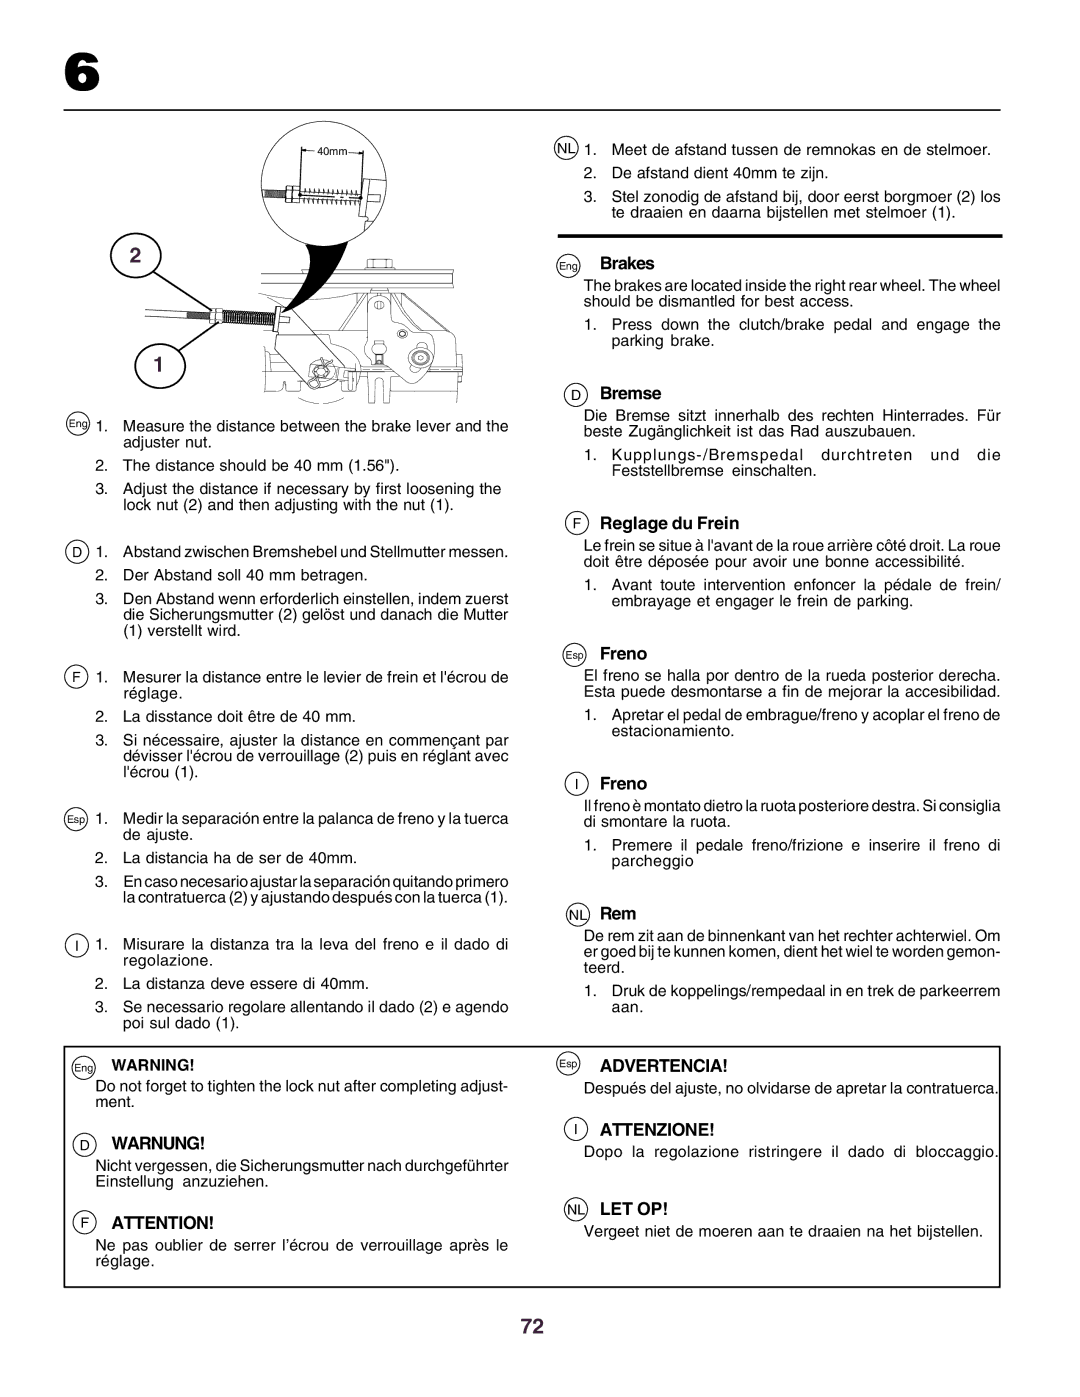
Eng 1. Measure the distance between the brake lever and the adjuster nut.

2.The distance should be 40 mm (1.56").

3.Adjust the distance if necessary by first loosening the lock nut (2) and then adjusting with the nut (1).

NL 1. Meet de afstand tussen de remnokas en de stelmoer.

2.De afstand dient 40mm te zijn.

3.Stel zonodig de afstand bij, door eerst borgmoer (2) los te draaien en daarna bijstellen met stelmoer (1).

Eng Brakes

The brakes are located inside the right rear wheel. The wheel should be dismantled for best access.

1.Press down the clutch/brake pedal and engage the parking brake.

DBremse

Die Bremse sitzt innerhalb des rechten Hinterrades. Für beste Zugänglichkeit ist das Rad auszubauen.

1.Kupplungs-/Bremspedal durchtreten und die Feststellbremse einschalten.

D1. Abstand zwischen Bremshebel und Stellmutter messen.

2.Der Abstand soll 40 mm betragen.

3.Den Abstand wenn erforderlich einstellen, indem zuerst die Sicherungsmutter (2) gelöst und danach die Mutter

(1)verstellt wird.

F1. Mesurer la distance entre le levier de frein et l'écrou de réglage.

2.La disstance doit être de 40 mm.

3.Si nécessaire, ajuster la distance en commençant par dévisser l'écrou de verrouillage (2) puis en réglant avec l'écrou (1).

Esp 1. Medir la separación entre la palanca de freno y la tuerca de ajuste.

2.La distancia ha de ser de 40mm.

3.En caso necesario ajustar la separación quitando primero la contratuerca (2) y ajustando después con la tuerca (1).

I1. Misurare la distanza tra la leva del freno e il dado di regolazione.

2.La distanza deve essere di 40mm.

3.Se necessario regolare allentando il dado (2) e agendo poi sul dado (1).

FReglage du Frein

Le frein se situe à l'avant de la roue arrière côté droit. La roue doit être déposée pour avoir une bonne accessibilité.

1.Avant toute intervention enfoncer la pédale de frein/ embrayage et engager le frein de parking.

Esp Freno

El freno se halla por dentro de la rueda posterior derecha. Esta puede desmontarse a fin de mejorar la accesibilidad.

1.Apretar el pedal de embrague/freno y acoplar el freno de estacionamiento.

IFreno

Il freno è montato dietro la ruota posteriore destra. Si consiglia di smontare la ruota.

1.Premere il pedale freno/frizione e inserire il freno di parcheggio

NL Rem

De rem zit aan de binnenkant van het rechter achterwiel. Om er goed bij te kunnen komen, dient het wiel te worden gemon- teerd.

1.Druk de koppelings/rempedaal in en trek de parkeerrem aan.

Eng WARNING!

Do not forget to tighten the lock nut after completing adjust- ment.

DWARNUNG!

Nicht vergessen, die Sicherungsmutter nach durchgeführter Einstellung anzuziehen.

FATTENTION!

Ne pas oublier de serrer l’écrou de verrouillage après le réglage.

Esp ADVERTENCIA!

Después del ajuste, no olvidarse de apretar la contratuerca.

IATTENZIONE!

Dopo la regolazione ristringere il dado di bloccaggio.

NL LET OP!

Vergeet niet de moeren aan te draaien na het bijstellen.

72

Page 72
Image 72
Husqvarna CTH160II instruction manual Warnung, Attenzione

CTH160II specifications

The Husqvarna CTH160II is a standout model in the realm of garden tractors, specifically designed to offer efficiency, comfort, and advanced features for homeowners with varying landscape needs. This machine is engineered for durability and performance, making it an ideal choice for maintaining lawns, gardens, and more extensive outdoor spaces.

One of the key features of the CTH160II is its powerful engine. Equipped with a robust Briggs & Stratton engine, it ensures reliable starting and strong performance, even under demanding conditions. The engine delivers a significant amount of horsepower, providing the necessary power for tackling tough mowing and terrain challenges.

The cutting deck on the CTH160II is another notable characteristic. With a 42-inch reinforced cutting deck, it provides a wide cutting path, which enhances efficiency and reduces mowing time. The deck is designed for superior grass collection and is compatible with various cutting heights, allowing users to achieve the desired grass length easily. Additionally, the deck features an innovative washout port, making maintenance straightforward by simplifying the cleaning process after use.

The ergonomics of the CTH160II are worth mentioning as well. The tractor is equipped with a comfortable seat that can be adjusted to accommodate different user preferences, thereby enhancing the overall mowing experience. The steering wheel is also positioned for optimal control, ensuring that the operator can maneuver the tractor effortlessly.

The Husqvarna CTH160II incorporates advanced technologies that enhance usability. Its hydrostatic transmission provides seamless speed control, eliminating the need for shifting gears, which makes it more accessible for users of all skill levels. Furthermore, the tractor features a compact design, allowing it to navigate through tight spaces and around obstacles with ease.

For those looking for versatility, the CTH160II can be equipped with various accessories, including mulching kits, sweeper attachments, and snow removal tools. This adaptability makes it suitable for a range of tasks throughout the year, from mowing to snow clearing.

In summary, the Husqvarna CTH160II combines power, precision, and user-friendly features, making it an excellent choice for homeowners looking to maintain their gardens and lawns efficiently. With its durable construction, thoughtful design, and impressive technological advancements, the CTH160II stands out as an essential tool for outdoor maintenance. Whether for routine mowing or more extensive landscaping tasks, this garden tractor is built to deliver reliable performance season after season.