2

1

4

1.

Front bagger tube

3

2.

Lower bagger tube


3.

1/4 x 50,8mm Carriage


Bolts


4.

1/4 Lock nut


5


3


2


6

1.

Front bagger tube

7

2.

1/4 x 50,8mm Carriage


Bolts


3.

1/4 Lock nut

1

4.

Vinyl Binding


5.

Dump handle tube

4

6.

Clevis pin

7.

Retainer spring

6MM (1/4") - 9MM (3/8")


2

1


3


1. Top Surfaces Even

2.Horizontal Adjustment Bracket

3.Vertical Adjustment Bracket

1

2


A


3


1.

Handle


2.

Retainer Spring

A


3.

Pin


4.

Plug


4

2

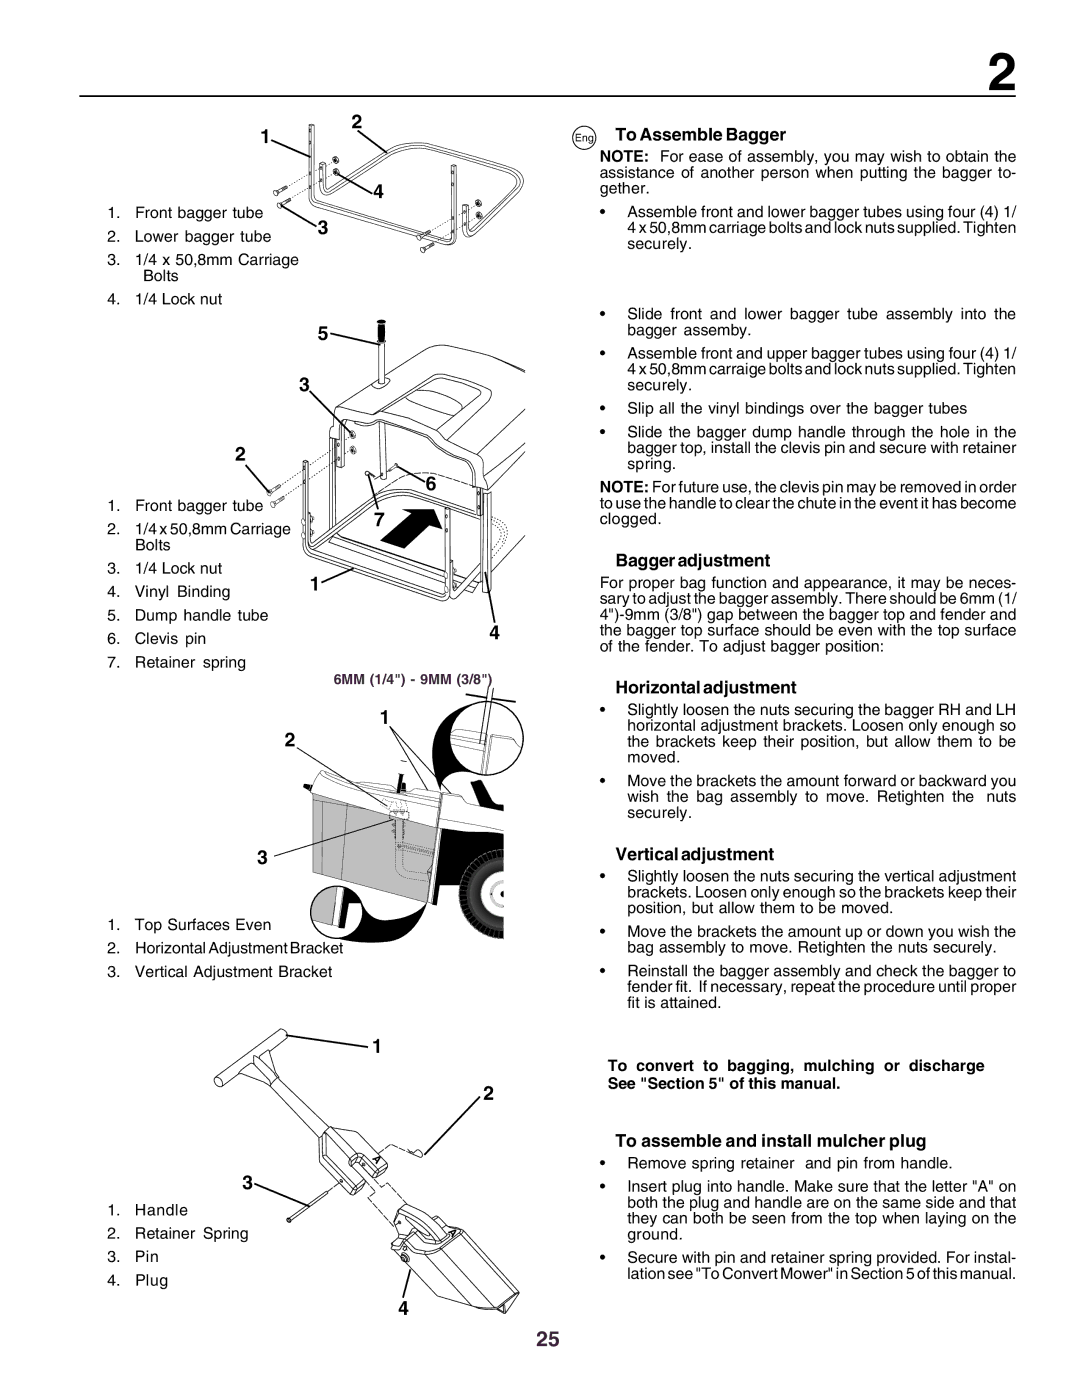
Eng To Assemble Bagger

NOTE: For ease of assembly, you may wish to obtain the assistance of another person when putting the bagger to- gether.

Assemble front and lower bagger tubes using four (4) 1/ 4 x 50,8mm carriage bolts and lock nuts supplied. Tighten securely.

Slide front and lower bagger tube assembly into the bagger assemby.

Assemble front and upper bagger tubes using four (4) 1/ 4 x 50,8mm carraige bolts and lock nuts supplied. Tighten securely.

Slip all the vinyl bindings over the bagger tubes

Slide the bagger dump handle through the hole in the bagger top, install the clevis pin and secure with retainer spring.

NOTE: For future use, the clevis pin may be removed in order to use the handle to clear the chute in the event it has become clogged.

Bagger adjustment

For proper bag function and appearance, it may be neces- sary to adjust the bagger assembly. There should be 6mm (1/ 4")-9mm (3/8") gap between the bagger top and fender and the bagger top surface should be even with the top surface of the fender. To adjust bagger position:

Horizontal adjustment

Slightly loosen the nuts securing the bagger RH and LH horizontal adjustment brackets. Loosen only enough so the brackets keep their position, but allow them to be moved.

Move the brackets the amount forward or backward you wish the bag assembly to move. Retighten the nuts securely.

Vertical adjustment

Slightly loosen the nuts securing the vertical adjustment brackets. Loosen only enough so the brackets keep their position, but allow them to be moved.

Move the brackets the amount up or down you wish the bag assembly to move. Retighten the nuts securely.

Reinstall the bagger assembly and check the bagger to fender fit. If necessary, repeat the procedure until proper fit is attained.

To convert to bagging, mulching or discharge See "Section 5" of this manual.

To assemble and install mulcher plug

Remove spring retainer and pin from handle.

Insert plug into handle. Make sure that the letter "A" on both the plug and handle are on the same side and that they can both be seen from the top when laying on the ground.

Secure with pin and retainer spring provided. For instal- lation see "To Convert Mower" in Section 5 of this manual.

25

Page 25
Image 25
Husqvarna CTH160II instruction manual Eng To Assemble Bagger, Bagger adjustment, Horizontal adjustment, Vertical adjustment

CTH160II specifications

The Husqvarna CTH160II is a standout model in the realm of garden tractors, specifically designed to offer efficiency, comfort, and advanced features for homeowners with varying landscape needs. This machine is engineered for durability and performance, making it an ideal choice for maintaining lawns, gardens, and more extensive outdoor spaces.

One of the key features of the CTH160II is its powerful engine. Equipped with a robust Briggs & Stratton engine, it ensures reliable starting and strong performance, even under demanding conditions. The engine delivers a significant amount of horsepower, providing the necessary power for tackling tough mowing and terrain challenges.

The cutting deck on the CTH160II is another notable characteristic. With a 42-inch reinforced cutting deck, it provides a wide cutting path, which enhances efficiency and reduces mowing time. The deck is designed for superior grass collection and is compatible with various cutting heights, allowing users to achieve the desired grass length easily. Additionally, the deck features an innovative washout port, making maintenance straightforward by simplifying the cleaning process after use.

The ergonomics of the CTH160II are worth mentioning as well. The tractor is equipped with a comfortable seat that can be adjusted to accommodate different user preferences, thereby enhancing the overall mowing experience. The steering wheel is also positioned for optimal control, ensuring that the operator can maneuver the tractor effortlessly.

The Husqvarna CTH160II incorporates advanced technologies that enhance usability. Its hydrostatic transmission provides seamless speed control, eliminating the need for shifting gears, which makes it more accessible for users of all skill levels. Furthermore, the tractor features a compact design, allowing it to navigate through tight spaces and around obstacles with ease.

For those looking for versatility, the CTH160II can be equipped with various accessories, including mulching kits, sweeper attachments, and snow removal tools. This adaptability makes it suitable for a range of tasks throughout the year, from mowing to snow clearing.

In summary, the Husqvarna CTH160II combines power, precision, and user-friendly features, making it an excellent choice for homeowners looking to maintain their gardens and lawns efficiently. With its durable construction, thoughtful design, and impressive technological advancements, the CTH160II stands out as an essential tool for outdoor maintenance. Whether for routine mowing or more extensive landscaping tasks, this garden tractor is built to deliver reliable performance season after season.