Manuals
/
Husqvarna
/
Household Appliance
/
Sewing Machine
Husqvarna
E10 manual Fitting The Snap-In Accessory Box, To open, lift up at the point of the arrow
Models:
E10
1
8
32
32
Download
32 pages
55.29 Kb
5
6
7
8
9
10
11
12
<
>
Troubleshooting
Maintenance
Connecting The Machine To Power Source
Should there be any problem, ask your local dealer for advice
Adjust Presser Foot Pressure
How to
Safety
Hand wheel 16. Stitch selector dial 17. Power switch
Needle plate 7. Accessories box 8. Bobbin stop
Page 8
Image 8
FITTING THE
SNAP-IN
ACCESSORY BOX
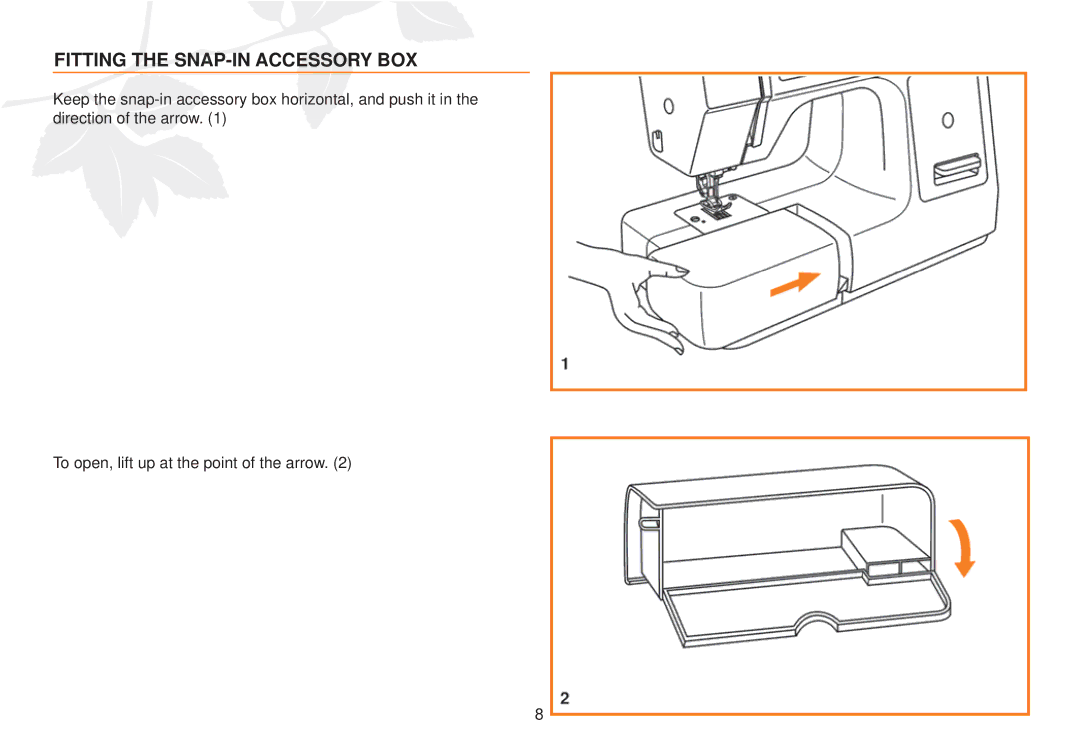
Keep the
snap-in
accessory box horizontal, and push it in the direction of the arrow. (1)
To open, lift up at the point of the arrow. (2)
8
Page 7
Page 9
Page 8
Image 8
Page 7
Page 9
Contents
USER’S GUIDE
DANGER - To reduce the risk of electric shock
IMPORTANT SAFETY INSTRUCTIONS
SAVE THESE INSTRUCTIONS
Congratulations
LIST OF CONTENTS
PRINCIPAL PARTS OF THE MACHINE
6. Needle plate 7. Accessories box 8. Bobbin stop
1. Thread tension dial 2. Presser foot pressure
3. Thread take-up lever 4. Thread cutting 5. Presser foot
15. Hand wheel 16. Stitch selector dial 17. Power switch
12. Spool pin 13. Bobbin winder 14. Hole for second spool pin
18. Main plug socket 19. Bobbin thread guide 20. Upper thread guide
21. Handle 22. Presser foot lever
ACCESSORIES
1. All purpose foot 2. Zipper foot 3. Satin stitch foot
4. Blind hem foot 5 Buttonhole foot 6. L-screwdriver
7. Seam ripper/ brush 8. Oil bottle 9. Second spool pin
FITTING THE SNAP-IN ACCESSORY BOX
To open, lift up at the point of the arrow
CONNECTING THE MACHINE TO POWER SOURCE
Foot control
Sewing light
For USA and Canada
CHANGING THE BULB
Should there be any problem, ask your local dealer for advice
Replace bulb with same type rated 10 watts 110-120V or 15 watts
Loosen screw A as illustrated Remove the cover B
ADJUST PRESSER FOOT PRESSURE
TWO-STEP PRESSER FOOT LEVER
ATTACHING THE PRESSER FOOT SHANK/ ANKLE
Attaching the presser foot holder
Attaching the presser foot
Removing the presser foot
WINDING THE BOBBIN
INSERTING THE BOBBIN
1. Open the hinged cover
3. Put the thread under the tension spring
4. Hold the bobbin case by the hinged latch
INSERTING THE NEEDLE
THREADING THE UPPER THREAD
THREAD TENSION
BRINGING UP THE BOBBIN THREAD
CUTTING THE THREAD
REVERSE SEWING
REMOVING THE FABRIC
NEEDLE, FABRIC SELECTION
MATCHING NEEDLE / FABRIC / THREAD
NEEDLE, FABRIC, THREAD SELECTION GUIDE
STRAIGHT STITCHING
Straight stitching center needle position
Straight stitching right needle position
Stitch length dial Stitch display Stitch selection dial
Stitch length dial
ZIGZAG STITCHING
Function of stitch length dial while zigzaging
HOW TO SEW BUTTONHOLES
Preparation
To prepare the fabric
Stitch length dial
Place stabilizer underneath for fine and stretchy fabrics
Tips
Slightly reduce upper thread tension to produce a satin stitch on top
BLIND HEM
Blind hem for stretch fabrics
ZIPPERS AND PIPING
3-STEP ZIG-ZAG
Patching
STITCH SELECTION
Triple straight stitch
Triple zig-zag
Stitch length dial Stitch length dial
MAINTENANCE
Cleaning the feed dog
Cleaning and lubricating the hook
Remove the stitch plate
TROUBLE SHOOTING GUIDE
Problem
Cause
Correction