ASSEMBLY
Open battery box door for:
•Inspection for secure connections (to tighten hard- ware).
•Inspection for corrosion.
•Testing battery.
•Jumping (if required).
•Periodic charging .
| DISCARD |
|
POSITIVE | TERMINAL |
|
PROTECTIVE |
| |
(RED) CABLE | CAPS |
|
| HEX | LOCK |
| WASHER | |
| NUT | |
| FLAT | |
|
| |
|
| WASHER |
|
| HEX |
|
| BOLT |
| NEGATIVE | |
| (BLACK) CABLE | |
FIG. 2
SEAT
PAN
BATTERY ![]()
![]()
![]()
![]()
![]()
BOX DOOR
FIG. 3
INSTALL SEAT (See Fig. 4)
Adjust seat before tightening adjustment knob.
•Remove cardboard packing on seat pan.
•Place seat on seat pan and assemble shoulder bolt. Tighten shoulder bolt securely.
•Assemble adjustment knob and flat washer loosely. Do not tighten.
•Lower seat into operating position and sit on seat.
•Slide seat until a comfortable position is reached which allows you to press clutch/brake pedal all the way down.
•Get off seat without moving its adjusted position.
•Raise seat and tighten adjustment knob securely.
SEAT
SEAT PAN
SHOULDER
BOLT
ADJUSTMENT | LARGE FLAT WASHER |
KNOB |
FIG. 4
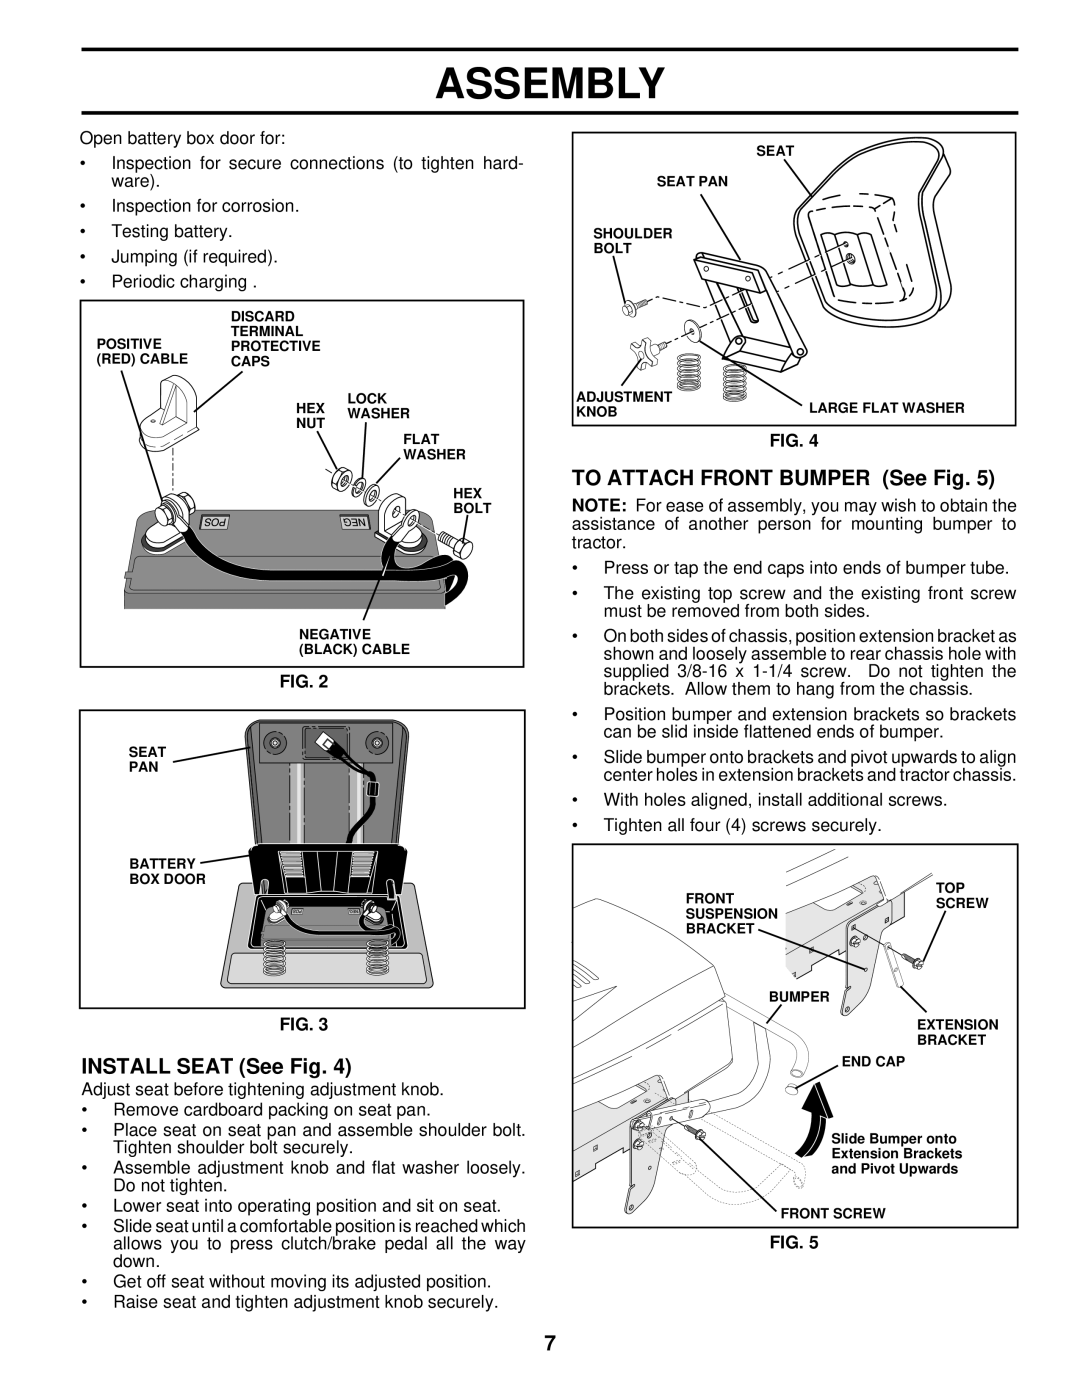
TO ATTACH FRONT BUMPER (See Fig. 5)
NOTE: For ease of assembly, you may wish to obtain the assistance of another person for mounting bumper to tractor.
•Press or tap the end caps into ends of bumper tube.
•The existing top screw and the existing front screw must be removed from both sides.
•On both sides of chassis, position extension bracket as shown and loosely assemble to rear chassis hole with supplied
•Position bumper and extension brackets so brackets can be slid inside flattened ends of bumper.
•Slide bumper onto brackets and pivot upwards to align center holes in extension brackets and tractor chassis.
•With holes aligned, install additional screws.
•Tighten all four (4) screws securely.
FRONT | TOP |
SCREW | |
SUSPENSION | |
BRACKET |
|
| BUMPER |
| EXTENSION |
| BRACKET |
| END CAP |
| Slide Bumper onto |
| Extension Brackets |
| and Pivot Upwards |
| FRONT SCREW |
FIG. 5
7