A

B


C


D

A

F


E

Install auger control rod

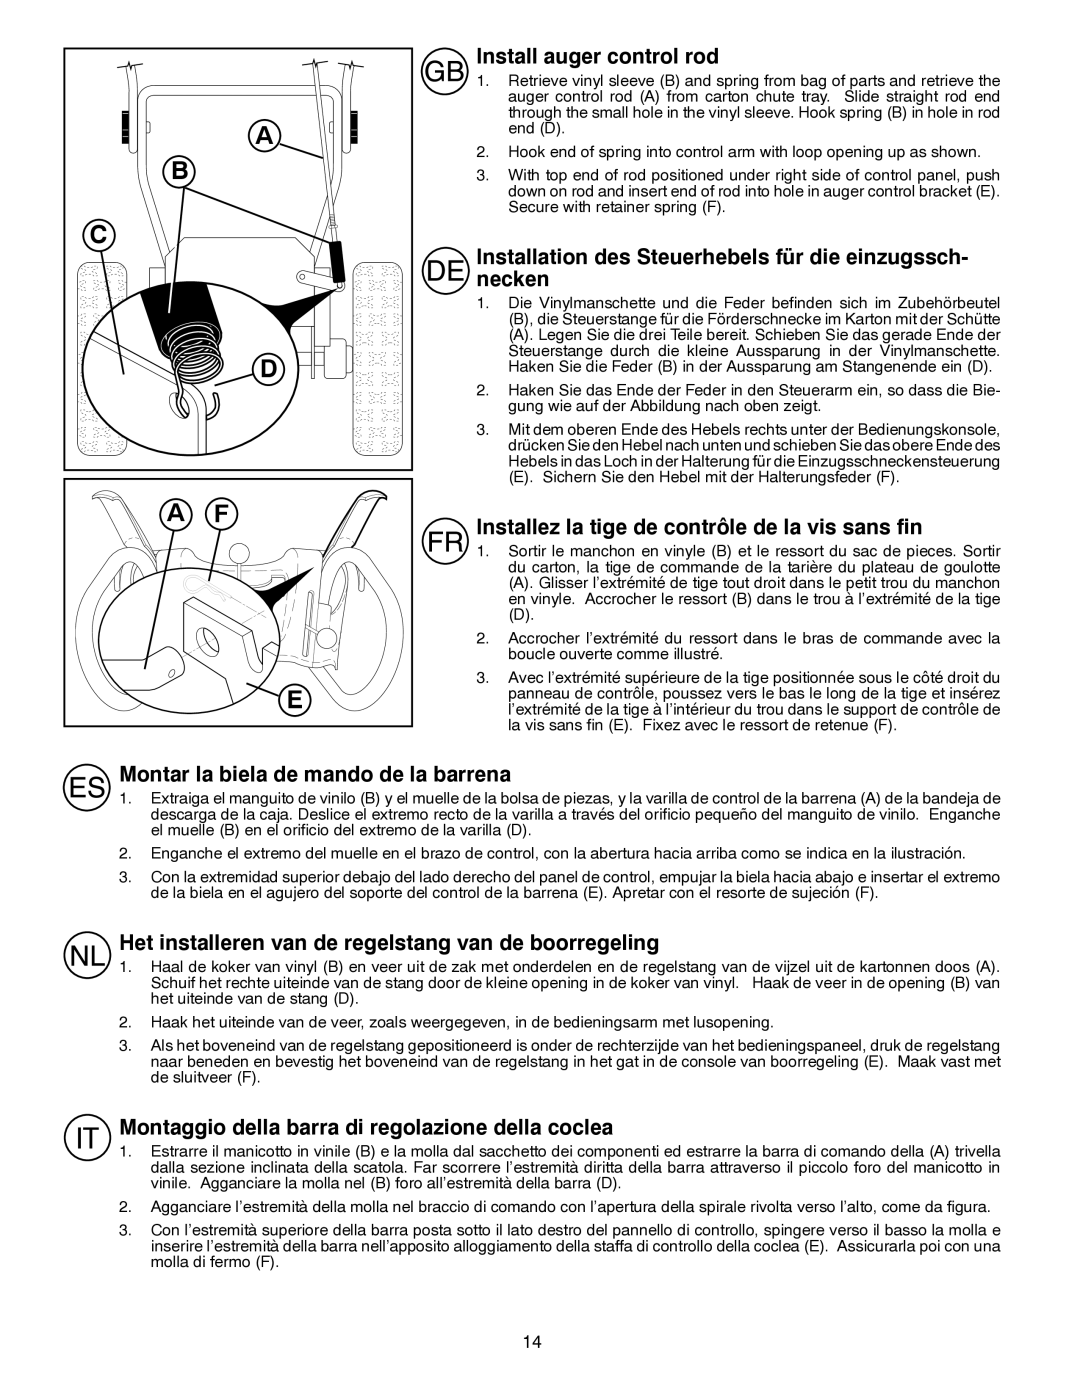
1.Retrieve vinyl sleeve (B) and spring from bag of parts and retrieve the auger control rod (A) from carton chute tray. Slide straight rod end through the small hole in the vinyl sleeve. Hook spring (B) in hole in rod end (D).

2.Hook end of spring into control arm with loop opening up as shown.

3.With top end of rod positioned under right side of control panel, push down on rod and insert end of rod into hole in auger control bracket (E). Secure with retainer spring (F).

Installation des Steuerhebels für die einzugssch- necken

1.Die Vinylmanschette und die Feder befinden sich im Zubehörbeutel (B), die Steuerstange für die Förderschnecke im Karton mit der Schütte

(A). Legen Sie die drei Teile bereit. Schieben Sie das gerade Ende der Steuerstange durch die kleine Aussparung in der Vinylmanschette. Haken Sie die Feder (B) in der Aussparung am Stangenende ein (D).

2.Haken Sie das Ende der Feder in den Steuerarm ein, so dass die Bie- gung wie auf der Abbildung nach oben zeigt.

3.Mit dem oberen Ende des Hebels rechts unter der Bedienungskonsole, drücken Sie den Hebel nach unten und schieben Sie das obere Ende des Hebels in das Loch in der Halterung für die Einzugsschneckensteuerung

(E). Sichern Sie den Hebel mit der Halterungsfeder (F).

Installez la tige de contrôle de la vis sans fin

1.Sortir le manchon en vinyle (B) et le ressort du sac de pieces. Sortir du carton, la tige de commande de la tarière du plateau de goulotte

(A). Glisser l’extrémité de tige tout droit dans le petit trou du manchon en vinyle. Accrocher le ressort (B) dans le trou à l’extrémité de la tige

(D).

2.Accrocher l’extrémité du ressort dans le bras de commande avec la boucle ouverte comme illustré.

3.Avec l’extrémité supérieure de la tige positionnée sous le côté droit du panneau de contrôle, poussez vers le bas le long de la tige et insérez l’extrémité de la tige à l’intérieur du trou dans le support de contrôle de la vis sans fin (E). Fixez avec le ressort de retenue (F).

Montar la biela de mando de la barrena

1.Extraiga el manguito de vinilo (B) y el muelle de la bolsa de piezas, y la varilla de control de la barrena (A) de la bandeja de descarga de la caja. Deslice el extremo recto de la varilla a través del orificio pequeño del manguito de vinilo. Enganche el muelle (B) en el orificio del extremo de la varilla (D).

2.Enganche el extremo del muelle en el brazo de control, con la abertura hacia arriba como se indica en la ilustración.

3.Con la extremidad superior debajo del lado derecho del panel de control, empujar la biela hacia abajo e insertar el extremo de la biela en el agujero del soporte del control de la barrena (E). Apretar con el resorte de sujeción (F).

Het installeren van de regelstang van de boorregeling

1.Haal de koker van vinyl (B) en veer uit de zak met onderdelen en de regelstang van de vijzel uit de kartonnen doos (A). Schuif het rechte uiteinde van de stang door de kleine opening in de koker van vinyl. Haak de veer in de opening (B) van het uiteinde van de stang (D).

2.Haak het uiteinde van de veer, zoals weergegeven, in de bedieningsarm met lusopening.

3.Als het boveneind van de regelstang gepositioneerd is onder de rechterzijde van het bedieningspaneel, druk de regelstang naar beneden en bevestig het boveneind van de regelstang in het gat in de console van boorregeling (E). Maak vast met de sluitveer (F).

Montaggio della barra di regolazione della coclea

1.Estrarre il manicotto in vinile (B) e la molla dal sacchetto dei componenti ed estrarre la barra di comando della (A) trivella dalla sezione inclinata della scatola. Far scorrere l’estremità diritta della barra attraverso il piccolo foro del manicotto in vinile. Agganciare la molla nel (B) foro all’estremità della barra (D).

2.Agganciare l’estremità della molla nel braccio di comando con l’apertura della spirale rivolta verso l’alto, come da figura.

3.Con l’estremità superiore della barra posta sotto il lato destro del pannello di controllo, spingere verso il basso la molla e inserire l’estremità della barra nell’apposito alloggiamento della staffa di controllo della coclea (E). Assicurarla poi con una molla di fermo (F).

14

Page 14
Image 14
Husqvarna ST261E instruction manual Install auger control rod, Installation des Steuerhebels für die einzugssch- necken

ST261E specifications

The Husqvarna ST261E is a powerful and versatile snow blower designed to tackle tough winter conditions with ease. This machine combines advanced technology with user-friendly features to deliver reliable performance, making it a favorite among homeowners and professionals alike.

One of the standout features of the ST261E is its robust 208cc engine. This powerful motor ensures high efficiency and reliable starting, even in cold weather. The electronic ignition system provides quick and easy starts without the hassle of priming or choking, making it perfect for those unexpected snowfalls.

The snow blower is equipped with a large 26-inch clearing width and a 23-inch intake height, allowing it to handle substantial amounts of snow in less time. Whether dealing with light flurries or heavy, wet snow, the ST261E is designed to clear paths quickly and efficiently. The adjustable skid shoes allow users to set the machine to different surfaces, ensuring optimal performance on driveways, sidewalks, and more.

One of the key innovations in the ST261E is its unique auger design. The heavy-duty auger is specially engineered to break up and throw snow with minimal effort, providing excellent throwing distance and reducing the risk of clogging. This feature is particularly useful when dealing with heavy, packed snow or icy conditions.

Furthermore, the snow blower includes a remote-controlled chute rotation, allowing operators to easily adjust the direction of snow discharge while on the move. This feature enhances maneuverability, enabling the user to effectively direct the snow where it needs to go without stopping the machine.

Comfort and ergonomics have not been overlooked in the design of the Husqvarna ST261E. The snow blower is equipped with an adjustable handle, allowing for optimal height adjustment to reduce fatigue during use. Additionally, the control panel is intuitively laid out, providing easy access to controls even while wearing gloves.

In conclusion, the Husqvarna ST261E is an outstanding option for those looking to conquer winter’s challenges. With its combination of power, innovative design, and user-friendly features, it ensures efficient snow removal, making it a reliable companion in the harshest of winter conditions. Whether for residential or light commercial use, the ST261E is engineered to deliver exceptional performance season after season.