Husqvarna ST261E instruction manual Install discharge chute / chute rotater head

Models: ST261E

1 64
Download 64 pages 41.64 Kb
Page 15
Image 15

A

G


F


C


D

B

E

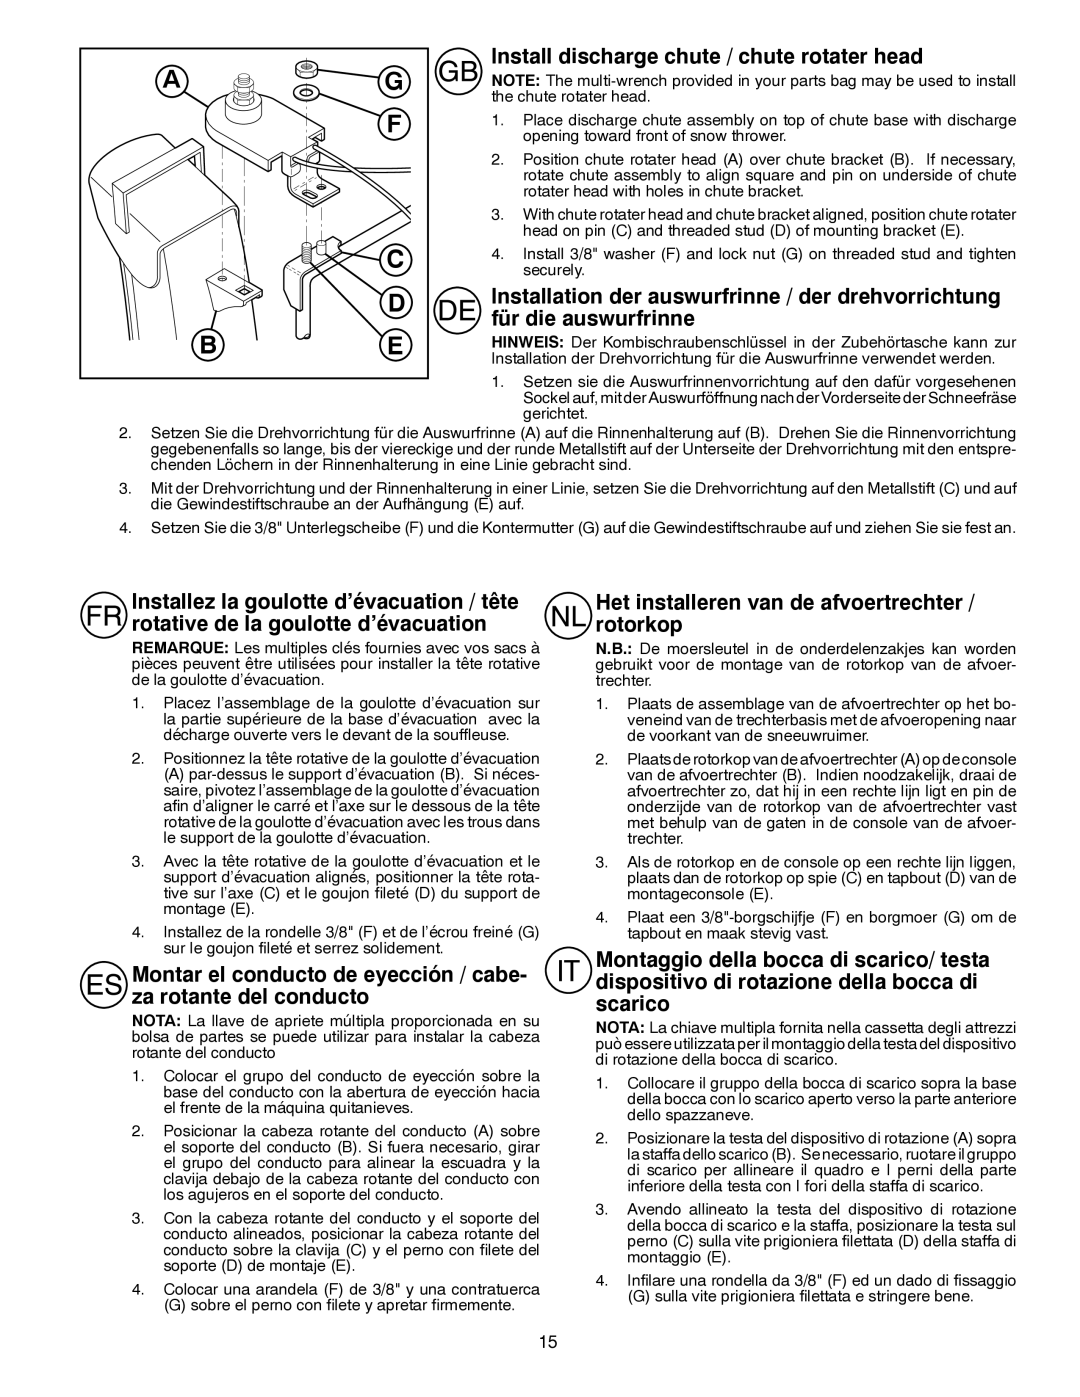
Install discharge chute / chute rotater head

NOTE: The multi-wrench provided in your parts bag may be used to install the chute rotater head.

1.Place discharge chute assembly on top of chute base with discharge opening toward front of snow thrower.

2.Position chute rotater head (A) over chute bracket (B). If necessary, rotate chute assembly to align square and pin on underside of chute rotater head with holes in chute bracket.

3.With chute rotater head and chute bracket aligned, position chute rotater head on pin (C) and threaded stud (D) of mounting bracket (E).

4.Install 3/8" washer (F) and lock nut (G) on threaded stud and tighten securely.

Installation der auswurfrinne / der drehvorrichtung für die auswurfrinne

HINWEIS: Der Kombischraubenschlüssel in der Zubehörtasche kann zur Installation der Drehvorrichtung für die Auswurfrinne verwendet werden.

1.Setzen sie die Auswurfrinnenvorrichtung auf den dafür vorgesehenen Sockel auf, mit der Auswurföffnung nach der Vorderseite der Schneefräse gerichtet.

2.Setzen Sie die Drehvorrichtung für die Auswurfrinne (A) auf die Rinnenhalterung auf (B). Drehen Sie die Rinnenvorrichtung gegebenenfalls so lange, bis der viereckige und der runde Metallstift auf der Unterseite der Drehvorrichtung mit den entspre- chenden Löchern in der Rinnenhalterung in eine Linie gebracht sind.

3.Mit der Drehvorrichtung und der Rinnenhalterung in einer Linie, setzen Sie die Drehvorrichtung auf den Metallstift (C) und auf die Gewindestiftschraube an der Aufhängung (E) auf.

4.Setzen Sie die 3/8" Unterlegscheibe (F) und die Kontermutter (G) auf die Gewindestiftschraube auf und ziehen Sie sie fest an.

Installez la goulotte d’évacuation / tête rotative de la goulotte d’évacuation

REMARQUE: Les multiples clés fournies avec vos sacs à pièces peuvent être utilisées pour installer la tête rotative de la goulotte d’évacuation.

1.Placez l’assemblage de la goulotte d’évacuation sur la partie supérieure de la base d’évacuation avec la décharge ouverte vers le devant de la souffleuse.

2.Positionnez la tête rotative de la goulotte d’évacuation

(A) par-dessus le support d’évacuation (B). Si néces- saire, pivotez l’assemblage de la goulotte d’évacuation afin d’aligner le carré et l’axe sur le dessous de la tête rotative de la goulotte d’évacuation avec les trous dans le support de la goulotte d’évacuation.

3.Avec la tête rotative de la goulotte d’évacuation et le support d’évacuation alignés, positionner la tête rota- tive sur l’axe (C) et le goujon fileté (D) du support de montage (E).

4.Installez de la rondelle 3/8" (F) et de l’écrou freiné (G) sur le goujon fileté et serrez solidement.

Montar el conducto de eyección / cabe- za rotante del conducto

NOTA: La llave de apriete múltipla proporcionada en su bolsa de partes se puede utilizar para instalar la cabeza rotante del conducto

1.Colocar el grupo del conducto de eyección sobre la base del conducto con la abertura de eyección hacia el frente de la máquina quitanieves.

2.Posicionar la cabeza rotante del conducto (A) sobre el soporte del conducto (B). Si fuera necesario, girar el grupo del conducto para alinear la escuadra y la clavija debajo de la cabeza rotante del conducto con los agujeros en el soporte del conducto.

3.Con la cabeza rotante del conducto y el soporte del conducto alineados, posicionar la cabeza rotante del conducto sobre la clavija (C) y el perno con filete del soporte (D) de montaje (E).

4.Colocar una arandela (F) de 3/8" y una contratuerca

(G) sobre el perno con filete y apretar firmemente.

Het installeren van de afvoertrechter / rotorkop

N.B.: De moersleutel in de onderdelenzakjes kan worden gebruikt voor de montage van de rotorkop van de afvoer- trechter.

1.Plaats de assemblage van de afvoertrechter op het bo- veneind van de trechterbasis met de afvoeropening naar de voorkant van de sneeuwruimer.

2.Plaats de rotorkop van de afvoertrechter (A) op de console van de afvoertrechter (B). Indien noodzakelijk, draai de afvoertrechter zo, dat hij in een rechte lijn ligt en pin de onderzijde van de rotorkop van de afvoertrechter vast met behulp van de gaten in de console van de afvoer- trechter.

3.Als de rotorkop en de console op een rechte lijn liggen, plaats dan de rotorkop op spie (C) en tapbout (D) van de montageconsole (E).

4.Plaat een 3/8"-borgschijfje (F) en borgmoer (G) om de tapbout en maak stevig vast.

Montaggio della bocca di scarico/ testa dispositivo di rotazione della bocca di scarico

NOTA: La chiave multipla fornita nella cassetta degli attrezzi può essere utilizzata per il montaggio della testa del dispositivo di rotazione della bocca di scarico.

1.Collocare il gruppo della bocca di scarico sopra la base della bocca con lo scarico aperto verso la parte anteriore dello spazzaneve.

2.Posizionare la testa del dispositivo di rotazione (A) sopra la staffa dello scarico (B). Se necessario, ruotare il gruppo di scarico per allineare il quadro e I perni della parte inferiore della testa con I fori della staffa di scarico.

3.Avendo allineato la testa del dispositivo di rotazione della bocca di scarico e la staffa, posizionare la testa sul perno (C) sulla vite prigioniera filettata (D) della staffa di montaggio (E).

4.Infilare una rondella da 3/8" (F) ed un dado di fissaggio

(G) sulla vite prigioniera filettata e stringere bene.

15

Page 15
Image 15
Husqvarna ST261E Install discharge chute / chute rotater head, Het installeren van de afvoertrechter / rotorkop

ST261E specifications

The Husqvarna ST261E is a powerful and versatile snow blower designed to tackle tough winter conditions with ease. This machine combines advanced technology with user-friendly features to deliver reliable performance, making it a favorite among homeowners and professionals alike.

One of the standout features of the ST261E is its robust 208cc engine. This powerful motor ensures high efficiency and reliable starting, even in cold weather. The electronic ignition system provides quick and easy starts without the hassle of priming or choking, making it perfect for those unexpected snowfalls.

The snow blower is equipped with a large 26-inch clearing width and a 23-inch intake height, allowing it to handle substantial amounts of snow in less time. Whether dealing with light flurries or heavy, wet snow, the ST261E is designed to clear paths quickly and efficiently. The adjustable skid shoes allow users to set the machine to different surfaces, ensuring optimal performance on driveways, sidewalks, and more.

One of the key innovations in the ST261E is its unique auger design. The heavy-duty auger is specially engineered to break up and throw snow with minimal effort, providing excellent throwing distance and reducing the risk of clogging. This feature is particularly useful when dealing with heavy, packed snow or icy conditions.

Furthermore, the snow blower includes a remote-controlled chute rotation, allowing operators to easily adjust the direction of snow discharge while on the move. This feature enhances maneuverability, enabling the user to effectively direct the snow where it needs to go without stopping the machine.

Comfort and ergonomics have not been overlooked in the design of the Husqvarna ST261E. The snow blower is equipped with an adjustable handle, allowing for optimal height adjustment to reduce fatigue during use. Additionally, the control panel is intuitively laid out, providing easy access to controls even while wearing gloves.

In conclusion, the Husqvarna ST261E is an outstanding option for those looking to conquer winter’s challenges. With its combination of power, innovative design, and user-friendly features, it ensures efficient snow removal, making it a reliable companion in the harshest of winter conditions. Whether for residential or light commercial use, the ST261E is engineered to deliver exceptional performance season after season.