
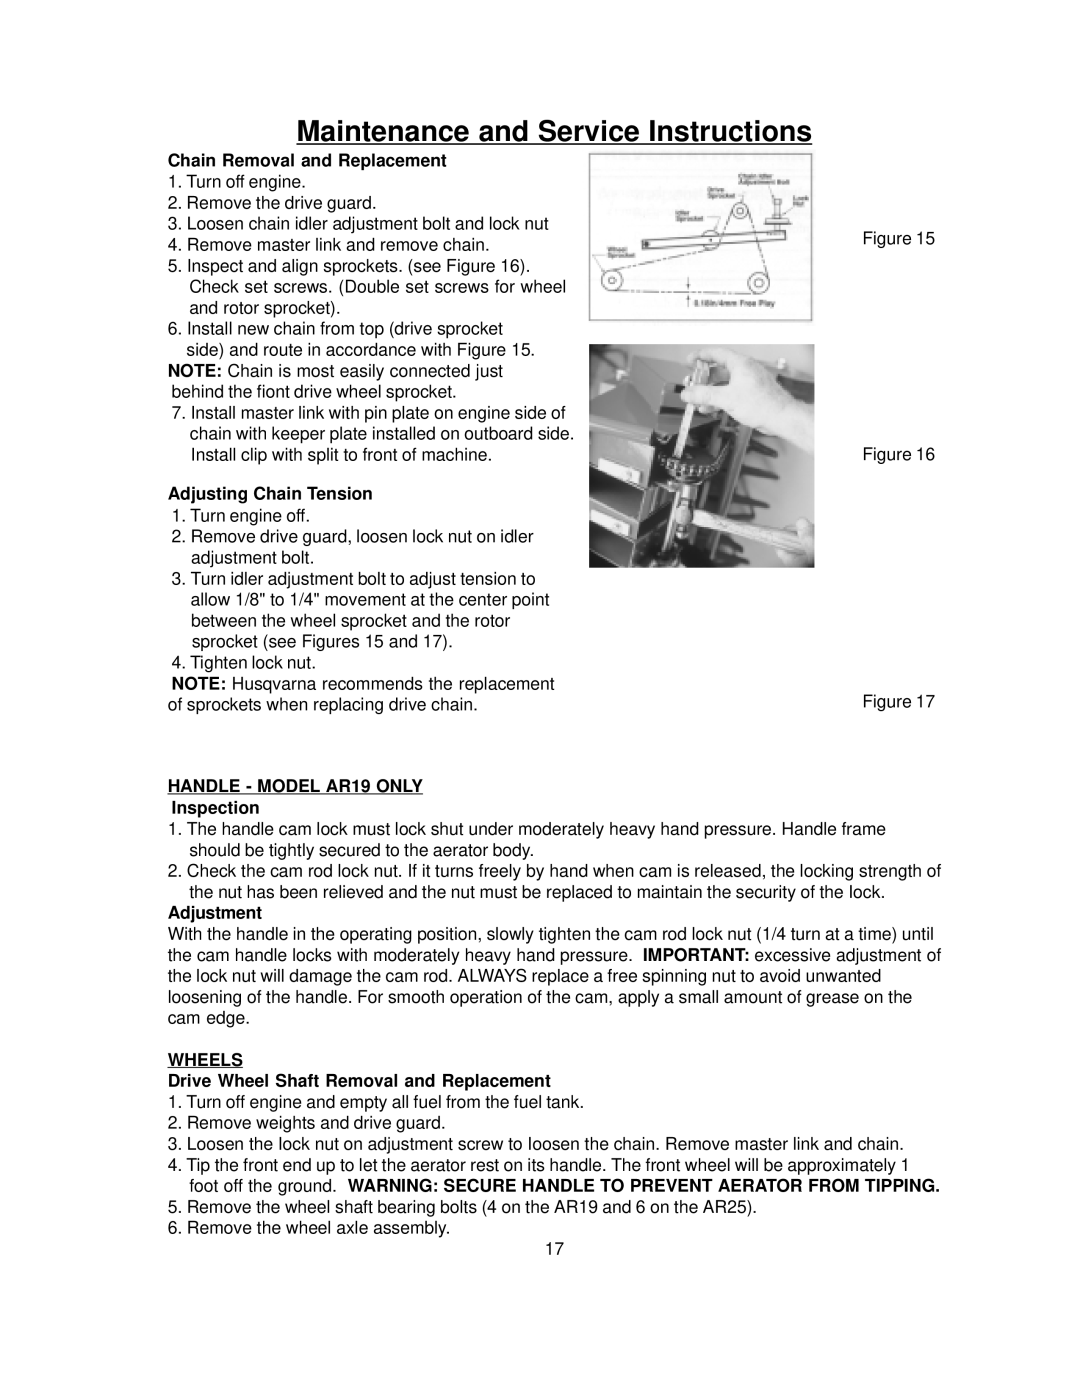
AR19, AR25, TA36 specifications
The Husqvarna TA36, AR19, and AR25 are notable products in the extensive line-up from the renowned manufacturer Husqvarna, known for its high-performance outdoor power equipment. Each model is designed to cater to specific user needs while embodying the brand's commitment to quality, innovation, and efficiency.The Husqvarna TA36 is a robust and versatile tiller ideal for both home gardeners and professional landscapers. Its powerful engine ensures efficient soil cultivation, while its durable design allows for easy maneuverability in various terrains. The TA36 features adjustable tine depths, allowing users to customize their tilling experience based on the type of soil and desired results. The ergonomically designed handles provide comfort during operation, significantly reducing operator fatigue. Additionally, the quick-release tines enable easy switching and maintenance, making the TA36 a user-friendly option for anyone looking to enhance their gardening experience.
The Husqvarna AR19, on the other hand, stands out as an exceptional backpack battery blower. Designed for maximum ease of use, its lightweight construction allows for extended hours of operation without compromising comfort. The AR19 operates with Husqvarna's advanced battery technology, which provides longer run times and quicker charging times compared to traditional gas-powered blowers. Its high-efficiency brushless motor delivers impressive airflow, making it suitable for both residential and commercial tasks. Furthermore, the AR19 features low noise levels, ensuring a quieter work environment, an important consideration for residential settings and public areas.
Meanwhile, the Husqvarna AR25 represents a step up in power and capability among the battery-powered blowers. Equipped with enhanced airflow dynamics, the AR25 efficiently clears leaves and debris from large areas. Its aerodynamic design not only improves performance but also contributes to energy savings during operation. Like the AR19, the AR25 benefits from Husqvarna's innovative battery technology, allowing for seamless integration with other tools in their battery range. Users can enjoy the convenience of interchangeable batteries, facilitating a more productive work experience. The AR25 comes with intuitive controls, easy handling, and an adjustable nozzle for precise blowing, making it perfect for tackling tough tasks efficiently.
In summary, the Husqvarna TA36, AR19, and AR25 embody the perfect blend of power, efficiency, and user-centric design. Whether it’s cultivating soil with the TA36, managing leaf debris with the AR19, or benefiting from the enhanced performance of the AR25, Husqvarna continues to push the boundaries of outdoor equipment technology, ensuring users get the most effective tools for their gardening and landscaping needs. Each model represents a commitment to durability and performance, making them essential additions to any outdoor toolkit.