Ikelite Digital Housing
i n s t r u c t i o n m a n u a l
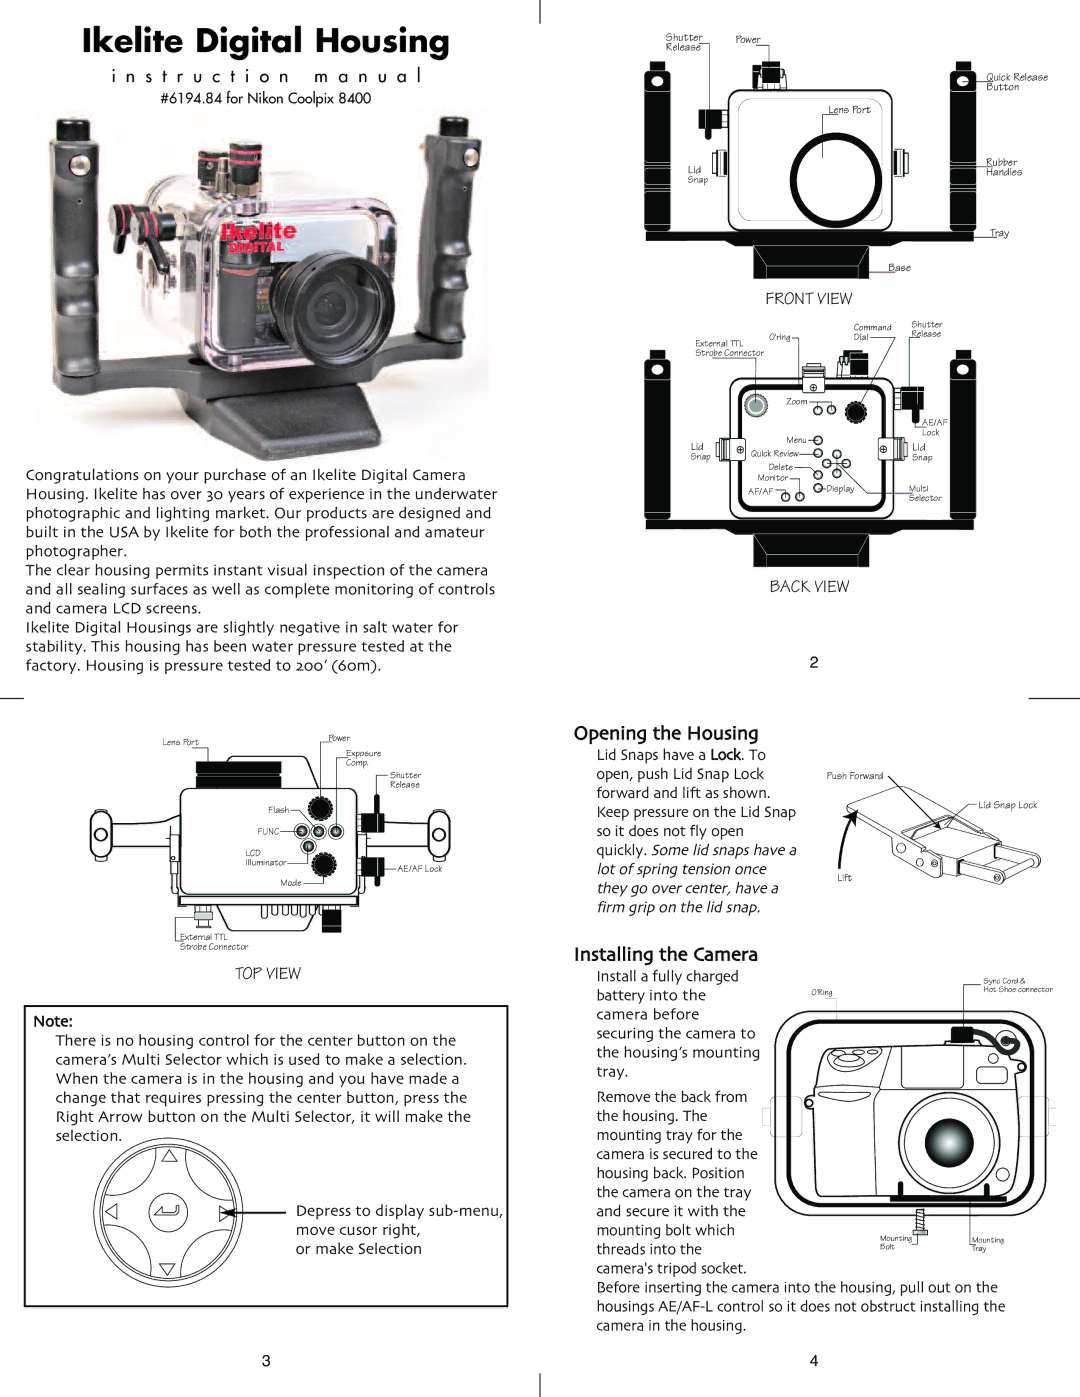
#6194.84 for Nikon Coolpix 8400
Congratulations on your purchase of an Ikelite Digital Camera Housing. Ikelite has over 30 years of experience in the underwater photographic and lighting market. Our products are designed and built in the USA by Ikelite for both the professional and amateur photographer.
The clear housing permits instant visual inspection of the camera and all sealing surfaces as well as complete monitoring of controls and camera LCD screens.
Ikelite Digital Housings are slightly negative in salt water for stability. This housing has been water pressure tested at the factory. Housing is pressure tested to 200’ (60m).
Shutter Power
Release
Lens Port
Lid
Snap
Base
FRONT VIEW
|
| Command | Shutter |
External TTL | O'ring | Dial | Release |
| |||
|
|
| |
Strobe Connector |
|
| |
| Zoom |
|
|
|
|
| AE/AF |
| Menu |
| Lock |
Lid |
| Lid | |
Quick Review |
| ||
Snap |
| Snap | |
Delete |
| ||
|
|
| |
| Monitor | Display | Multi |
| AF/AF | ||
|
|
| Selector |
BACK VIEW
Lens Port |
|
| Power | |||||
|
|
|
| Exposure | ||||
|
|
|
|
|
|
| ||
|
|
|
|
|
|
|
| Comp. |
|
|
|
|
|
|
|
| |
Shutter
Release
Flash
FUNC ![]()
![]()
![]()
LCD
Illuminator
AE/AF Lock
Mode
Opening the Housing Lid Snaps have a Lock. To open, push Lid Snap Lock forward and lift as shown.
Keep pressure on the Lid Snap so it does not fly open quickly. Some lid snaps have a lot of spring tension once they go over center, have a firm grip on the lid snap.
2
Push Forward
Lift
External TTL
Strobe Connector
TOP VIEW
Note:
There is no housing control for the center button on the camera’s Multi Selector which is used to make a selection. When the camera is in the housing and you have made a change that requires pressing the center button, press the Right Arrow button on the Multi Selector, it will make the selection.
Depress to display
or make Selection
3
Installing the Camera
Install a fully charged |
| Sync Cord & |
| Hot Shoe connector | |
battery into the | O'Ring |
|
camera before |
|
|
securing the camera to |
|
|
the housing’s mounting |
|
|
tray. |
|
|
Remove the back from |
|
|
the housing. The |
|
|
mounting tray for the |
|
|
camera is secured to the |
|
|
housing back. Position |
|
|
the camera on the tray |
|
|
and secure it with the |
|
|
mounting bolt which | Mounting | Mounting |
threads into the | Bolt | Tray |
camera's tripod socket. |
|
|
Before inserting the camera into the housing, pull out on the housings
4