Orion Website
Customer Service
Teléfono
Sitio WEB DE Orion
Important Safeguards
English
Contents
Features
Power source
To USE AC Power Source
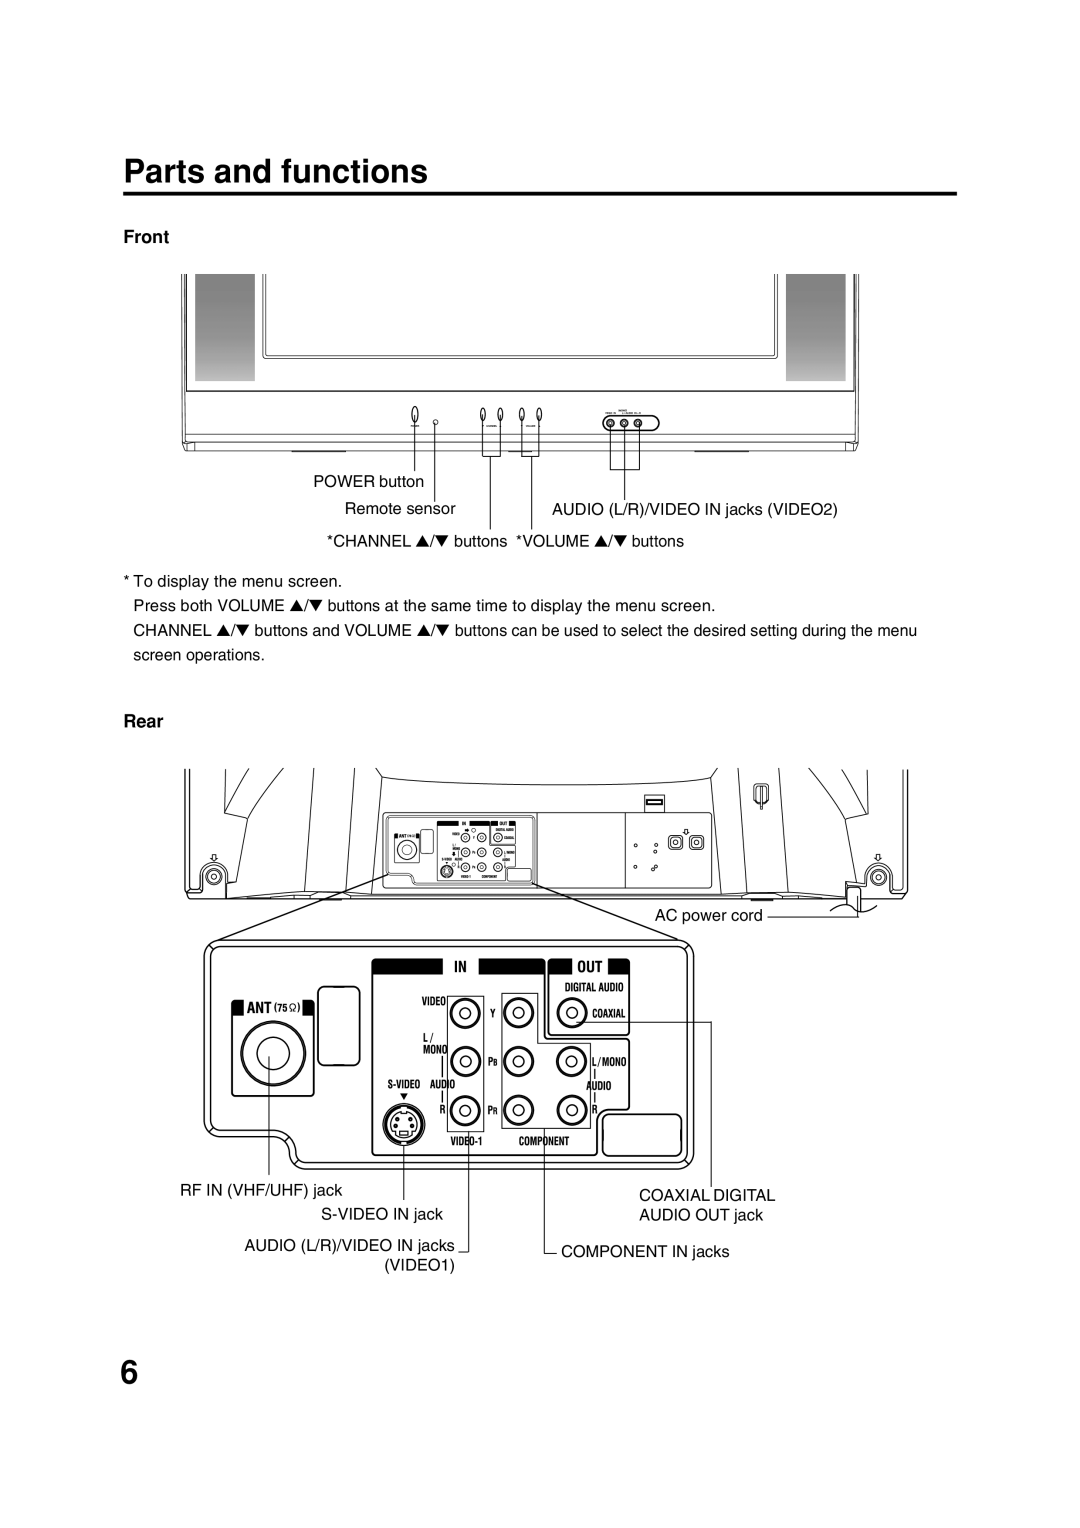
Rear
Parts and functions
Front
Coaxial Digital
Remote control
Count up 10 minutes each time the button is pressed
Antenna connections
Matching
Cable TV connections
To connect the TV to a VCR
Connections to other equipment
Selecting the video input source
To connect the TV to a VCR with an S-Video cord
To connect the TV to a DVD player with component video
Connections to other equipment
To connect the TV to a DVD player/Satellite receiver
To connect the TV to a DTV receiver/set-top box
Using an AV Amplifier with built-in digital surround
Coaxial Digital Audio Output
Front of the TV
To connect the TV to a camcorder
To connect the TV to a Game
To Audio/Video OUT Audio/Video cord not supplied
Starting setup
Enter
Setting the language
Press or to select Language
TV/CABLE selection
Cable Chart
Memorizing channels
Press or to select TV/CABLE
To add/delete channels
Automatic memory tuning
Memorizing channels
Memory
To Select Analog Channels
TV operation
Press the Direct Channel Selection
To Select Digital Channels
TV operation
Setting the V-Chip
To register a password
Enter the same password again to confirm, then press
Setting the V-Chip
To set the V-CHIP
To change the password
Your password, then press Enter
Locking channels
Locks menu appears
Locking the video inputs
Component
To lock the front panel
Setting the front panel lock
You also can unlock the front panel using the menus
To unlock the front panel
Labeling channels
To create channel labels
To erase channel labels
Setting the clock
Example Setting the clock to 830 AM, 25 th SAT March
Press MENU, then Press or to select Setup menu
Setting the on timer
Preparation
Option
OFF Timer
Setting the off timer
Enable or disable the ON/OFF Timer function
Timer
Picture size
Setting the picture size
Selecting the picture size
Zoom picture size for 169 format programs
Tint
RESET, then press
Center
Max
Closed Caption
C3, C4, T1, T2, T3, T4 and OFF
CC advanced
This feature is designed to customize Digital Captions only
Press To select Item you want to adjust, then
Press or to select CC ADVANCED, then press CC Advanced menu
Audio
To listen to a second audio program SAP
To select
Press To select
MTS Stereo
Press MENU, then Press or to select Audio menu
Audio Language
PCM
Press or to check Digital-signal strength
Checking the Digital-signal strength
Press MENU, then press or to select Setup menu
Signal meter feature is not available for analog channels
Troubleshooting
Symptoms Possible Solutions
Accessory
This warranty does not cover
Orion SALES, INC N. Union DR
OLNEY, Illinois
Para SU Seguridad
Alambre DE Entrada DE
Para SU Seguridad
Solución de problemas Especificaciones
Índice
Control Remoto
Para Utilizar Corriente Alterna CA
Características
Fuente de alimentación
Notas
Vista posterior
Partes y sus funciones
Vista frontal
VIDEO1
Control Remoto
Precauciones Para LAS Pilas
Combinador
Conexiones de la antena
Jack de
UHF 300 ohmios VHF 300 ohmios
Conexiones de TV cable
Jack de antena
Convertidor/Decodificador Divisor
Para conectar el TV a una videograbadora
Conexiones a otros equipos
Selección de la fuente de entrada de vídeo
Para conectar el TV a un VCR con una toma S-VIDEO
Conexiones a otros equipos
Vídeo Audio Entrada de
Component Atrás del TV
Altavoz
Frente del aparato
Para conectar la unidad a la videocámara
Para conectar el televisor a un sistema de juegos de vídeo
Salida de Audio/Vídeo Cable de Audio/Vídeo no suministrado
Configuración inicial
Presione o para seleccionar Language
Setup
Selección de idioma
Presione Exit para volver a la imagen normal
Presione o para seleccionar TV/CABLE
Memorización de canales
Selección de TV/CABLE
Presione o para seleccionar TV o Cable
Para agregar/borrar canales
Memorización de canales Continuación
Sintonizacion de memoria automática de canal
ADD/DELETE
Para Seleccionar Canales Digitales
Operaci-n del TV
Para Seleccionar Canales
Canales DE VHF/UHF/CABLE
Operación del TV Continuación
Ajuste del Chip-V
Para registre contraseña
Aparece en lugar del número
TV-Y
Ajuste del Chip-V Continuación
Para ajustar el Chip-V
Chip
Para cambiar la contraseña
Entre la contraseña nueva con los botones
Numéricos 0 a 9 y presione Enter
Bloqueando los canales
Presione MENU, luego presione Para desplegar el menú de
Locks
VIDEO2, Component
Bloqueando la entrada de video
Presione Para desplegar El modo que entra de la Contraseña
Video + Bloquea VIDEO1, VIDEO2, COMPONENT, canal
Para desbloquear el panel frontal
Configuración del bloqueo del panel frontal
Para bloquear el panel frontal
Puede desbloquear el panel frontal mediante los menús
Para asignar etiquetas a los canales
Para crear etiquetas de canal
Para borrar las etiquetas de canal
En el momento adecuado
Ajuste del reloj
Ejemplo Ajustando el reloj a 830 AM, Sábado 25 de marzo de
Fije el DÍA, el AÑO y la Hora como en el paso
Para ajustar el temporizador de conexión
Preparación
ON/OFF Timer
Para activar o desactivar la función ON/OFF Timer
Para confirmar el ON/OFF Timer Presione -/DISPLAY para
Para ajustar el temporizador de desconexión
Tamaño 43 de la imagen
Configuración del tamaño de la imagen
Seleccionando el tamaño de la imagen
Tamaño 169 de la imagen
Presione Para Seleccionar RESET, luego
Subtítulos
C3, C4, T1, T2, T3, T4 y OFF
Subtítulos avanzados
Para escuchar un Programa de Audio Secundario SAP
Presione o para seleccionar STR Estéreo
Selección del idioma del audio
Presione MENU, luego Presione o para Seleccionar menú de
Cómo comprobar la potencia de la señal digital
Puede ver el indicador de señal digital
Solución de Problemas
Síntoma Posible Solución
Especificaciones
Accesorio
Nota Esta garantía quedará nula cuando el producto
Esta garantía no cubre
Memo
Memo
J3W40621B SH 06/03