Mount the Control Box

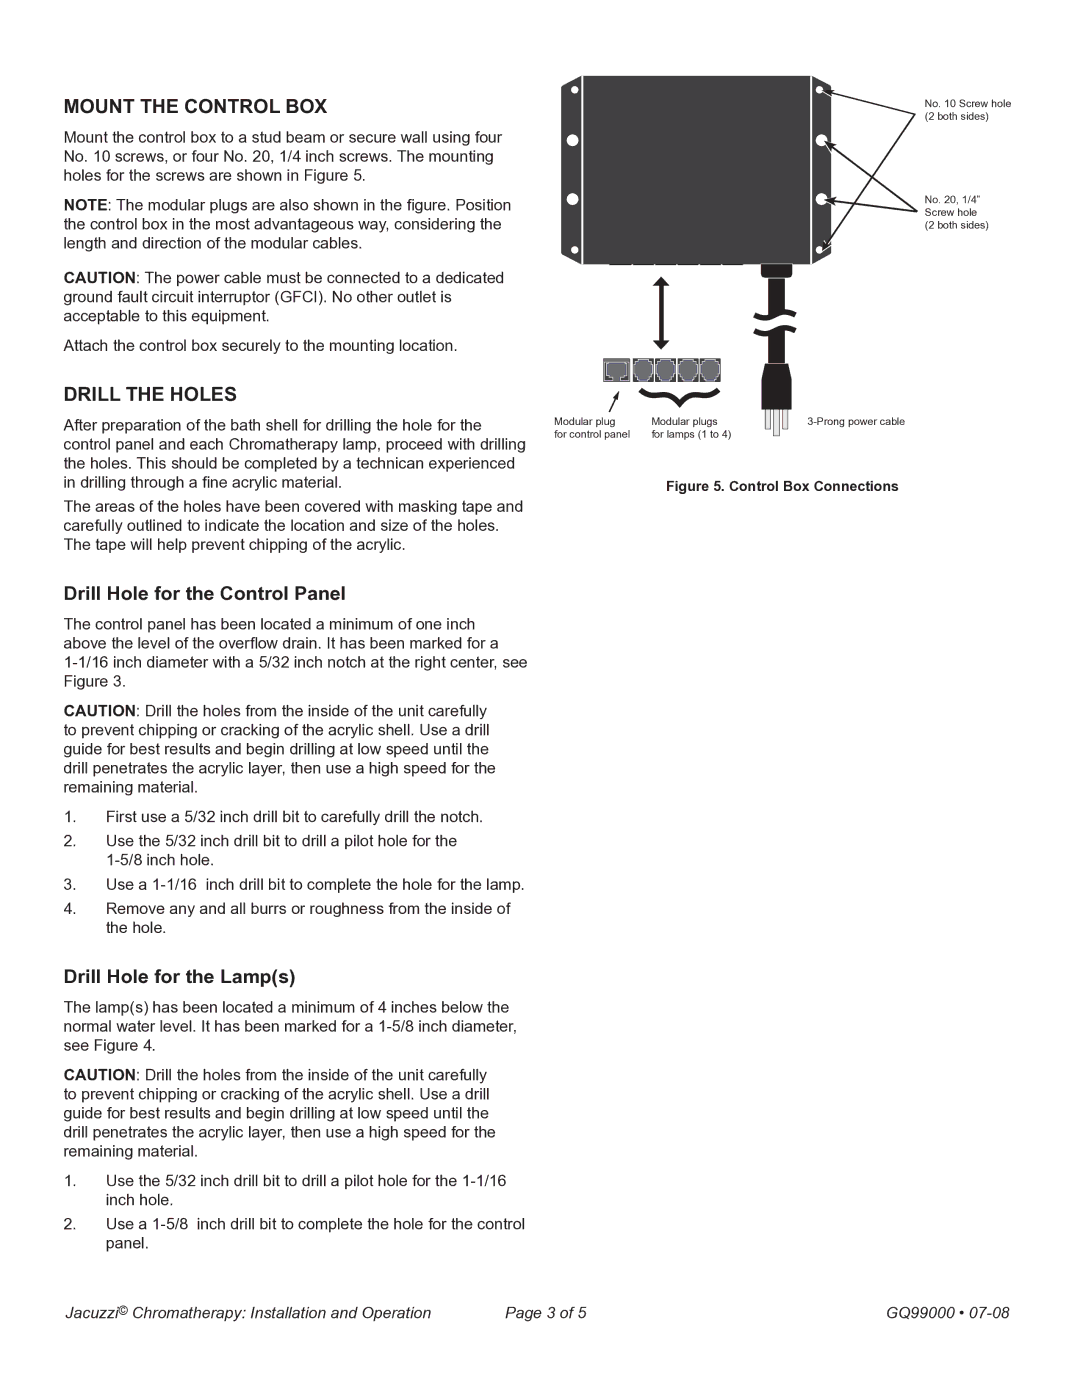
Mount the control box to a stud beam or secure wall using four No. 10 screws, or four No. 20, 1/4 inch screws. The mounting holes for the screws are shown in Figure 5.

NOTE: The modular plugs are also shown in the figure. Position the control box in the most advantageous way, considering the length and direction of the modular cables.

CAUTION: The power cable must be connected to a dedicated ground fault circuit interruptor (GFCI). No other outlet is acceptable to this equipment.

Attach the control box securely to the mounting location.

drill the holes

After preparation of the bath shell for drilling the hole for the control panel and each Chromatherapy lamp, proceed with drilling the holes. This should be completed by a technican experienced in drilling through a fine acrylic material.

The areas of the holes have been covered with masking tape and carefully outlined to indicate the location and size of the holes. The tape will help prevent chipping of the acrylic.

Drill Hole for the Control Panel

The control panel has been located a minimum of one inch above the level of the overflow drain. It has been marked for a

1-1/16 inch diameter with a 5/32 inch notch at the right center, see Figure 3.

CAUTION: Drill the holes from the inside of the unit carefully to prevent chipping or cracking of the acrylic shell. Use a drill guide for best results and begin drilling at low speed until the drill penetrates the acrylic layer, then use a high speed for the remaining material.

1.First use a 5/32 inch drill bit to carefully drill the notch.

2.Use the 5/32 inch drill bit to drill a pilot hole for the 1‑5/8 inch hole.

3.Use a 1-1/16 inch drill bit to complete the hole for the lamp.

4.Remove any and all burrs or roughness from the inside of the hole.

Drill Hole for the Lamp(s)

The lamp(s) has been located a minimum of 4 inches below the normal water level. It has been marked for a 1-5/8 inch diameter, see Figure 4.

CAUTION: Drill the holes from the inside of the unit carefully to prevent chipping or cracking of the acrylic shell. Use a drill guide for best results and begin drilling at low speed until the drill penetrates the acrylic layer, then use a high speed for the remaining material.

1.Use the 5/32 inch drill bit to drill a pilot hole for the 1-1/16 inch hole.

2.Use a 1-5/8 inch drill bit to complete the hole for the control panel.

No. 10 Screw hole (2 both sides)

No. 20, 1/4” Screw hole (2 both sides)

Modular plug

Modular plugs


3-Prong power cable

for control panel

for lamps (1 to 4)


Figure 5. Control Box Connections

Jacuzzi© Chromatherapy: Installation and Operation

Page  of 5

GQ99000 • 07-08

Page 3
Image 3
Jacuzzi GQ99000 manual Mount the Control Box, Drill the holes, Drill Hole for the Control Panel, Drill Hole for the Lamps

GQ99000 specifications

The Jacuzzi GQ99000 is a luxurious spa that combines modern design with advanced technologies for an unparalleled relaxation experience. This hot tub is perfect for those who want to unwind after a long day or enjoy quality time with family and friends.

One of the standout features of the GQ99000 is its spacious design, accommodating up to six people comfortably. The ergonomic seating arrangement ensures that every bather experiences maximum comfort. The strategically placed jets provide a therapeutic massage experience, targeting specific muscle groups to relieve tension and stress.

The GQ99000 is equipped with a state-of-the-art hydrotherapy system that utilizes adjustable jets for a customizable massage experience. Users can easily control the intensity and direction of the jets to focus on sore areas, promoting relaxation and recovery. This system is complemented by a built-in heater that maintains the water temperature, allowing users to enjoy their spa experience at a consistent and comfortable level.

In terms of technology, the Jacuzzi GQ99000 features a user-friendly digital control panel that provides easy access to all functions. This allows users to adjust the temperature, control the jet settings, and even set timers for automatic shut-off. The system is designed for convenient operation, making it suitable for both experienced spa users and beginners.

Energy efficiency is another key characteristic of the GQ99000. The spa is designed with high-quality insulation and efficient heaters that minimize energy consumption, making it an eco-friendly option for those conscious of their environmental impact. This energy-efficient design ensures that the spa remains cost-effective in the long run.

The GQ99000 also boasts a stunning aesthetic appeal. With its sleek lines and modern finish, it easily complements any outdoor setting. The spa is available in various color options to match the user’s personal style. Additionally, it features integrated LED lighting, creating a wonderful ambiance for nighttime use.

Overall, the Jacuzzi GQ99000 is a perfect blend of comfort, technology, and aesthetic appeal. With its spacious seating, customizable hydrotherapy options, user-friendly controls, energy efficiency, and beautiful design, it stands out as an excellent choice for anyone looking to elevate their outdoor relaxation experience. Whether for personal enjoyment or social gatherings, the GQ99000 promises to deliver both luxury and therapeutic benefits.