|
|
|
| |
|
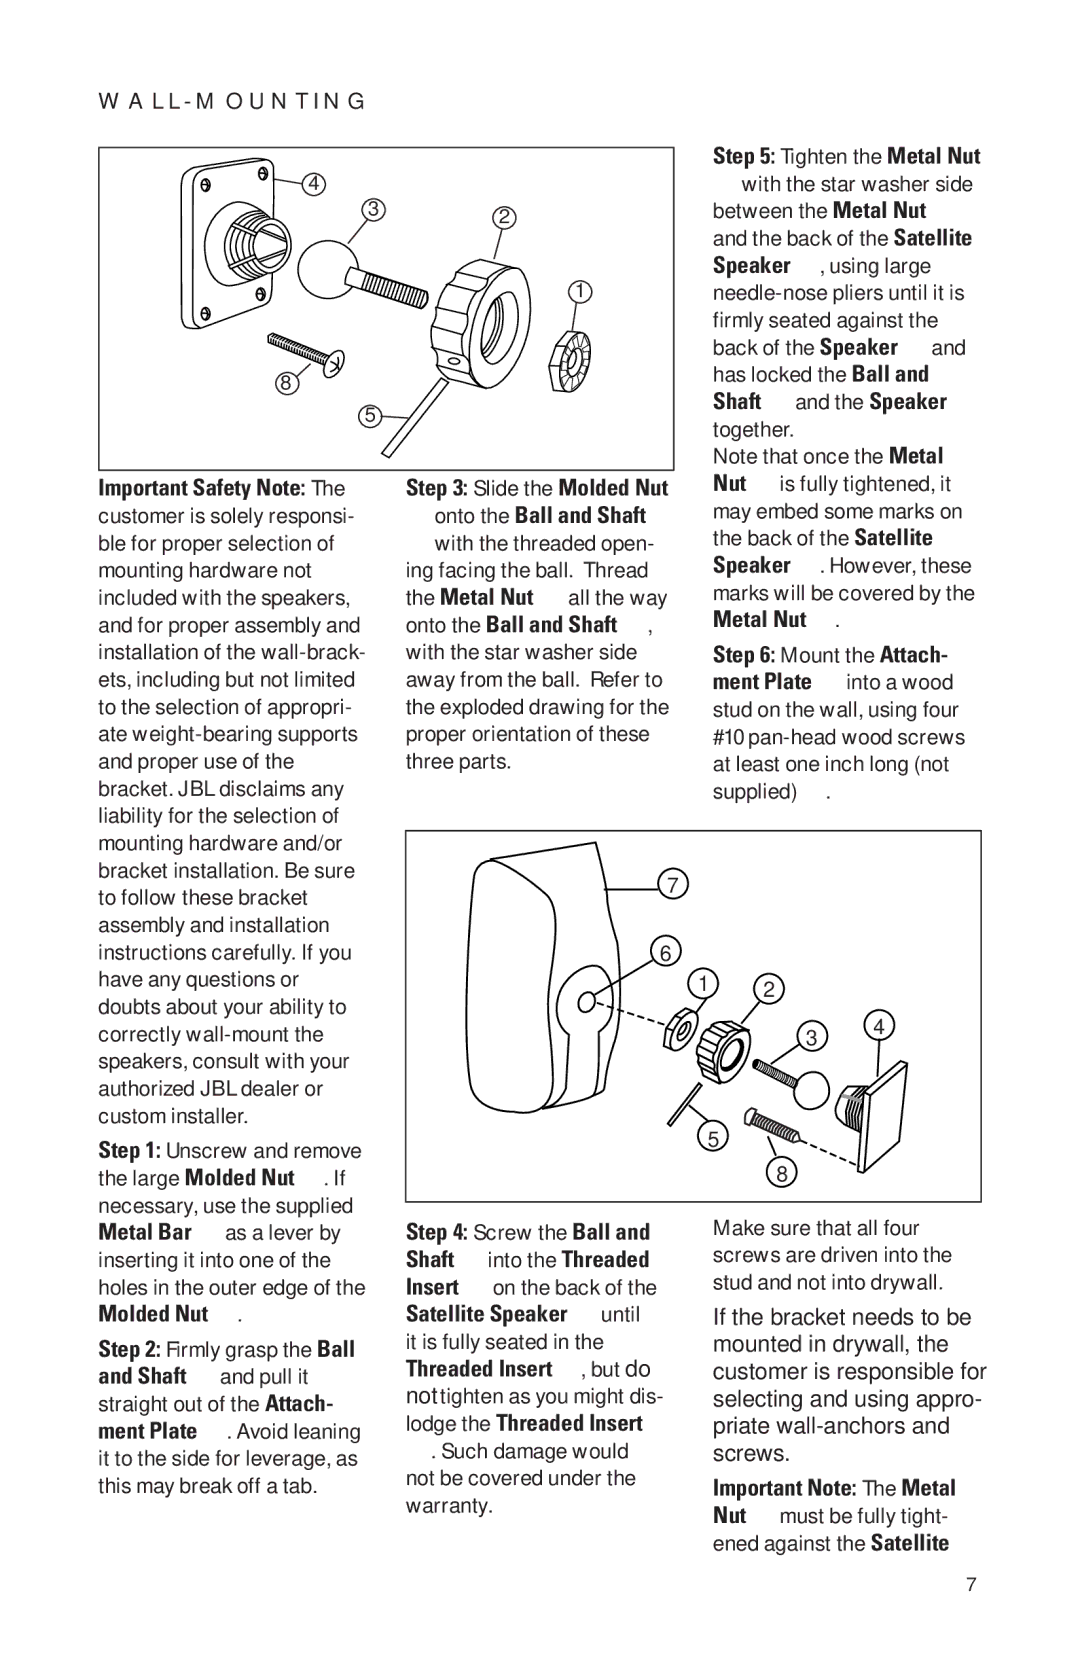
| Step 5: Tighten the Metal Nut | ||
4 |
| ¡ with the star washer side | ||
3 | 2 | between the Metal Nut ¡ | ||
|
| and the back of the Satellite | ||
|
| Speaker ¶, using large | ||
| 1 | |||
|
| firmly seated against the | ||
|
| back of the Speaker ¶ and | ||
8 |
| has locked the Ball and | ||
| Shaft £ and the Speaker ¶ | |||
5 |
| |||
| together. |
| ||
|
|
| ||
|
| Note that once the Metal | ||
Important Safety Note: The | Step 3: Slide the Molded Nut | Nut ¡ is fully tightened, it | ||
customer is solely responsi- | ™ onto the Ball and Shaft | may embed some marks on | ||
ble for proper selection of | £ with the threaded open- | the back of the Satellite | ||
mounting hardware not | ing facing the ball. Thread | Speaker ¶. However, these | ||
included with the speakers, | the Metal Nut ¡ all the way | marks will be covered by the | ||
and for proper assembly and | onto the Ball and Shaft £, | Metal Nut ¡. |
| |
installation of the | with the star washer side | Step 6: Mount the Attach- | ||
ets, including but not limited | away from the ball. Refer to | ment Plate ¢ into a wood | ||
to the selection of appropri- | the exploded drawing for the | stud on the wall, using four | ||
ate | proper orientation of these | #10 | ||
and proper use of the | three parts. | at least one inch long (not | ||
bracket. JBL disclaims any |
| supplied) •. |
| |
liability for the selection of |
|
|
| |
mounting hardware and/or |
|
|
| |
bracket installation. Be sure | 7 |
|
| |
to follow these bracket |
|
| ||
|
|
| ||
assembly and installation |
|
|
| |
instructions carefully. If you | 6 |
|
| |
have any questions or | 1 | 2 |
| |
doubts about your ability to |
| |||
|
| 4 | ||
correctly |
| 3 | ||
speakers, consult with your |
|
|
| |
authorized JBL dealer or |
|
|
| |
custom installer. | 5 |
| ||
Step 1: Unscrew and remove |
| |||
| 8 |
| ||
the large Molded Nut ™. If |
|
| ||
necessary, use the supplied |
| Make sure that all four | ||
Metal Bar ∞ as a lever by | Step 4: Screw the Ball and | |||
inserting it into one of the | Shaft £ into the Threaded | screws are driven into the | ||
holes in the outer edge of the | Insert § on the back of the | stud and not into drywall. | ||
Molded Nut ™. | Satellite Speaker ¶ until | If the bracket needs to be | ||
Step 2: Firmly grasp the Ball | it is fully seated in the | mounted in drywall, the | ||
and Shaft £ and pull it | Threaded Insert §, but do | customer is responsible for | ||
straight out of the Attach- | not tighten as you might dis- | selecting and using appro- | ||
ment Plate ¢. Avoid leaning | lodge the Threaded Insert | priate | ||
it to the side for leverage, as | §. Such damage would | screws. |
| |
this may break off a tab. | not be covered under the | Important Note: The Metal | ||
warranty. | ||||
| Nut ¡ must be fully tight- | |||
|
| |||
ened against the Satellite
7