JBL Professional BASSQ manual Calibration And Room Mode Correction, Before You Begin

Models: BASSQ

1 12
Download 12 pages 48.72 Kb
Page 10
Image 10
CALIBRATION AND ROOM MODE CORRECTION

CALIBRATION AND ROOM MODE CORRECTION

Once you have connected the sub- woofer input into the JBL BassQ unit and connected the outputs from the unit to all subwoofers in the system, you will need to run the BassQ test to finalize the room calibration and correction.

Before You Begin

It is very important that all subwoofers are on and installed before you run the BassQ process. If you move a sub- woofer or add a sub to the system, you will need to rerun the test. Set all initial settings on all attached subwoofers or subwoofer amplifiers to nominal or 0dB input level (phase set to 0°) and bypass all internal crossovers.

If Your System Includes an AV2

Before beginning any calibration, select BASSQ ->Yes from the AV2 Setup menu. This will optimize the delay settings and AV2 Autocal for use with the JBL BassQ processor. It will be necessary to manu- ally set the subwoofer output level from the AV2 processor. See the AV2 manual for details.

Step One: Microphone Setup

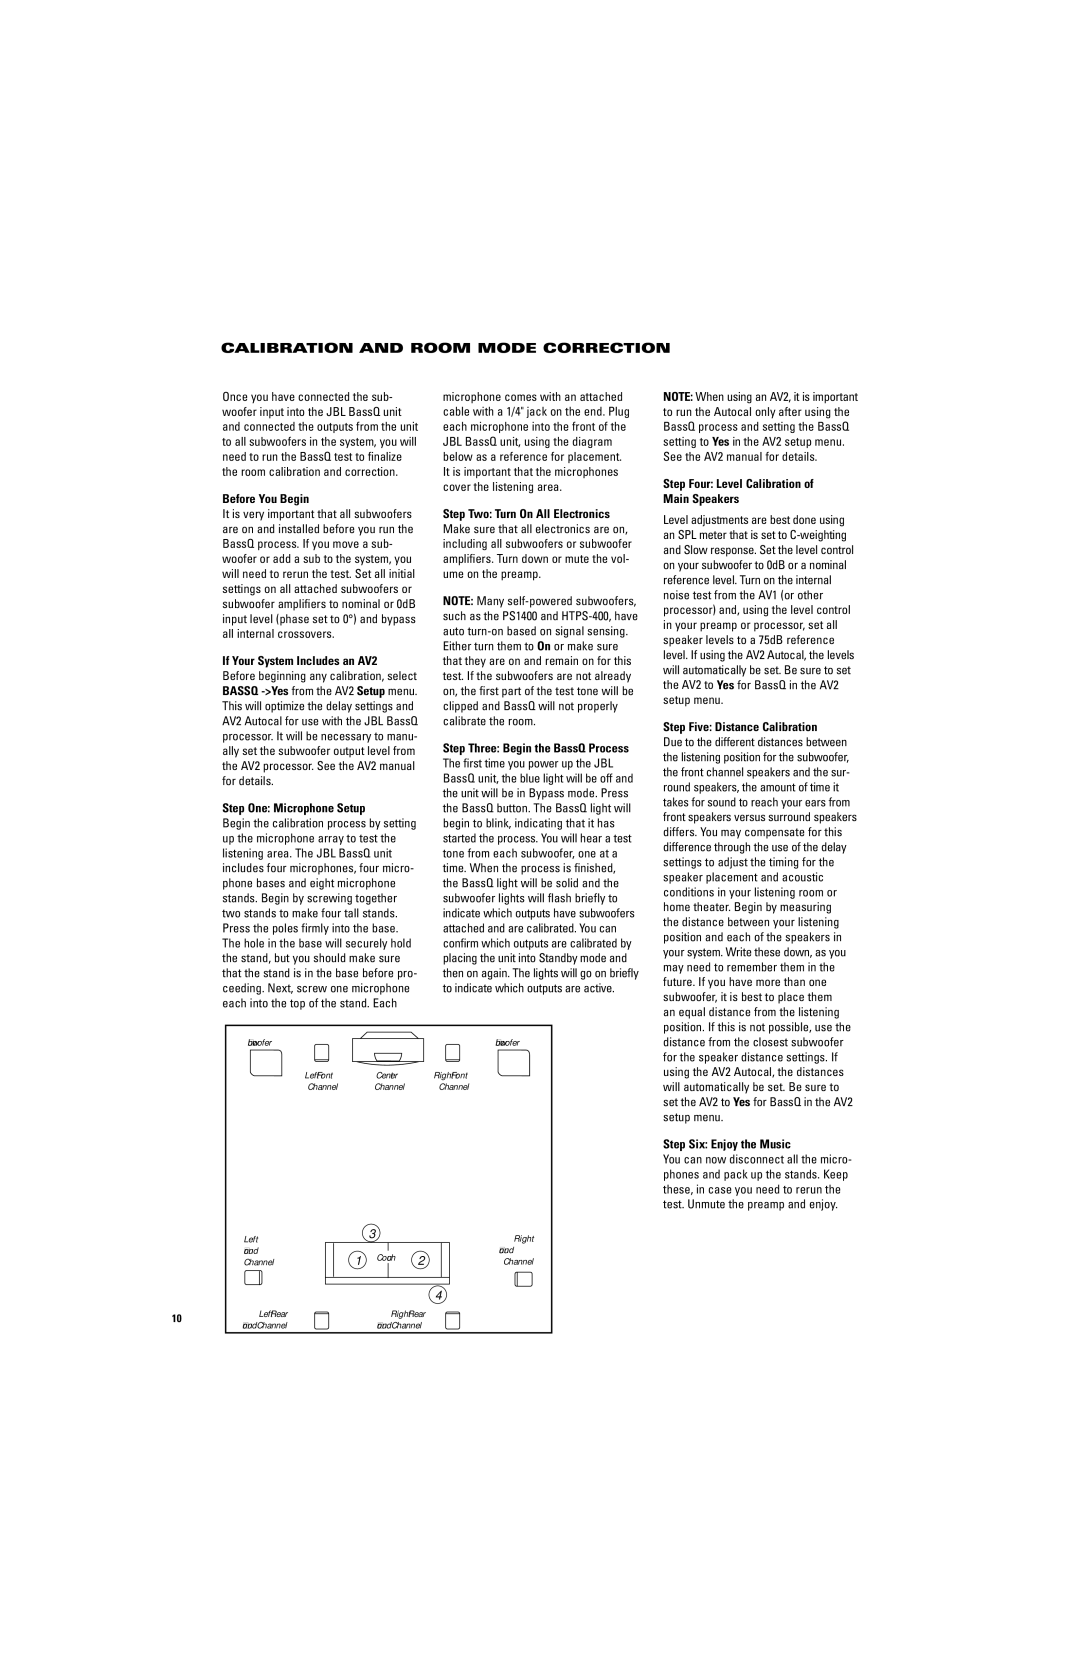
Begin the calibration process by setting up the microphone array to test the listening area. The JBL BassQ unit includes four microphones, four micro- phone bases and eight microphone stands. Begin by screwing together two stands to make four tall stands. Press the poles firmly into the base. The hole in the base will securely hold the stand, but you should make sure that the stand is in the base before pro- ceeding. Next, screw one microphone each into the top of the stand. Each

microphone comes with an attached cable with a 1/4" jack on the end. Plug each microphone into the front of the JBL BassQ unit, using the diagram below as a reference for placement. It is important that the microphones cover the listening area.

Step Two: Turn On All Electronics

Make sure that all electronics are on, including all subwoofers or subwoofer amplifiers. Turn down or mute the vol- ume on the preamp.

NOTE: Many self-powered subwoofers, such as the PS1400 and HTPS-400, have auto turn-on based on signal sensing.

Either turn them to On or make sure that they are on and remain on for this test. If the subwoofers are not already on, the first part of the test tone will be clipped and BassQ will not properly calibrate the room.

Step Three: Begin the BassQ Process

The first time you power up the JBL BassQ unit, the blue light will be off and the unit will be in Bypass mode. Press the BassQ button. The BassQ light will begin to blink, indicating that it has started the process. You will hear a test tone from each subwoofer, one at a time. When the process is finished, the BassQ light will be solid and the subwoofer lights will flash briefly to indicate which outputs have subwoofers attached and are calibrated. You can confirm which outputs are calibrated by placing the unit into Standby mode and then on again. The lights will go on briefly to indicate which outputs are active.

NOTE: When using an AV2, it is important to run the Autocal only after using the BassQ process and setting the BassQ setting to Yes in the AV2 setup menu. See the AV2 manual for details.

Step Four: Level Calibration of Main Speakers

Level adjustments are best done using an SPL meter that is set to C-weighting and Slow response. Set the level control on your subwoofer to 0dB or a nominal reference level. Turn on the internal noise test from the AV1 (or other processor) and, using the level control in your preamp or processor, set all speaker levels to a 75dB reference level. If using the AV2 Autocal, the levels will automatically be set. Be sure to set the AV2 to Yes for BassQ in the AV2 setup menu.

Step Five: Distance Calibration

Due to the different distances between the listening position for the subwoofer, the front channel speakers and the sur- round speakers, the amount of time it takes for sound to reach your ears from front speakers versus surround speakers differs. You may compensate for this difference through the use of the delay settings to adjust the timing for the speaker placement and acoustic conditions in your listening room or home theater. Begin by measuring the distance between your listening position and each of the speakers in your system. Write these down, as you may need to remember them in the future. If you have more than one subwoofer, it is best to place them

Subwoofer


Subwoofer

Left Front

Center

Right Front

Channel

Channel

Channel


Left


3


Right


Surround

1

Couch

2

Surround


Channel

Channel


4


10

Left Rear


Right Rear


Surround Channel


Surround Channel


an equal distance from the listening position. If this is not possible, use the distance from the closest subwoofer for the speaker distance settings. If using the AV2 Autocal, the distances will automatically be set. Be sure to set the AV2 to Yes for BassQ in the AV2 setup menu.

Step Six: Enjoy the Music

You can now disconnect all the micro- phones and pack up the stands. Keep these, in case you need to rerun the test. Unmute the preamp and enjoy.

Page 10
Image 10
JBL Professional BASSQ manual Calibration And Room Mode Correction, Before You Begin, If Your System Includes an AV2