Water Pressure

A cold water supply with water pressure of between 35 and 120 psi (241 and 827 kPa) is required to operate the water dispenser and ice maker. If you have questions about your water pressure, call a licensed, qualified plumber.

Reverse Osmosis Water Supply

IMPORTANT: The pressure of the water supply coming out of a reverse osmosis system going to the water inlet valve of the refrigerator needs to be between 35 and 120 psi (241 and

827 kPa).

If a reverse osmosis water filtration system is connected to your cold water supply, the water pressure to the reverse osmosis system needs to be a minimum of 40 to 60 psi (276 to 414 kPa).

If the water pressure to the reverse osmosis system is less than

40 to 60 psi (276 to 414 kPa):

Check to see whether the sediment filter in the reverse osmosis system is blocked. Replace the filter if necessary.

Allow the storage tank on the reverse osmosis system to refill after heavy usage.

If your refrigerator has a water filter, it may further reduce the water pressure when used in conjunction with a reverse osmosis system. Remove the water filter. See “Water Filtration System.”

If you have questions about your water pressure, call a licensed, qualified plumber.

Connect the Water Supply

Read all directions before you begin.

IMPORTANT: If you turn the refrigerator on before the water line is connected, turn the ice maker OFF.

Connect to Water Line

1.Unplug refrigerator or disconnect power.

2.Turn OFF main water supply. Turn ON nearest faucet long enough to clear line of water.

3.Find a ¹⁄₂" to 1¹⁄₄" (12.7 mm to 31.8 mm) vertical cold water pipe near the refrigerator.

IMPORTANT:

Make sure it is a cold water pipe.

Horizontal pipe will work, but the following procedure must be followed: Drill on the top side of the pipe, not the bottom. This will help keep water away from the drill. This also keeps normal sediment from collecting in the valve.

4.Determine the length of copper tubing you need. Measure from the connection on the rear of the refrigerator to the water pipe. Add 7 ft (2.1 m) to allow for cleaning. Use ¹⁄₄" (6.35 mm) O.D. (outside diameter) copper tubing. Be sure both ends of copper tubing are cut square.

5.Using a cordless drill, drill a ¹⁄₄" hole in the cold water pipe you have selected.

A

B


C


D


E


F


G

A. Cold water pipe

E. Compression sleeve

B. Pipe clamp

F. Shutoff valve

C. Copper tubing

G. Packing nut

D. Compression nut


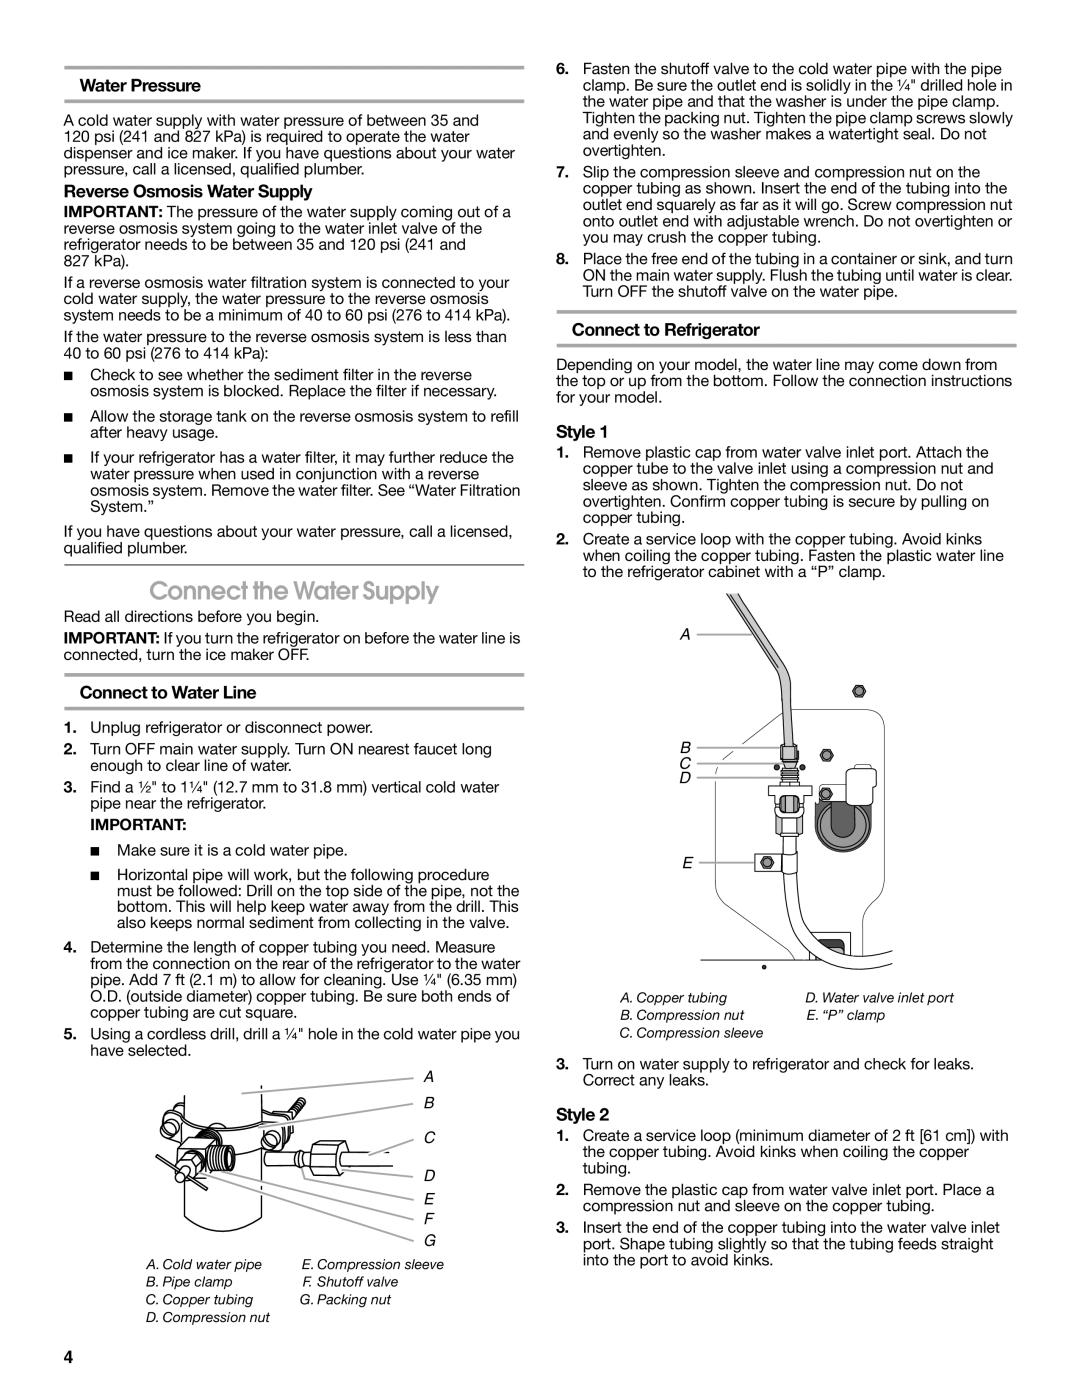
6.Fasten the shutoff valve to the cold water pipe with the pipe clamp. Be sure the outlet end is solidly in the ¹⁄₄" drilled hole in the water pipe and that the washer is under the pipe clamp. Tighten the packing nut. Tighten the pipe clamp screws slowly and evenly so the washer makes a watertight seal. Do not overtighten.

7.Slip the compression sleeve and compression nut on the copper tubing as shown. Insert the end of the tubing into the outlet end squarely as far as it will go. Screw compression nut onto outlet end with adjustable wrench. Do not overtighten or you may crush the copper tubing.

8.Place the free end of the tubing in a container or sink, and turn ON the main water supply. Flush the tubing until water is clear. Turn OFF the shutoff valve on the water pipe.

Connect to Refrigerator

Depending on your model, the water line may come down from the top or up from the bottom. Follow the connection instructions for your model.

Style 1

1.Remove plastic cap from water valve inlet port. Attach the copper tube to the valve inlet using a compression nut and sleeve as shown. Tighten the compression nut. Do not overtighten. Confirm copper tubing is secure by pulling on copper tubing.

2.Create a service loop with the copper tubing. Avoid kinks when coiling the copper tubing. Fasten the plastic water line to the refrigerator cabinet with a “P” clamp.

A

B

C

D

E

A. Copper tubing

D. Water valve inlet port

B. Compression nut

E. “P” clamp

C. Compression sleeve


3.Turn on water supply to refrigerator and check for leaks. Correct any leaks.

Style 2

1.Create a service loop (minimum diameter of 2 ft [61 cm]) with the copper tubing. Avoid kinks when coiling the copper tubing.

2.Remove the plastic cap from water valve inlet port. Place a compression nut and sleeve on the copper tubing.

3.Insert the end of the copper tubing into the water valve inlet port. Shape tubing slightly so that the tubing feeds straight into the port to avoid kinks.

4

Page 4
Image 4
Jenn-Air JFC2089WEM installation instructions Connect the Water Supply

JFC2089WEM specifications

The Jenn-Air JFC2089WEM is a sophisticated refrigerator that combines elegance with advanced technology for a seamless kitchen experience. This model is part of Jenn-Air's premium line of appliances, designed for consumers who appreciate both style and function.

One of the standout features of the JFC2089WEM is its dual-temperature design. This refrigerator utilizes a dual evaporator system to maintain optimal humidity levels for both the refrigerator and freezer compartments. The result is fresher food for longer periods, reducing spoilage and maintaining the quality of your groceries.

The refrigerator boasts an impressive capacity of 20 cubic feet, which provides ample storage space for families of all sizes. Its innovative organization system includes adjustable shelves and humidity-controlled crisper drawers, allowing users to configure the interior in a way that best suits their needs. The crisper drawers are especially beneficial for fruits and vegetables, as they help retain moisture and flavor, keeping produce crisp and fresh.

Another highlight of the JFC2089WEM is the advanced filtration system. This includes a water filtration system that ensures ice and water dispensed are free from impurities, providing not only great tasting water but also peace of mind regarding water quality. Additionally, the refrigerator features an external ice and water dispenser, making it quick and convenient to enjoy chilled beverages without the need to open the refrigerator door.

The Jenn-Air JFC2089WEM also integrates smart technologies for enhanced user experience. With Wi-Fi connectivity, users can monitor and control the appliance remotely through a smartphone app. This feature allows for adjustments to temperature settings, alerts for door open situations, and more, ensuring an efficient and manageable kitchen environment.

In terms of design, the JFC2089WEM is available in a sleek stainless-steel finish, which not only adds a modern touch but is also fingerprint-resistant, keeping the surface clean and smudge-free. The integrated design allows it to blend seamlessly into any kitchen decor.

Energy efficiency is another attribute of the Jenn-Air JFC2089WEM, as it is ENERGY STAR certified. This certification signifies that the refrigerator meets strict energy efficiency guidelines, helping to reduce energy costs while being environmentally friendly.

Overall, the Jenn-Air JFC2089WEM stands out as a top choice for those looking for a combination of style, technology, and functionality in their kitchen appliances. Its array of features and modern conveniences makes it a worthy investment for a contemporary home.