Oven Operation 12

♦ ♦ ♦ ♦ ♦ ♦ ♦ ♦ ♦ ♦ ♦ ♦ ♦ ♦ ♦ ♦ ♦ ♦ ♦ ♦ ♦ ♦ ♦ ♦ ♦ ♦ ♦ ♦ ♦ ♦ ♦ ♦ ♦ ♦ ♦ ♦ ♦ ♦ ♦ ♦ ♦

Broiling

For best results, use a pan designed for broiling. For addi- tional broiling tips, see “Cooking Made Simple” booklet.

Setting the Controls for Broiling

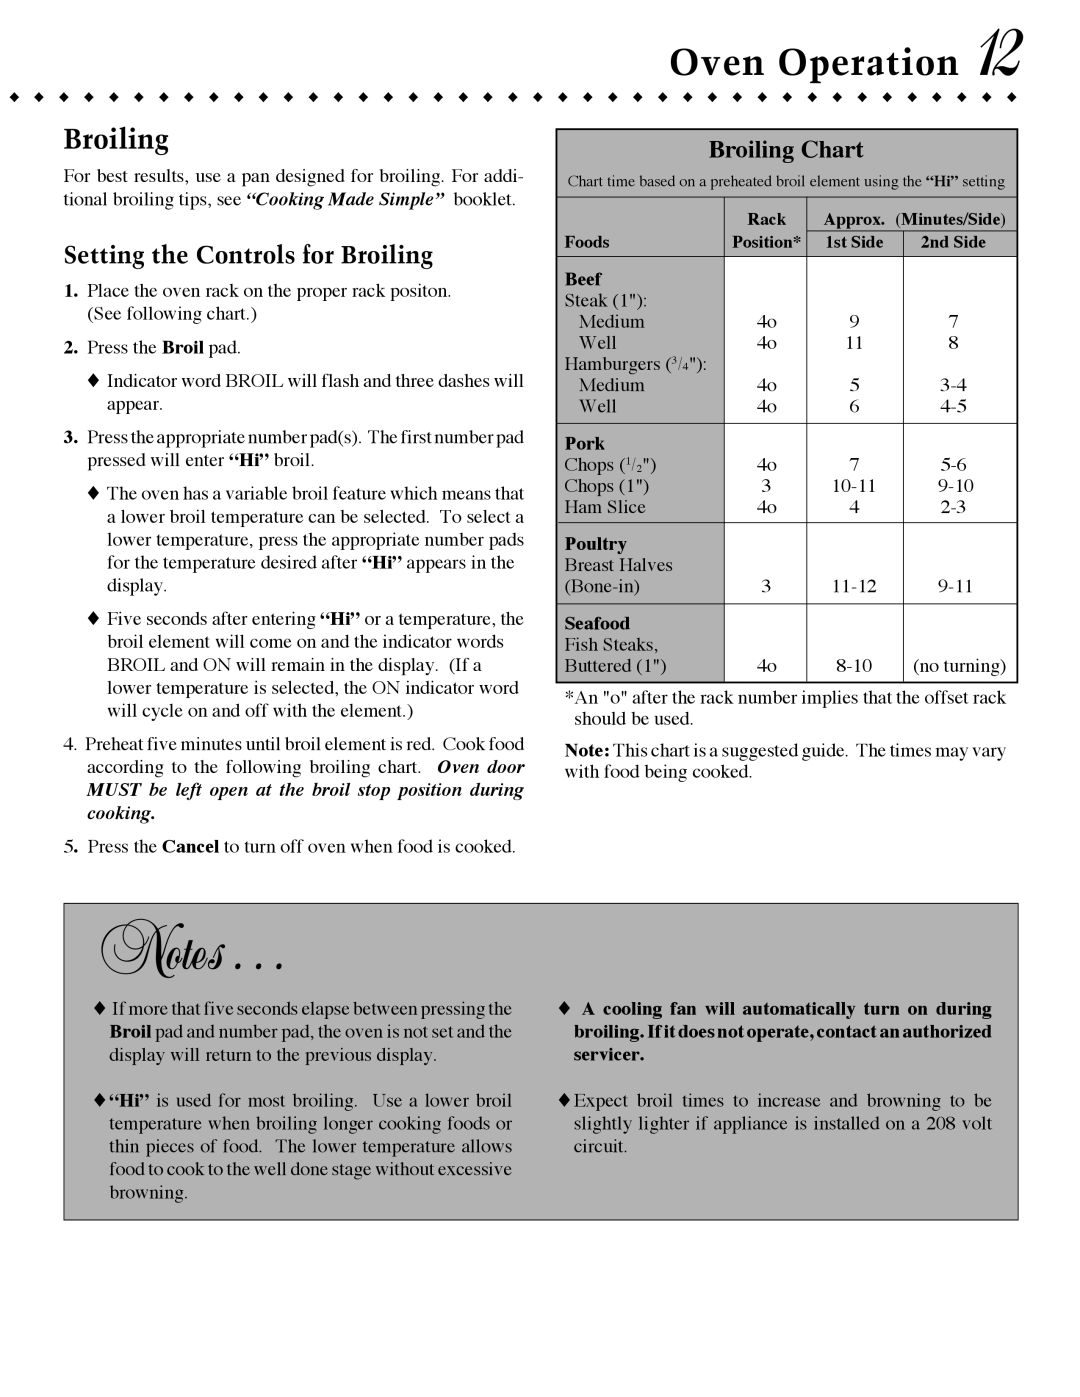
1.Place the oven rack on the proper rack positon. (See following chart.)

2.Press the Broil pad.

Indicator word BROIL will flash and three dashes will appear.

3.Press the appropriate number pad(s). The first number pad pressed will enter “Hi” broil.

The oven has a variable broil feature which means that a lower broil temperature can be selected. To select a lower temperature, press the appropriate number pads for the temperature desired after “Hi” appears in the display.

Five seconds after entering “Hi” or a temperature, the broil element will come on and the indicator words BROIL and ON will remain in the display. (If a lower temperature is selected, the ON indicator word will cycle on and off with the element.)

4.Preheat five minutes until broil element is red. Cook food according to the following broiling chart. Oven door

MUST be left open at the broil stop position during cooking.

5. Press the Cancel to turn off oven when food is cooked.

Broiling Chart

Chart time based on a preheated broil element using the “Hi” setting


Rack

Approx.

(Minutes/Side)


Foods

Position*

1st Side


2nd Side


Beef


Steak (1"):


Medium

4o

9


7


Well

4o

11


8


Hamburgers (3/4"):


Medium

4o

5


3-4


Well

4o

6


4-5


Pork


Chops (1/2")

4o

7


5-6


Chops (1")

3

10-11


9-10


Ham Slice

4o

4


2-3


Poultry


Breast Halves


(Bone-in)

3

11-12


9-11


Seafood


Fish Steaks,


Buttered (1")

4o

8-10


(no turning)


*An "o" after the rack number implies that the offset rack should be used.

Note: This chart is a suggested guide. The times may vary with food being cooked.

Notes . . .

If more that five seconds elapse between pressing the Broil pad and number pad, the oven is not set and the display will return to the previous display.

“Hi” is used for most broiling. Use a lower broil temperature when broiling longer cooking foods or thin pieces of food. The lower temperature allows food to cook to the well done stage without excessive browning.

A cooling fan will automatically turn on during broiling. If it does not operate, contact an authorized servicer.

Expect broil times to increase and browning to be slightly lighter if appliance is installed on a 208 volt circuit.

Page 13
Image 13
Jenn-Air JMW9530, JJW9527, JMW9527, JJW9630, JJW9530, JJW9627 warranty Setting the Controls for Broiling, Broiling Chart

JJW9627, JJW9530, JJW9630, JMW9527, JMW9530 specifications

The Jenn-Air JMW9527, JJW9530, JJW9630, JJW9527, and JMW9530 are premium wall ovens designed to elevate cooking experiences with their advanced features and technologies. These models are designed to meet the demands of both amateur cooks and professional chefs, offering precision, versatility, and exceptional performance.

One of the key features of these Jenn-Air ovens is their advanced culinary technology. The ovens are equipped with a sophisticated convection cooking system, providing even heat distribution for perfectly baked dishes. The true convection feature allows for optimal airflow, ensuring that multiple dishes can be cooked simultaneously without flavor transfer. Whether it’s baking pastries, roasting meats, or preparing casseroles, these ovens produce consistent, high-quality results.

Another standout characteristic of the Jenn-Air JMW9527 and its counterparts is the precise temperature control. With accurate digital thermostats, users can expect stability and reliability in temperature settings. The built-in temperature probe is a remarkable addition, allowing cooks to monitor the internal temperature of meats, ensuring they are cooked perfectly without the risk of overcooking.

The design of these ovens is equally impressive. They feature a sleek, modern aesthetic with a stainless steel finish that complements any kitchen decor. The spacious interior accommodates large dishes, making it ideal for family gatherings or entertaining guests. Moreover, the intuitive touchscreen controls provide a user-friendly interface, allowing for easy navigation through cooking settings and functions.

Cleaning is also a breeze with the Jenn-Air wall ovens. The self-cleaning feature saves time and effort, utilizing high temperatures to burn away residues, while the smooth-glide racks make loading and unloading heavy dishes effortless.

Connectivity is an essential element in today’s smart kitchens, and these Jenn-Air models do not disappoint. They are equipped with smart technology, allowing users to control and monitor their oven remotely via a smartphone app. This feature grants the ability to preheat the oven, adjust cooking times, and even receive notifications when cooking is complete.

In summary, the Jenn-Air JMW9527, JJW9530, JJW9630, JJW9527, and JMW9530 wall ovens combine sophisticated features with user-friendly technology. Their versatile cooking capabilities, precise temperature control, elegant design, and smart connectivity make them a top choice for those looking to enhance their kitchen experience. With these ovens, users can confidently explore new culinary creations and enjoy the art of cooking like never before.