6.(Optional) To set a delayed start, press the quickset pad next to Delay Start and set the desired time. See the “Delay Start” section for additional information.

7.Press CANCEL OVEN (CANCEL UPPER or CANCEL LOWER on double models) to turn off the oven.

Before second proofing, shape dough, place in baking pan(s) and cover loosely. Follow steps 1-7.

Rapid Proof

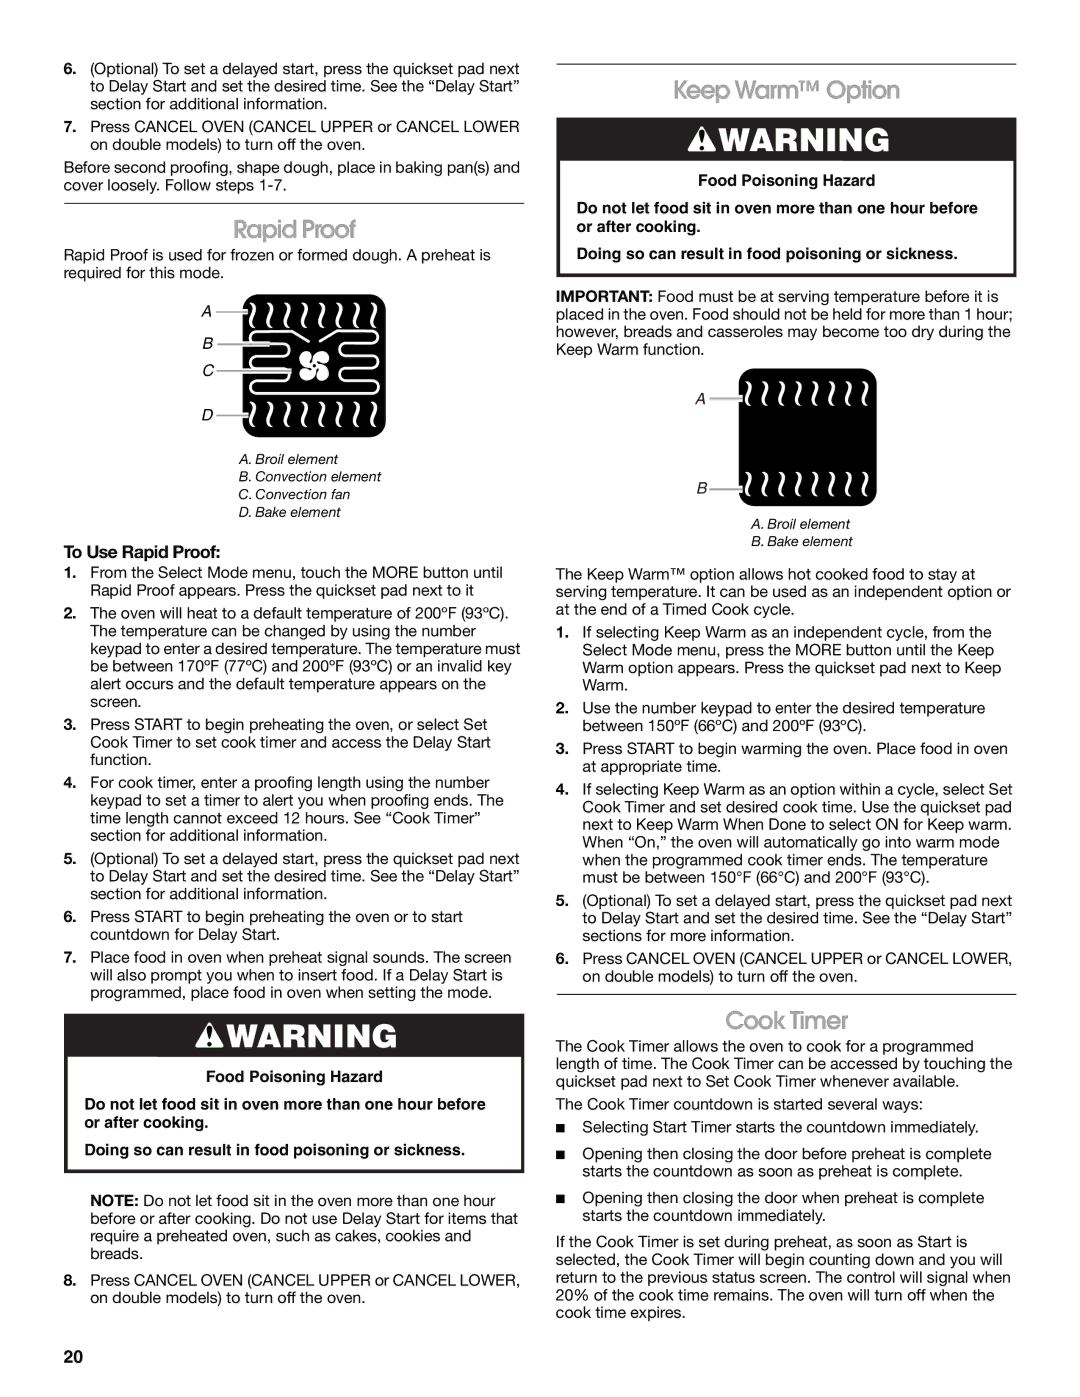
Rapid Proof is used for frozen or formed dough. A preheat is required for this mode.

A

B

C

D

A. Broil element

B. Convection element

C. Convection fan

D. Bake element

To Use Rapid Proof:

1.From the Select Mode menu, touch the MORE button until Rapid Proof appears. Press the quickset pad next to it

2.The oven will heat to a default temperature of 200ºF (93ºC). The temperature can be changed by using the number keypad to enter a desired temperature. The temperature must be between 170ºF (77ºC) and 200ºF (93ºC) or an invalid key alert occurs and the default temperature appears on the screen.

3.Press START to begin preheating the oven, or select Set Cook Timer to set cook timer and access the Delay Start function.

4.For cook timer, enter a proofing length using the number keypad to set a timer to alert you when proofing ends. The time length cannot exceed 12 hours. See “Cook Timer” section for additional information.

5.(Optional) To set a delayed start, press the quickset pad next to Delay Start and set the desired time. See the “Delay Start” section for additional information.

6.Press START to begin preheating the oven or to start countdown for Delay Start.

7.Place food in oven when preheat signal sounds. The screen will also prompt you when to insert food. If a Delay Start is programmed, place food in oven when setting the mode.

WARNING

Food Poisoning Hazard

Do not let food sit in oven more than one hour before or after cooking.

Doing so can result in food poisoning or sickness.

NOTE: Do not let food sit in the oven more than one hour before or after cooking. Do not use Delay Start for items that require a preheated oven, such as cakes, cookies and breads.

8.Press CANCEL OVEN (CANCEL UPPER or CANCEL LOWER, on double models) to turn off the oven.

Keep Warm™ Option

WARNING

Food Poisoning Hazard

Do not let food sit in oven more than one hour before or after cooking.

Doing so can result in food poisoning or sickness.

IMPORTANT: Food must be at serving temperature before it is placed in the oven. Food should not be held for more than 1 hour; however, breads and casseroles may become too dry during the Keep Warm function.

A

B

A. Broil element

B. Bake element

The Keep Warm™ option allows hot cooked food to stay at serving temperature. It can be used as an independent option or at the end of a Timed Cook cycle.

1.If selecting Keep Warm as an independent cycle, from the Select Mode menu, press the MORE button until the Keep Warm option appears. Press the quickset pad next to Keep Warm.

2.Use the number keypad to enter the desired temperature between 150ºF (66ºC) and 200ºF (93ºC).

3.Press START to begin warming the oven. Place food in oven at appropriate time.

4.If selecting Keep Warm as an option within a cycle, select Set Cook Timer and set desired cook time. Use the quickset pad next to Keep Warm When Done to select ON for Keep warm. When “On,” the oven will automatically go into warm mode when the programmed cook timer ends. The temperature must be between 150°F (66°C) and 200°F (93°C).

5.(Optional) To set a delayed start, press the quickset pad next to Delay Start and set the desired time. See the “Delay Start” sections for more information.

6.Press CANCEL OVEN (CANCEL UPPER or CANCEL LOWER, on double models) to turn off the oven.

Cook Timer

The Cook Timer allows the oven to cook for a programmed length of time. The Cook Timer can be accessed by touching the quickset pad next to Set Cook Timer whenever available.

The Cook Timer countdown is started several ways:

Selecting Start Timer starts the countdown immediately.

Opening then closing the door before preheat is complete starts the countdown as soon as preheat is complete.

Opening then closing the door when preheat is complete starts the countdown immediately.

If the Cook Timer is set during preheat, as soon as Start is selected, the Cook Timer will begin counting down and you will return to the previous status screen. The control will signal when 20% of the cook time remains. The oven will turn off when the cook time expires.

20

Page 20
Image 20
Jenn-Air JMW2327, JMW2427, JMW2330, JMW2430 manual Keep Warm Option, Cook Timer, To Use Rapid Proof

JMW2430, JMW2330, JMW2427, JMW2327 specifications

Jenn-Air appliances, renowned for their luxury and innovative design, offer a range of high-performance wall ovens that elevate the culinary experience. The models JMC2130, JMW2427, JMW2330, JMC2430, and JMW2327 showcase advanced features, cutting-edge technology, and a commitment to quality.

The Jenn-Air JMC2130 is a sleek, countertop microwave that combines versatility with a compact design. Its powerful cooking options include convection and microwave capabilities, allowing users to achieve crispy results quickly. The unit features a 1.3 cubic-foot capacity with a 1,000-watt cooking power, making it suitable for a variety of dishes. The Smart Sensor technology ensures even cooking by automatically adjusting the cooking time, while the easy-to-use control panel simplifies operation with pre-programmed settings.

Moving on to the JMW2427, this model is designed for built-in microwave applications. It seamlessly integrates into your kitchen, reinforcing a sophisticated design aesthetic. The 2.4 cubic-foot capacity accommodates larger dishes, and the convection cooking feature allows for browning and crisping, giving your meals a professional touch. Additionally, the model boasts an intuitive touchscreen interface that makes navigating setting adjustments user-friendly.

The JMW2330 offers similar features but takes it a step further with advanced steam cooking capabilities. This innovative technology allows food to maintain moisture and enhances flavor, making it an excellent choice for health-conscious cooks. The 1.9 cubic-foot capacity, along with a variety of power levels and auto-cook options, makes the JMW2330 versatile for everyday meals.

For those desiring a robust performance in a double oven setup, the JMC2430 is a standout model. This double wall oven brings together convection cooking, Smart Oven technology, and precise temperature controls to provide a professional-grade cooking experience right at home. The ample capacity of both ovens allows for simultaneous cooking of multiple dishes, revolutionizing the way you prepare meals for gatherings.

Lastly, the JMW2327 reflects sophisticated style and efficiency. This microwave complements modern kitchen designs while offering powerful cooking performance. With features such as sensor cooking, which detects moisture and automatically adjusts cooking time, this model is tailored for convenience without sacrificing quality.

Overall, these Jenn-Air models exemplify the perfect blend of style, technology, and functionality, making them ideal for culinary enthusiasts looking to enhance their kitchen experience.