Unpack the Ice Maker

WARNING

Excessive Weight Hazard

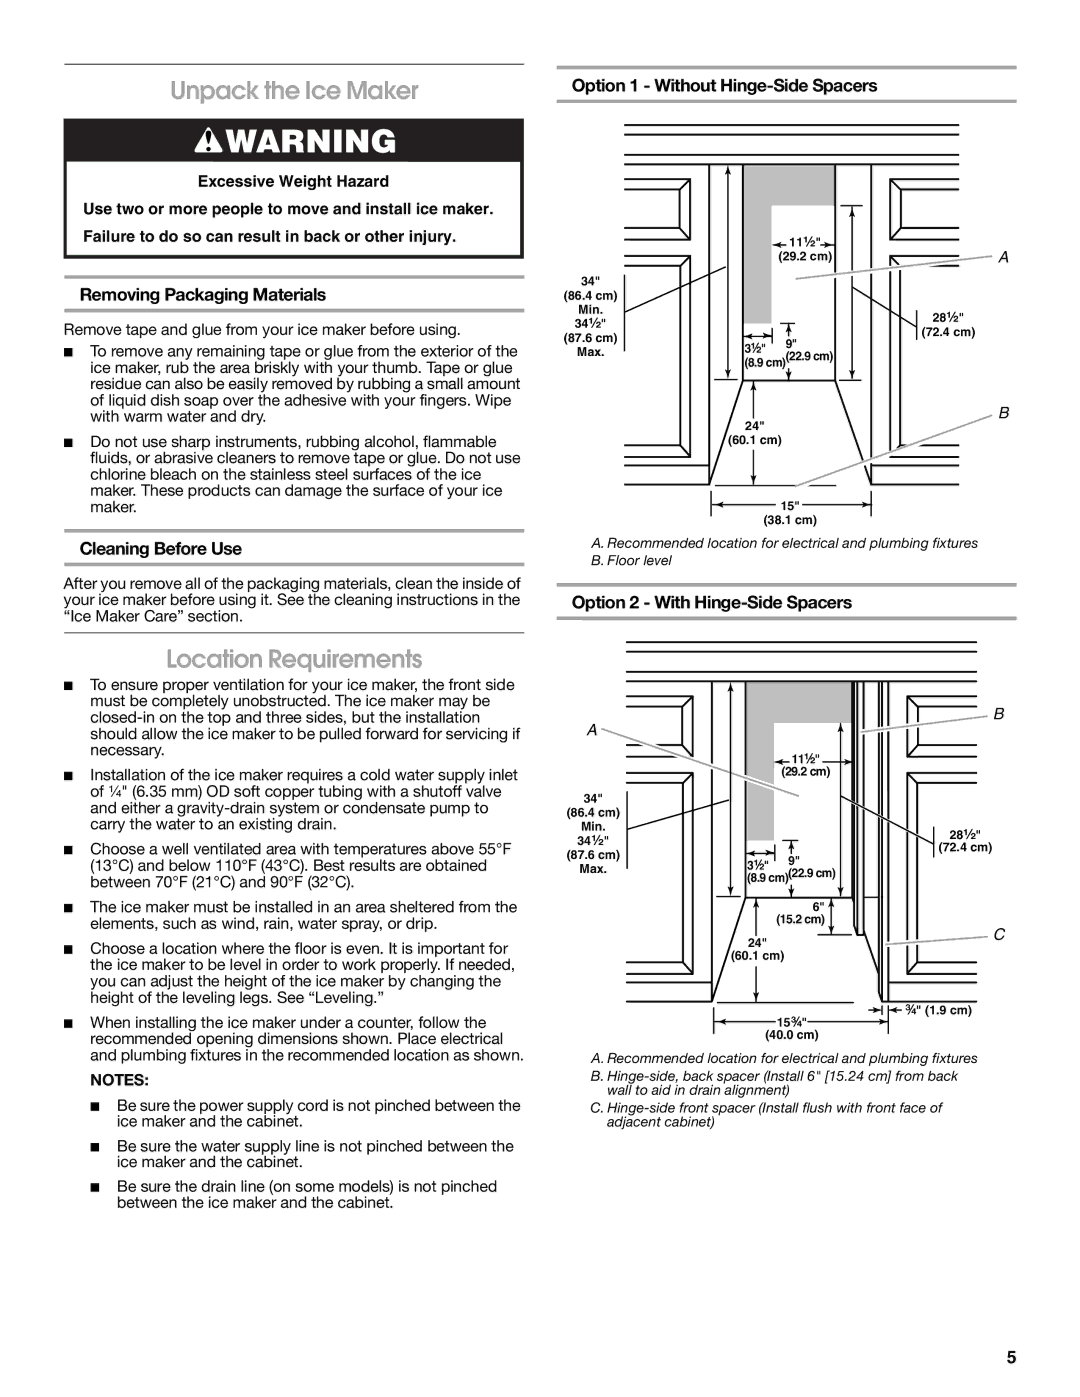
Option 1 - Without Hinge-Side Spacers

Use two or more people to move and install ice maker. Failure to do so can result in back or other injury.

Removing Packaging Materials

Remove tape and glue from your ice maker before using.

To remove any remaining tape or glue from the exterior of the

ice maker, rub the area briskly with your thumb. Tape or glue

residue can also be easily removed by rubbing a small amount

of liquid dish soap over the adhesive with your fingers. Wipe

34"

(86.4 cm)

Min.

34¹⁄₂"

(87.6 cm)

Max.

11¹⁄₂" (29.2 cm)

3¹⁄₂" 9"

(8.9 cm)(22.9 cm)

A

28¹⁄₂"

(72.4 cm)

with warm water and dry.

Do not use sharp instruments, rubbing alcohol, flammable

fluids, or abrasive cleaners to remove tape or glue. Do not use

chlorine bleach on the stainless steel surfaces of the ice

maker. These products can damage the surface of your ice

maker.

Cleaning Before Use

After you remove all of the packaging materials, clean the inside of your ice maker before using it. See the cleaning instructions in the “Ice Maker Care” section.

B

24"

(60.1 cm)

15"

(38.1 cm)

A. Recommended location for electrical and plumbing fixtures B. Floor level

Option 2 - With Hinge-Side Spacers

Location Requirements

To ensure proper ventilation for your ice maker, the front side must be completely unobstructed. The ice maker may be closed-in on the top and three sides, but the installation should allow the ice maker to be pulled forward for servicing if necessary.

Installation of the ice maker requires a cold water supply inlet of ¹⁄₄" (6.35 mm) OD soft copper tubing with a shutoff valve and either a gravity-drain system or condensate pump to carry the water to an existing drain.

Choose a well ventilated area with temperatures above 55°F (13°C) and below 110°F (43°C). Best results are obtained between 70°F (21°C) and 90°F (32°C).

The ice maker must be installed in an area sheltered from the elements, such as wind, rain, water spray, or drip.

Choose a location where the floor is even. It is important for the ice maker to be level in order to work properly. If needed, you can adjust the height of the ice maker by changing the height of the leveling legs. See “Leveling.”

When installing the ice maker under a counter, follow the recommended opening dimensions shown. Place electrical and plumbing fixtures in the recommended location as shown.

NOTES:

Be sure the power supply cord is not pinched between the ice maker and the cabinet.

Be sure the water supply line is not pinched between the ice maker and the cabinet.

Be sure the drain line (on some models) is not pinched between the ice maker and the cabinet.

A


B


11¹⁄₂"


(29.2 cm)


34"


(86.4 cm)


Min.


28¹⁄₂"


34¹⁄₂"


(87.6 cm)


(72.4 cm)

Max.


3¹⁄₂"

9"


(8.9 cm)(22.9 cm)


6"


(15.2 cm)


C


24"


(60.1 cm)


³⁄₄" (1.9 cm)


15³⁄₄"


(40.0 cm)


A. Recommended location for electrical and plumbing fixtures

B. Hinge-side, back spacer (Install 6" [15.24 cm] from back wall to aid in drain alignment)

C. Hinge-side front spacer (Install flush with front face of adjacent cabinet)

5

Page 5
Image 5
Jenn-Air W10282143B manual Unpack the Ice Maker, Location Requirements

W10282143B specifications

The Jenn-Air W10282143B is a high-performance appliance that exemplifies the brand's commitment to innovation and quality in kitchen technology. Designed to cater to the needs of modern culinary enthusiasts, this model integrates advanced features and functionalities that simplify meal preparation while enhancing cooking experiences.

One of the standout features of the Jenn-Air W10282143B is its high-efficiency cooling system. This system ensures that food items are stored at optimal temperatures, preserving freshness for an extended period. The unit is also equipped with adjustable shelving, allowing users to customize the interior layout to accommodate various food items, from large platters to delicate produce. This versatility is a significant advantage for households with diverse storage needs.

Technologically, the Jenn-Air W10282143B incorporates smart connectivity features. Through Wi-Fi integration, users can control the appliance remotely via a dedicated app. This means you can adjust settings, receive alerts, and even monitor energy usage from your smartphone. This level of control and convenience is ideal for busy individuals and families who are always on the go.

Another key characteristic of the Jenn-Air W10282143B is its sleek and modern design. The appliance features a stainless-steel exterior that not only enhances its aesthetic appeal but also provides superior durability and easy maintenance. Fingerprint-resistant finishes prevent smudges and keep the surface looking clean and polished, contributing to a tidy kitchen environment.

In terms of energy efficiency, the Jenn-Air W10282143B meets stringent industry standards. It is designed to consume less electricity compared to traditional models, making it an environmentally friendly choice that helps to reduce utility bills without compromising performance.

Safety features are paramount in this design. The model includes automatic shut-off capabilities and safety locks, providing peace of mind for households with children or pets. Furthermore, the intuitive control panel is user-friendly, allowing everyone in the household to operate the appliance with ease.

Overall, the Jenn-Air W10282143B is a perfect blend of style, functionality, and smart technology. With its user-centric design and commitment to performance, it stands out as a reliable kitchen companion for anyone looking to enhance their culinary journey. The combination of innovative features and an elegant aesthetic makes this model a valuable addition to any modern kitchen.