To Convert Gas Pressure Regulator

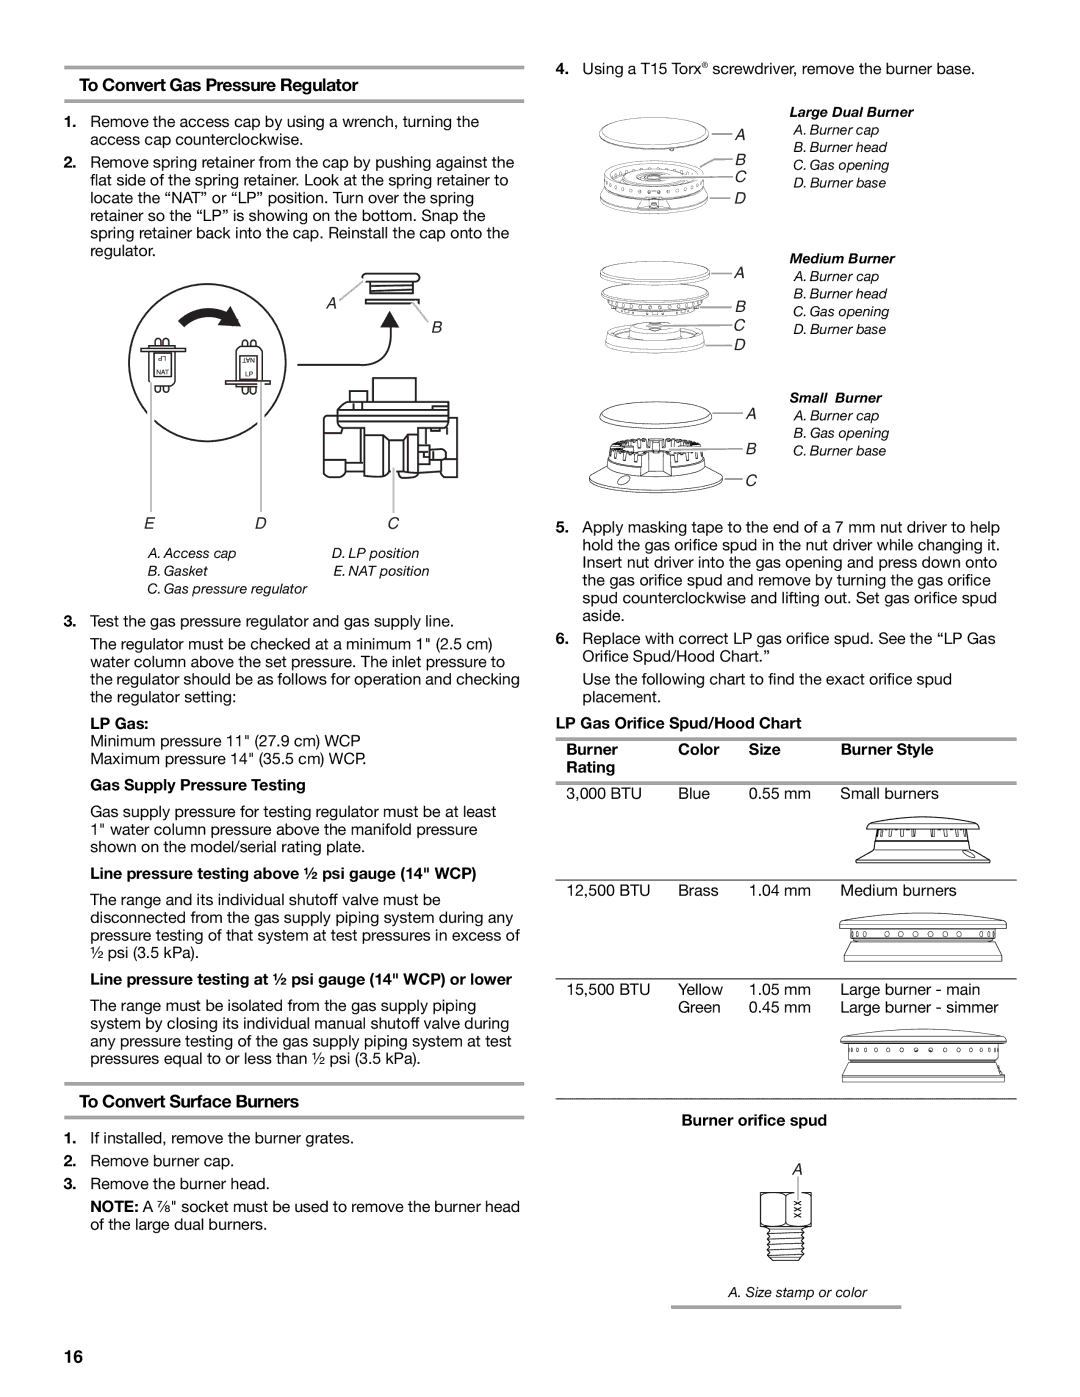
1.Remove the access cap by using a wrench, turning the access cap counterclockwise.

2.Remove spring retainer from the cap by pushing against the flat side of the spring retainer. Look at the spring retainer to locate the “NAT” or “LP” position. Turn over the spring retainer so the “LP” is showing on the bottom. Snap the spring retainer back into the cap. Reinstall the cap onto the regulator.

A

B

E

D

C

A. Access cap


D. LP position

B. Gasket


E. NAT position

C. Gas pressure regulator

3.Test the gas pressure regulator and gas supply line.

The regulator must be checked at a minimum 1" (2.5 cm) water column above the set pressure. The inlet pressure to the regulator should be as follows for operation and checking the regulator setting:

LP Gas:

Minimum pressure 11" (27.9 cm) WCP Maximum pressure 14" (35.5 cm) WCP.

Gas Supply Pressure Testing

Gas supply pressure for testing regulator must be at least 1" water column pressure above the manifold pressure shown on the model/serial rating plate.

Line pressure testing above ½ psi gauge (14" WCP)

The range and its individual shutoff valve must be disconnected from the gas supply piping system during any pressure testing of that system at test pressures in excess of ½ psi (3.5 kPa).

Line pressure testing at ½ psi gauge (14" WCP) or lower

The range must be isolated from the gas supply piping system by closing its individual manual shutoff valve during any pressure testing of the gas supply piping system at test pressures equal to or less than ½ psi (3.5 kPa).

4.Using a T15 Torx® screwdriver, remove the burner base.

Large Dual Burner

AA. Burner cap B. Burner head

B

C. Gas opening

CD. Burner base

D

Medium Burner

AA. Burner cap B. Burner head

BC. Gas opening

C

D. Burner base

D


A

Small Burner

A. Burner cap

B

B. Gas opening

C. Burner base

C

5.Apply masking tape to the end of a 7 mm nut driver to help hold the gas orifice spud in the nut driver while changing it. Insert nut driver into the gas opening and press down onto the gas orifice spud and remove by turning the gas orifice spud counterclockwise and lifting out. Set gas orifice spud aside.

6.Replace with correct LP gas orifice spud. See the “LP Gas Orifice Spud/Hood Chart.”

Use the following chart to find the exact orifice spud placement.

LP Gas Orifice Spud/Hood Chart

Burner

Color

Size

Burner Style

Rating


3,000 BTU

Blue

0.55 mm

Small burners


12,500 BTU Brass 1.04 mm Medium burners

15,500 BTU Yellow

1.05 mm

Large burner - main

Green

0.45 mm

Large burner - simmer

To Convert Surface Burners

1.If installed, remove the burner grates.

2.Remove burner cap.

3.Remove the burner head.

NOTE: A ⁷⁄₈" socket must be used to remove the burner head of the large dual burners.

Burner orifice spud

A

A. Size stamp or color

16

Page 16
Image 16
Jenn-Air W10349768A To Convert Gas Pressure Regulator, To Convert Surface Burners, Gas Supply Pressure Testing

W10349768A specifications

The Jenn-Air W10349768A is a premium range hood designed to enhance the functionality and aesthetic appeal of modern kitchens. With a blend of advanced technology and elegant design, this model meets the needs of culinary enthusiasts and homeowners alike.

One of the key features of the W10349768A is its powerful ventilation system. Equipped with a robust motor, it offers multiple fan speeds to efficiently eliminate smoke, odors, and airborne grease created during cooking. Its high airflow capacity ensures that even the most intense cooking sessions leave your kitchen fresh and clean. This range hood is particularly effective in larger kitchen spaces, making it a versatile choice for various layouts.

The design of the W10349768A prioritizes aesthetics as much as functionality. The sleek stainless steel finish not only provides a modern look but is also easy to clean and maintain, ensuring that it remains a focal point in your kitchen for years to come. The unit's minimalist design integrates seamlessly with a wide range of kitchen styles while providing the durability expected from a Jenn-Air product.

In terms of technology, the W10349768A features advanced noise reduction capabilities. It operates at a lower decibel level compared to traditional range hoods, making it ideal for open-concept living spaces where noise can disrupt conversations or the enjoyment of family gatherings. This attention to noise levels reflects Jenn-Air’s commitment to creating a pleasant cooking environment.

The range hood also comes with convenient features like adjustable lighting. Equipped with high-quality LED lights, it provides ample illumination for the cooking surface below, enhancing visibility while also being energy-efficient. This allows home cooks to monitor their meals effortlessly and adds an inviting ambiance to the kitchen.

Another notable characteristic of the W10349768A is its easy-to-use controls. The intuitive interface allows users to adjust fan speeds and lighting with just a touch, making it accessible for everyone in the household. Additionally, the dishwasher-safe filters ensure that maintenance is straightforward, promoting hygiene and performance.

All of these features make the Jenn-Air W10349768A a top choice for those looking to blend performance with style in their kitchen. Its powerful ventilation, modern aesthetics, and user-friendly technology position it as an essential tool for any serious home chef. Whether you're sautéing, grilling, or baking, this range hood is designed to enhance your culinary experience while elevating the overall design of your kitchen space.