Adjusting guide bearings

There are eight side blade guide/support bearings. These bearings are installed in the bearing seat, and the seat is attached to the sliding adjustment bracket.

These bearings are stacked, with two bearings on each adjustment eccentric. The width of each pair of stacked bearings is slightly less than the width of a blade.

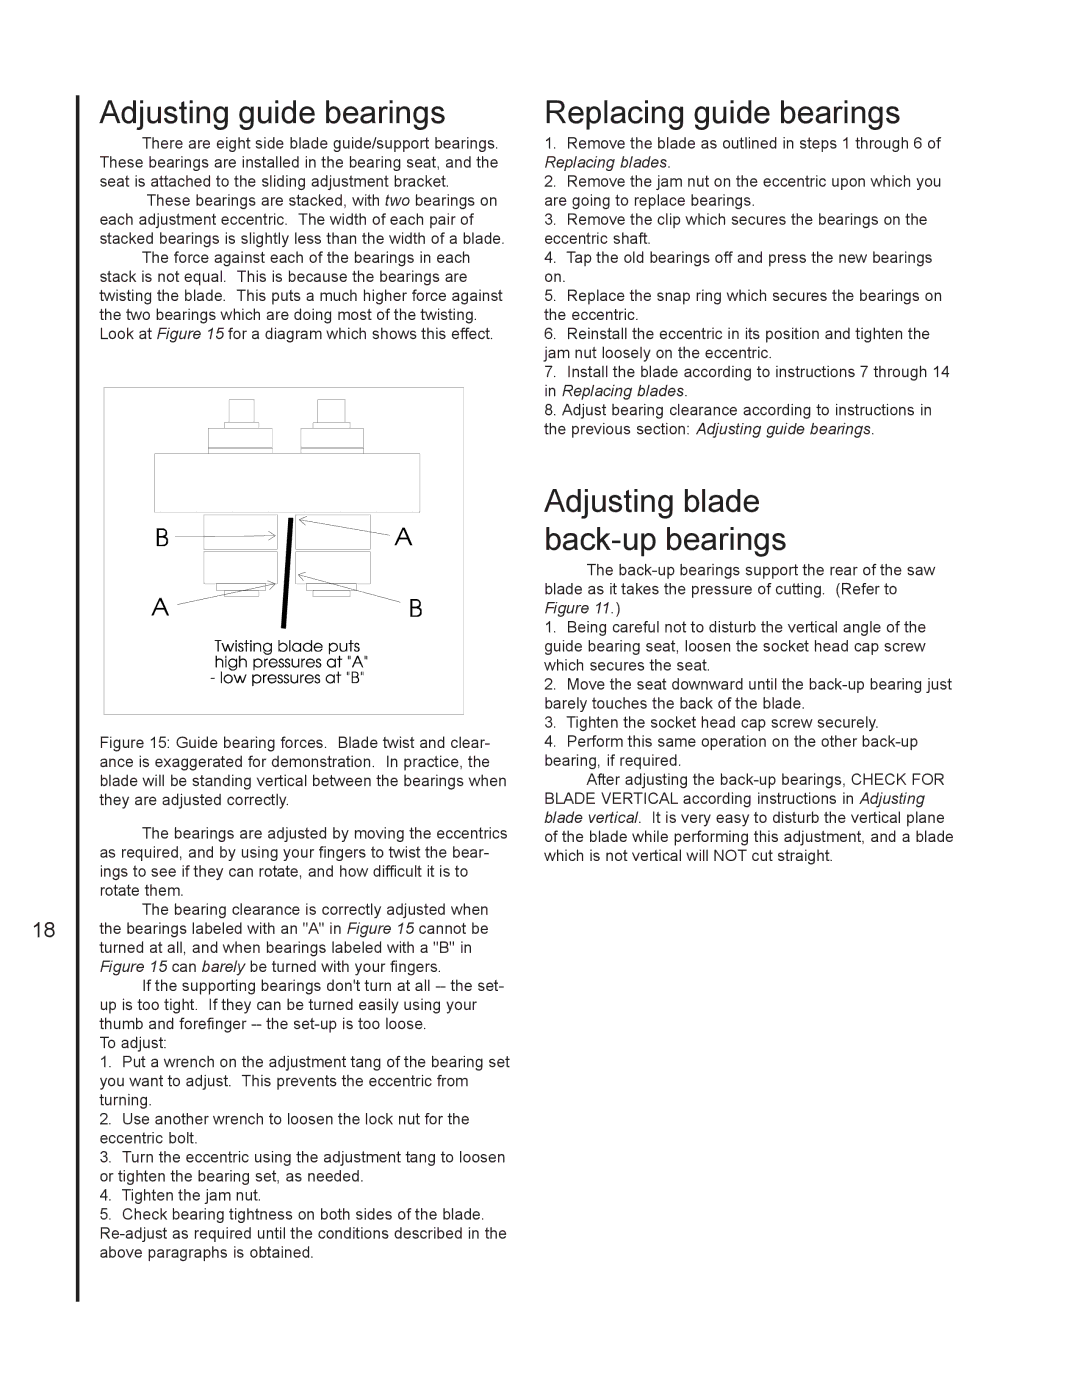
The force against each of the bearings in each stack is not equal. This is because the bearings are twisting the blade. This puts a much higher force against the two bearings which are doing most of the twisting. Look at Figure 15 for a diagram which shows this effect.

Replacing guide bearings

1.Remove the blade as outlined in steps 1 through 6 of Replacing blades.

2.Remove the jam nut on the eccentric upon which you are going to replace bearings.

3.Remove the clip which secures the bearings on the eccentric shaft.

4.Tap the old bearings off and press the new bearings on.

5.Replace the snap ring which secures the bearings on the eccentric.

6.Reinstall the eccentric in its position and tighten the jam nut loosely on the eccentric.

7.Install the blade according to instructions 7 through 14 in Replacing blades.

8.Adjust bearing clearance according to instructions in the previous section: Adjusting guide bearings.

18

Figure 15: Guide bearing forces. Blade twist and clear- ance is exaggerated for demonstration. In practice, the blade will be standing vertical between the bearings when they are adjusted correctly.

The bearings are adjusted by moving the eccentrics as required, and by using your fingers to twist the bear- ings to see if they can rotate, and how difficult it is to rotate them.

The bearing clearance is correctly adjusted when the bearings labeled with an "A" in Figure 15 cannot be turned at all, and when bearings labeled with a "B" in Figure 15 can barely be turned with your fingers.

If the supporting bearings don't turn at all -- the set- up is too tight. If they can be turned easily using your thumb and forefinger -- the set-up is too loose.

To adjust:

1.Put a wrench on the adjustment tang of the bearing set you want to adjust. This prevents the eccentric from turning.

2.Use another wrench to loosen the lock nut for the eccentric bolt.

3.Turn the eccentric using the adjustment tang to loosen or tighten the bearing set, as needed.

4.Tighten the jam nut.

5.Check bearing tightness on both sides of the blade.

Re-adjust as required until the conditions described in the above paragraphs is obtained.

Adjusting blade back-up bearings

The back-up bearings support the rear of the saw blade as it takes the pressure of cutting. (Refer to Figure 11.)

1.Being careful not to disturb the vertical angle of the guide bearing seat, loosen the socket head cap screw which secures the seat.

2.Move the seat downward until the back-up bearing just barely touches the back of the blade.

3.Tighten the socket head cap screw securely.

4.Perform this same operation on the other back-up bearing, if required.

After adjusting the back-up bearings, CHECK FOR BLADE VERTICAL according instructions in Adjusting blade vertical. It is very easy to disturb the vertical plane of the blade while performing this adjustment, and a blade which is not vertical will NOT cut straight.

Page 18
Image 18
Jet Tools J-3410-2 Adjusting guide bearings, Replacing guide bearings, Adjusting blade back-up bearings

J-3410-2, J-3410 specifications

Jet Tools is renowned for its high-quality woodworking and metalworking equipment, and the J-3410 and J-3410-2 drill presses are prime examples of this commitment to excellence. These machines are engineered for precision, durability, and efficiency, appealing to both hobbyists and professional craftsmen.

The J-3410 features a robust 1 HP motor that provides ample power for a variety of drilling applications. This strength enables it to handle a wide range of materials, making it versatile enough for various projects. The machine operates at five different speeds, ranging from 600 to 3,100 RPM, allowing users to select the ideal speed for the specific material and drill bit size they are using. This versatility is crucial for achieving the desired results, whether it’s delicate woodwork or tougher metals.

One of the standout features of the J-3410 is its adjustable table, which can tilt up to 45 degrees, facilitating angled drilling. The table is constructed from heavy-duty cast iron, ensuring stability and reducing vibration, which is vital for precision work. Additionally, this model comes with a built-in laser guide that provides an accurate reference point for drilling, enhancing user efficiency and accuracy.

The J-3410-2 model builds upon the features of the J-3410, offering dual laser guides for even greater precision. These guides help users easily align the drill bit, ensuring that holes are drilled exactly where intended. The dual lasers also enhance visibility, especially in low-light environments. This model also includes a larger work table, allowing for drilling operations on bigger workpieces without compromising stability.

Both models are equipped with a heavy-duty, quick-adjust depth stop. This feature allows for consistency in repetitive drilling tasks, which is essential for users who need to achieve uniform results. They also feature an easy-to-use belt and pulley system for speed changes, ensuring that the transition between different speeds is effortless.

Safety is paramount in the design of the J-3410 and J-3410-2 press. A protective on/off switch prevents accidental start-ups, while the cast iron construction enhances overall stability and reduces the likelihood of accidents during operation.

The Jet Tools J-3410 and J-3410-2 combine power, precision, and safety, making them excellent choices for anyone in need of reliable drilling equipment. Whether for professional use or personal projects, these drill presses stand out in their class, showcasing Jet's commitment to quality and innovation.