TIMER ON BUTTON
Use the TIMER ON button to initiate or cancel a single timed ON event. Use this feature to bring the system on when you return home or when you wake up in the morning. Press the TIMER ON button once. The clock icon ![]() disappears and a time setting appears with the word ON flashing at the right. Use the
disappears and a time setting appears with the word ON flashing at the right. Use the
9.Use
10.Use TURBO button to speed up cooling or heating.
11.Use I FEEL button to control your setpoint temperature from the remote control in cooling and heating modes.
REMOTE CONTROL BATTERIES
REPLACEMENT
turned on successfully, the word ON will appear to the right of the cur- rent time display. Press the TIMER ON button again if you want to can- cel the timed ON event.
TIMER OFF BUTTON
Use the TIMER OFF button to initiate or cancel a single timed OFF event. Use this feature to turn the system off when you leave the house or when you go to sleep. Use the same method described above to set the desired time for the system to stop operation. To make sure the function is turned off successfully, the word OFF will appear to the right of the current time display. Press the TIMER OFF button again if you want to cancel the timed OFF event.
REMOTE LOCK
Press
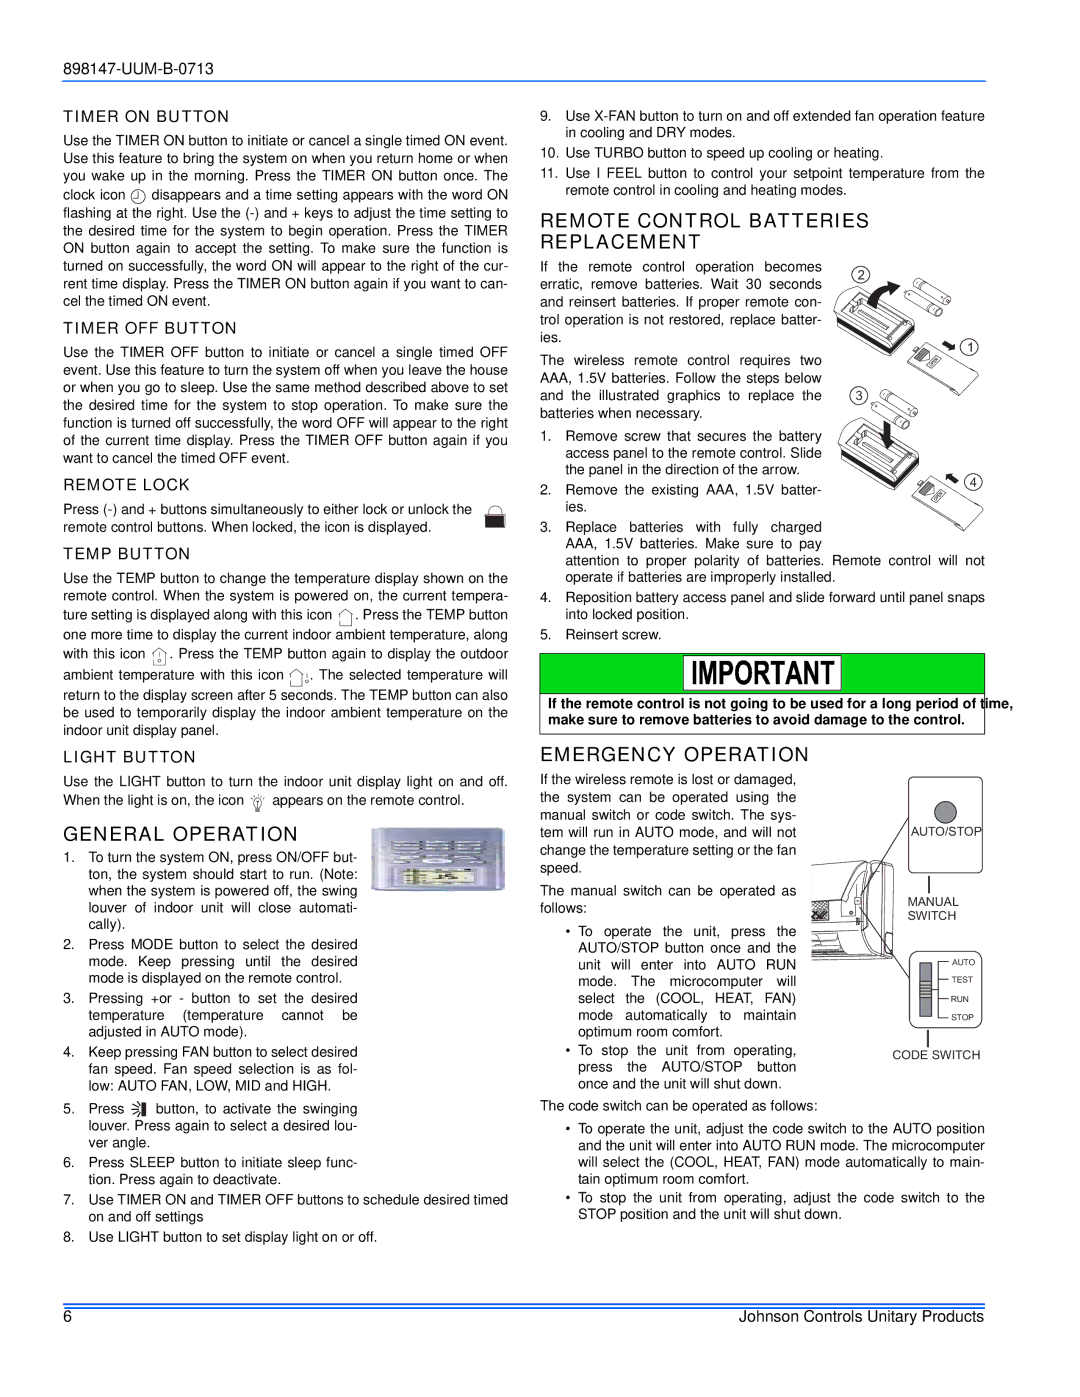
If the remote control operation becomes erratic, remove batteries. Wait 30 seconds and reinsert batteries. If proper remote con- trol operation is not restored, replace batter- ies.
The wireless remote control requires two AAA, 1.5V batteries. Follow the steps below and the illustrated graphics to replace the batteries when necessary.
1.Remove screw that secures the battery access panel to the remote control. Slide the panel in the direction of the arrow.
2.Remove the existing AAA, 1.5V batter- ies.
2
1
3
4
remote control buttons. When locked, the icon is displayed.
TEMP BUTTON
Use the TEMP button to change the temperature display shown on the remote control. When the system is powered on, the current tempera- ture setting is displayed along with this icon ![]() . Press the TEMP button one more time to display the current indoor ambient temperature, along with this icon
. Press the TEMP button one more time to display the current indoor ambient temperature, along with this icon ![]() . Press the TEMP button again to display the outdoor
. Press the TEMP button again to display the outdoor
ambient temperature with this icon ![]()
![]() . The selected temperature will
. The selected temperature will
return to the display screen after 5 seconds. The TEMP button can also be used to temporarily display the indoor ambient temperature on the indoor unit display panel.
3. Replace batteries with fully charged AAA, 1.5V batteries. Make sure to pay
attention to proper polarity of batteries. Remote control will not operate if batteries are improperly installed.
4.Reposition battery access panel and slide forward until panel snaps into locked position.
5.Reinsert screw.
If the remote control is not going to be used for a long period of time, make sure to remove batteries to avoid damage to the control.
LIGHT BUTTON
Use the LIGHT button to turn the indoor unit display light on and off. When the light is on, the icon ![]()
![]()
![]() appears on the remote control.
appears on the remote control.
GENERAL OPERATION
1. | To turn the system ON, press ON/OFF but- | ||
| ton, the system should start to run. (Note: | ||
| when the system is powered off, the swing | ||
| louver of indoor unit will close automati- | ||
| cally). |
|
|
2. | Press MODE button to select the desired | ||
| mode. Keep pressing until the desired | ||
| mode is displayed on the remote control. | ||
3. | Pressing +or - button to set the desired | ||
| temperature (temperature cannot be | ||
| adjusted in AUTO mode). | ||
4. | Keep pressing FAN button to select desired | ||
| fan speed. Fan speed selection is as fol- | ||
| low: AUTO FAN, LOW, MID and HIGH. | ||
5. | Press |
| button, to activate the swinging |
| |||
EMERGENCY OPERATION
If the wireless remote is lost or damaged, the system can be operated using the manual switch or code switch. The sys- tem will run in AUTO mode, and will not change the temperature setting or the fan speed.
The manual switch can be operated as follows:
• To operate the unit, press the AUTO/STOP button once and the unit will enter into AUTO RUN mode. The microcomputer will select the (COOL, HEAT, FAN) mode automatically to maintain optimum room comfort.
•To stop the unit from operating, press the AUTO/STOP button once and the unit will shut down.
The code switch can be operated as follows:
AUTO/STOP
MANUAL
SWITCH
AUTO
TEST
RUN
STOP
CODE SWITCH
| louver. Press again to select a desired lou- |
| ver angle. |
6. | Press SLEEP button to initiate sleep func- |
| tion. Press again to deactivate. |
7. | Use TIMER ON and TIMER OFF buttons to schedule desired timed |
| on and off settings |
8. | Use LIGHT button to set display light on or off. |
•To operate the unit, adjust the code switch to the AUTO position and the unit will enter into AUTO RUN mode. The microcomputer will select the (COOL, HEAT, FAN) mode automatically to main- tain optimum room comfort.
•To stop the unit from operating, adjust the code switch to the STOP position and the unit will shut down.
6 | Johnson Controls Unitary Products |