|
| ||
| NOTICE |
| |
The TEST button is for the technicians' testing, which should not be |
| ||
used by our user. |
| ||
MAINTENANCE |
| ||
OUTDOOR UNIT |
| ||
1. | Ensure power is off before cleaning. |
| |
2. | It may be necessary to wash the outdoor coil more frequently if it is | Fig. A | |
| exposed to substances which are corrosive or which block airflow |
| |
| across the coil (e.g., pet urine, cottonwood seeds, fertilizers, fluids | Fig. B | |
| that may contain high levels of corrosive chemicals such as salts). | ||
|
| ||
3. | Outdoor Coil (Sea Coast) - Moist air in ocean locations can carry | AIR FILTER | |
| salt, which is corrosive to most metal. Units that are located near |
| |
| the ocean require frequent inspections and maintenance. These |
| |
| inspections will determine the need to wash the unit including the | HEALTHY FILTER | |
| outdoor coil. Consult your installing contractor for proper intervals/ |
| |
| procedures for your geographic area or service contract. |
| |
4. | Outdoor unit fan motor is |
| |
| lubrication is needed. |
| |
5. | Visually inspect all connecting lines, joints and coils for evidence of |
| |
| oil leaks. | Fig. C | |
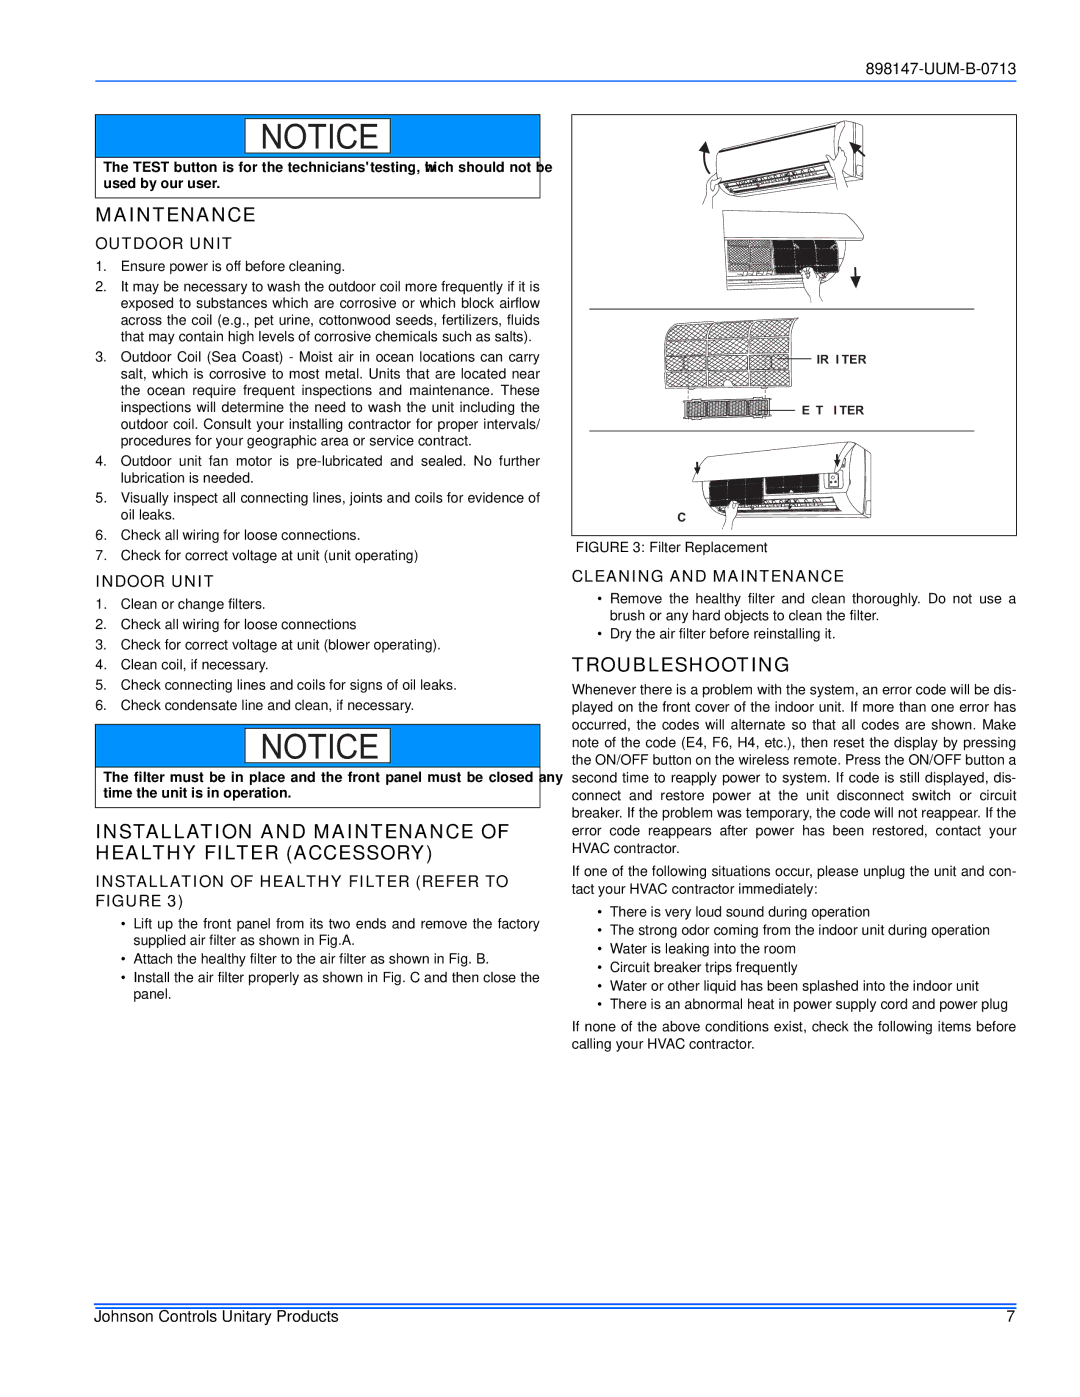
6. | Check all wiring for loose connections. | FIGURE 3: Filter Replacement | |
7. | Check for correct voltage at unit (unit operating) | ||
| |||
INDOOR UNIT
1.Clean or change filters.
2.Check all wiring for loose connections
3.Check for correct voltage at unit (blower operating).
4.Clean coil, if necessary.
5.Check connecting lines and coils for signs of oil leaks.
6.Check condensate line and clean, if necessary.
NOTICE
The filter must be in place and the front panel must be closed any time the unit is in operation.
INSTALLATION AND MAINTENANCE OF HEALTHY FILTER (ACCESSORY)
INSTALLATION OF HEALTHY FILTER (REFER TO FIGURE 3)
•Lift up the front panel from its two ends and remove the factory supplied air filter as shown in Fig.A.
•Attach the healthy filter to the air filter as shown in Fig. B.
•Install the air filter properly as shown in Fig. C and then close the panel.
CLEANING AND MAINTENANCE
•Remove the healthy filter and clean thoroughly. Do not use a brush or any hard objects to clean the filter.
•Dry the air filter before reinstalling it.
TROUBLESHOOTING
Whenever there is a problem with the system, an error code will be dis- played on the front cover of the indoor unit. If more than one error has occurred, the codes will alternate so that all codes are shown. Make note of the code (E4, F6, H4, etc.), then reset the display by pressing the ON/OFF button on the wireless remote. Press the ON/OFF button a second time to reapply power to system. If code is still displayed, dis- connect and restore power at the unit disconnect switch or circuit breaker. If the problem was temporary, the code will not reappear. If the error code reappears after power has been restored, contact your HVAC contractor.
If one of the following situations occur, please unplug the unit and con- tact your HVAC contractor immediately:
•There is very loud sound during operation
•The strong odor coming from the indoor unit during operation
•Water is leaking into the room
•Circuit breaker trips frequently
•Water or other liquid has been splashed into the indoor unit
•There is an abnormal heat in power supply cord and power plug
If none of the above conditions exist, check the following items before calling your HVAC contractor.
Johnson Controls Unitary Products | 7 |
