PREPARATION

– Setting/Displaying date and time –

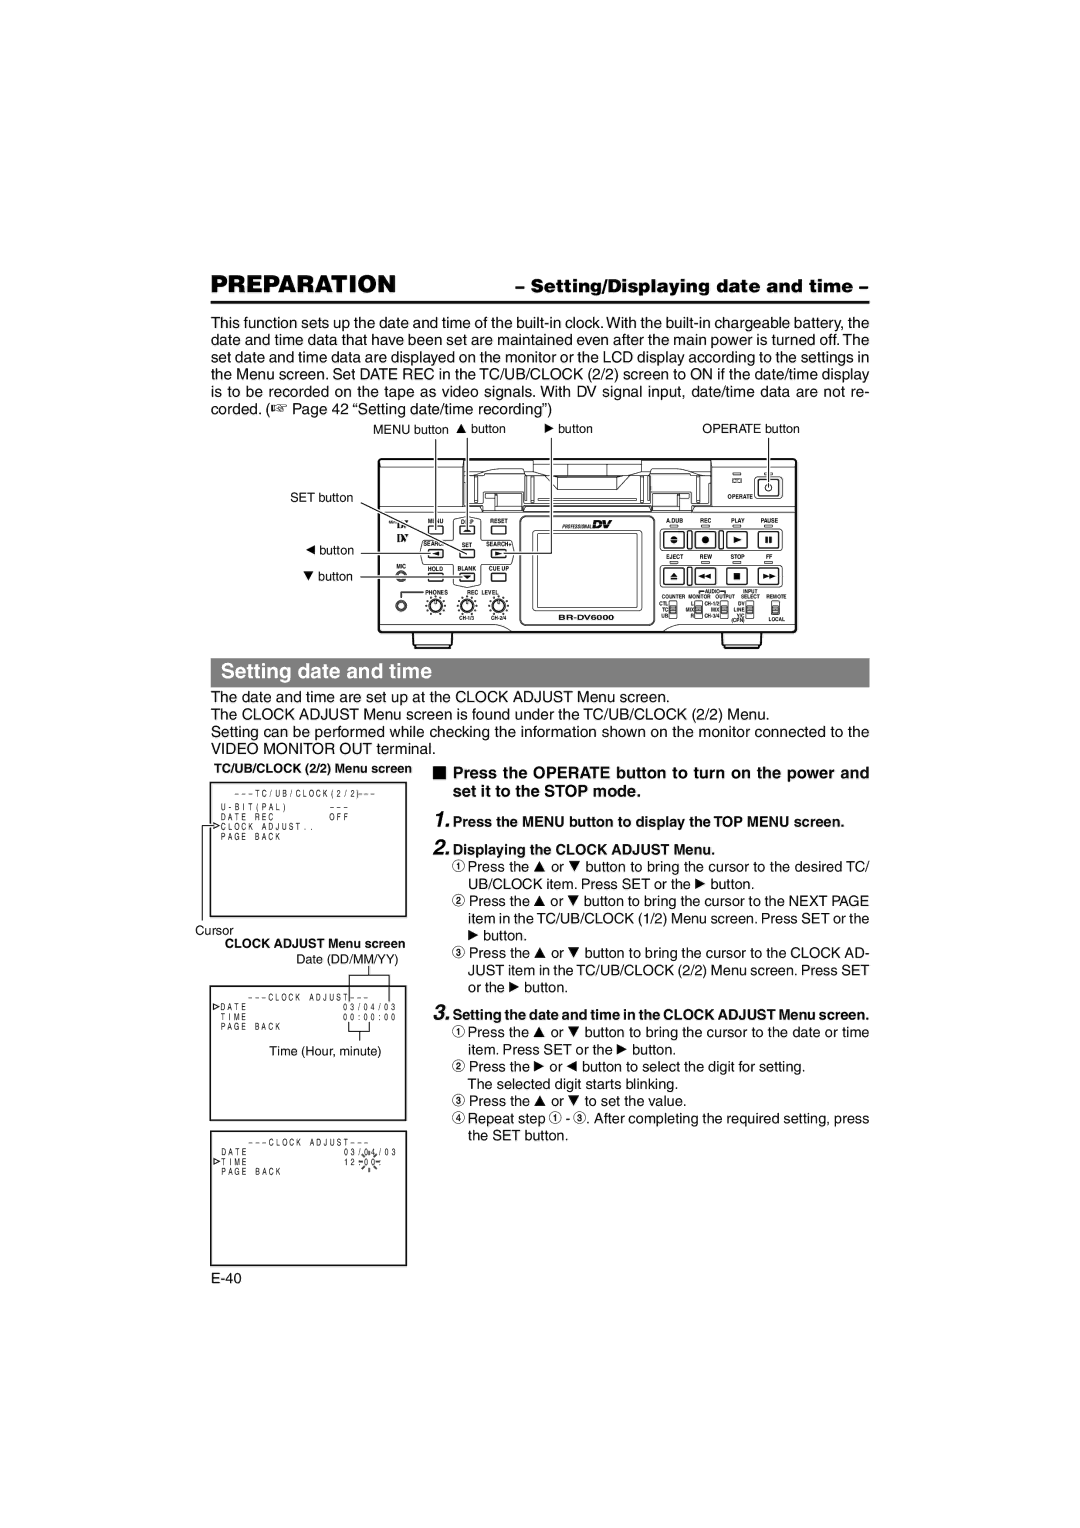
This function sets up the date and time of the built-in clock. With the built-in chargeable battery, the date and time data that have been set are maintained even after the main power is turned off. The set date and time data are displayed on the monitor or the LCD display according to the settings in the Menu screen. Set DATE REC in the TC/UB/CLOCK (2/2) screen to ON if the date/time display is to be recorded on the tape as video signals. With DV signal input, date/time data are not re- corded. (Page 42 “Setting date/time recording”)

SET button

;button

9button

MENU button 8 button

: button


OPERATE button


OPERATE


Mini

MENU

DISP

RESET

PROFESSIONAL

A.DUB


REC

PLAY

PAUSE


SEARCH–

SET

SEARCH+


EJECT


REW

STOP

FF

MIC

HOLD

BLANK

CUE UP


PHONES

REC LEVEL


AUDIO

INPUT

REMOTE


COUNTER MONITOR OUTPUT SELECT


CTL

L

CH-1/2

DV


TC

MIX

MIX

LINE


CH-1/3

CH-2/4

BR-DV6000

UB

R

CH-3/4

Y/C

LOCAL


(CPN)

Setting date and time

The date and time are set up at the CLOCK ADJUST Menu screen.

The CLOCK ADJUST Menu screen is found under the TC/UB/CLOCK (2/2) Menu.

Setting can be performed while checking the information shown on the monitor connected to the VIDEO MONITOR OUT terminal.

TC/UB/CLOCK (2/2) Menu screen

– – – T C / U B / C L O C K ( 2

/ 2 )– – –

U - B I T ( P A L )

– – –

D A T E

R E C

O F F

C L O C K A D J U S T . .


P A G E

B A C K


Cursor

CLOCK ADJUST Menu screen


Date (DD/MM/YY)


– – – C L O C K A D J U S T – – –

D A T E

0 3 / 0 4 / 0 3

T I M E

0 0 : 0 0 : 0 0

P A G E

B A C K


Time (Hour, minute)


– – – C L O C K A D J U S T – – –

D A T E

0 3 / 0 4 / 0 3

T I M E

1 2 : 0 0 :

P A G E

B A C K


Press the OPERATE button to turn on the power and set it to the STOP mode.

1. Press the MENU button to display the TOP MENU screen.

2. Displaying the CLOCK ADJUST Menu.

1Press the 8 or 9 button to bring the cursor to the desired TC/ UB/CLOCK item. Press SET or the : button.

2Press the 8 or 9 button to bring the cursor to the NEXT PAGE item in the TC/UB/CLOCK (1/2) Menu screen. Press SET or the

: button.

3Press the 8 or 9 button to bring the cursor to the CLOCK AD- JUST item in the TC/UB/CLOCK (2/2) Menu screen. Press SET or the : button.

3.Setting the date and time in the CLOCK ADJUST Menu screen.

1 Press the 8 or 9 button to bring the cursor to the date or time item. Press SET or the : button.

2 Press the : or ; button to select the digit for setting. The selected digit starts blinking.

3Press the 8 or 9 to set the value.

4Repeat step 1 - 3. After completing the required setting, press the SET button.

E-40

Page 40
Image 40
JVC BR-DV6000E instruction manual Setting date and time, Setting/Displaying date and time

BR-DV6000E specifications

The JVC BR-DV6000E is a professional DV deck that has become a staple for many video production specialists, offering a blend of robust features and reliable performance. Known for its versatility and user-friendly interface, the BR-DV6000E is designed to meet the needs of various applications, from broadcasting to video editing, making it an essential asset for professional environments.

One of the standout features of the BR-DV6000E is its ability to support multiple formats, including DV, miniDV, and DVCAM. This flexibility allows users to work with different types of media without the need for multiple decks, thus streamlining the workflow in any production setup. Additionally, the deck offers comprehensive compatibility with different video resolutions, ensuring that it meets the varying demands of modern video standards.

The BR-DV6000E is equipped with advanced technologies that enhance its performance. It boasts a high-quality digital video processing engine that ensures superior image quality, along with low noise levels, making it ideal for professional broadcast applications. The deck supports both NTSC and PAL formats, providing users with the freedom to work with international projects seamlessly.

Another notable characteristic of the BR-DV6000E is its robust build quality. Designed for everyday use in demanding environments, the deck features a durable chassis that withstands the rigors of regular operation, while the intuitive front panel layout provides easy access to essential controls and functions. This design not only aids in usability but also enhances productivity during editing sessions.

For connectivity, the BR-DV6000E offers a range of input and output options, including FireWire (IEEE 1394), which enables fast data transfer and easy integration with non-linear editing systems. This connectivity is crucial for professionals who require quick access to video footage during editing and post-production.

In conclusion, the JVC BR-DV6000E is a highly versatile and reliable DV deck that caters to the needs of professional videographers and broadcasters. With its support for multiple formats, high-quality digital processing, robust build, and extensive connectivity options, it is an invaluable tool for anyone looking to create high-quality video content in an efficient manner. The combination of these features ensures that the BR-DV6000E remains a popular choice among industry professionals, cementing its reputation as a dependable workhorse in the world of video production.