ELECTRICAL CONNECTIONS
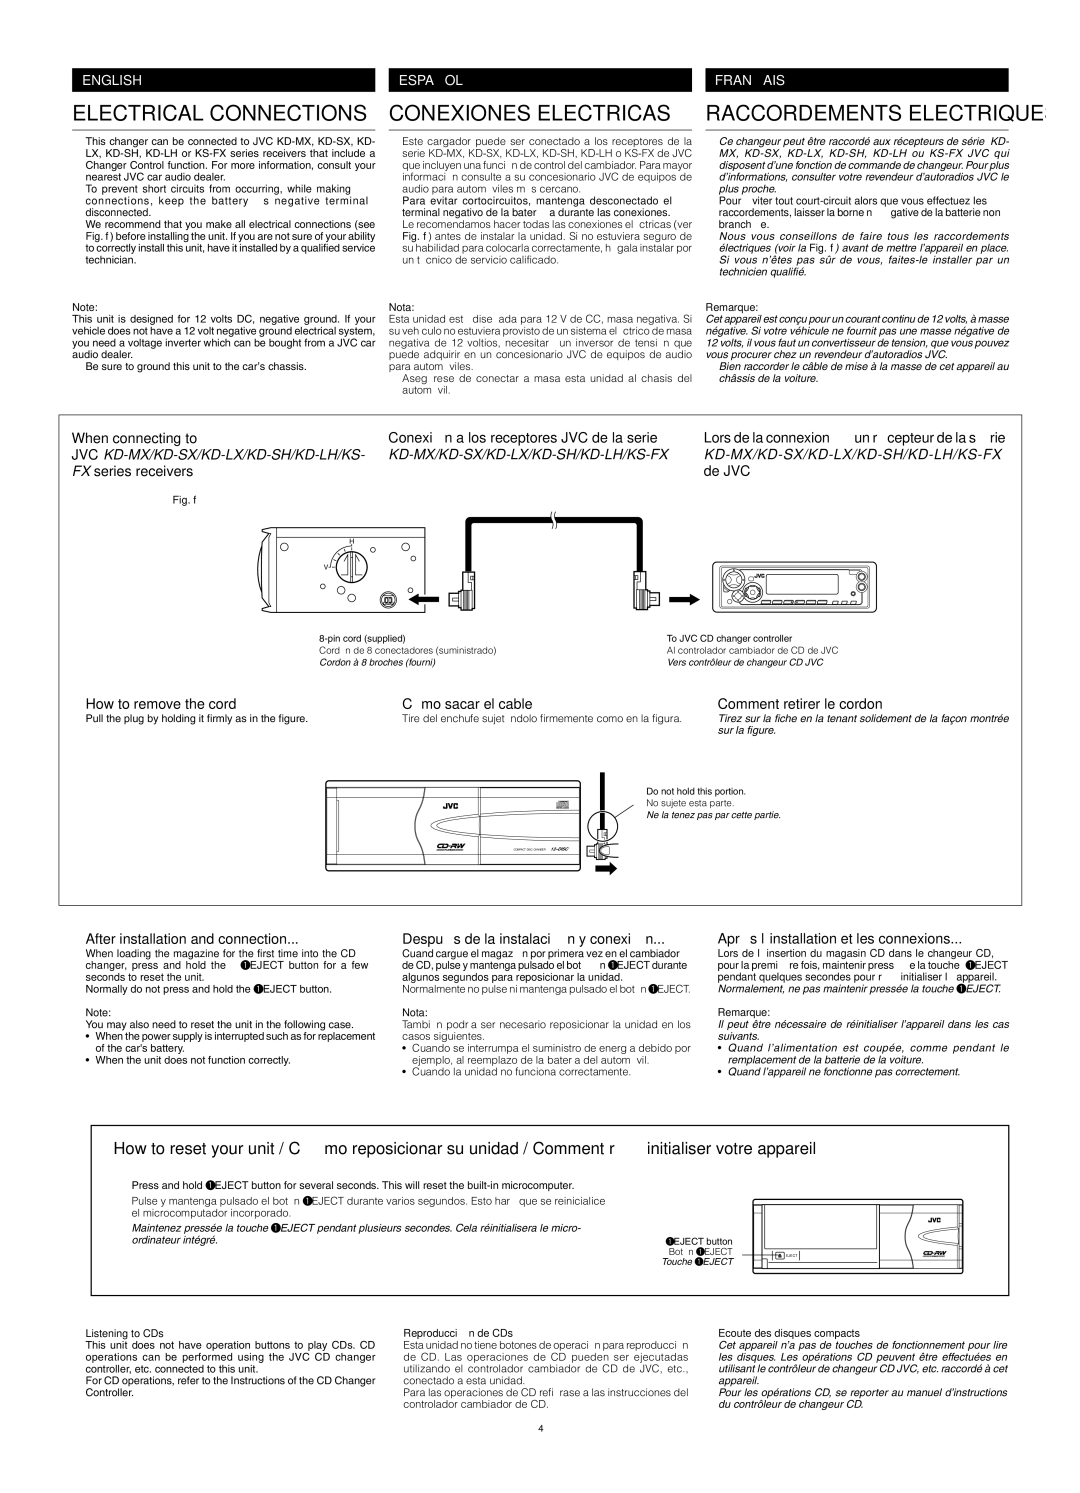
•This changer can be connected to JVC KD-MX, KD-SX, KD- LX, KD-SH, KD-LH or KS-FX series receivers that include a Changer Control function. For more information, consult your nearest JVC car audio dealer.
•To prevent short circuits from occurring, while making connections, keep the battery’s negative terminal disconnected.
We recommend that you make all electrical connections (see Fig. f) before installing the unit. If you are not sure of your ability to correctly install this unit, have it installed by a qualified service technician.
Note:
This unit is designed for 12 volts DC, negative ground. If your vehicle does not have a 12 volt negative ground electrical system, you need a voltage inverter which can be bought from a JVC car audio dealer.
•Be sure to ground this unit to the car’s chassis.
CONEXIONES ELECTRICAS
•Este cargador puede ser conectado a los receptores de la serie KD-MX, KD-SX, KD-LX, KD-SH, KD-LH o KS-FX de JVC que incluyen una función de control del cambiador. Para mayor información consulte a su concesionario JVC de equipos de audio para automóviles más cercano.
•Para evitar cortocircuitos, mantenga desconectado el terminal negativo de la batería durante las conexiones. Le recomendamos hacer todas las conexiones eléctricas (ver Fig. f) antes de instalar la unidad. Si no estuviera seguro de su habilidad para colocarla correctamente, hágala instalar por un técnico de servicio calificado.
Nota:
Esta unidad está diseñada para 12 V de CC, masa negativa. Si su vehículo no estuviera provisto de un sistema eléctrico de masa negativa de 12 voltios, necesitará un inversor de tensión que puede adquirir en un concesionario JVC de equipos de audio para automóviles.
•Asegúrese de conectar a masa esta unidad al chasis del automóvil.
RACCORDEMENTS ELECTRIQUES
•Ce changeur peut être raccordé aux récepteurs de série KD- MX, KD-SX, KD-LX, KD-SH, KD-LH ou KS-FX JVC qui disposent d’une fonction de commande de changeur. Pour plus d’informations, consulter votre revendeur d’autoradios JVC le plus proche.
•Pour éviter tout court-circuit alors que vous effectuez les raccordements, laisser la borne négative de la batterie non branchée.
Nous vous conseillons de faire tous les raccordements électriques (voir la Fig. f) avant de mettre l’appareil en place. Si vous n’êtes pas sûr de vous, faites-le installer par un technicien qualifié.
Remarque:
Cet appareil est conçu pour un courant continu de 12 volts, à masse négative. Si votre véhicule ne fournit pas une masse négative de 12 volts, il vous faut un convertisseur de tension, que vous pouvez vous procurer chez un revendeur d’autoradios JVC.
•Bien raccorder le câble de mise à la masse de cet appareil au châssis de la voiture.
Do not hold this portion.
No sujete esta parte.
Ne la tenez pas par cette partie.
COMPACT DISC CHANGER 12–DISC
•After installation and connection...
When loading the magazine for the first time into the CD changer, press and hold the 0EJECT button for a few seconds to reset the unit.
Normally do not press and hold the 0EJECT button.
Note:
You may also need to reset the unit in the following case.
•When the power supply is interrupted such as for replacement of the car's battery.
•When the unit does not function correctly.
•Después de la instalación y conexión...
Cuand cargue el magazín por primera vez en el cambiador de CD, pulse y mantenga pulsado el botón 0EJECT durante algunos segundos para reposicionar la unidad.
Normalmente no pulse ni mantenga pulsado el botón 0EJECT.
Nota:
También podría ser necesario reposicionar la unidad en los casos siguientes.
•Cuando se interrumpa el suministro de energía debido por ejemplo, al reemplazo de la batería del automóvil.
•Cuando la unidad no funciona correctamente.
•Après l’installation et les connexions...
Lors de l’insertion du magasin CD dans le changeur CD, pour la première fois, maintenir pressée la touche 0EJECT pendant quelques secondes pour réinitialiser l’appareil.
Normalement, ne pas maintenir pressée la touche 0EJECT.
Remarque:
Il peut être nécessaire de réinitialiser l’appareil dans les cas suivants.
•Quand l’alimentation est coupée, comme pendant le remplacement de la batterie de la voiture.
•Quand l’appareil ne fonctionne pas correctement.
•Listening to CDs
This unit does not have operation buttons to play CDs. CD operations can be performed using the JVC CD changer controller, etc. connected to this unit.
For CD operations, refer to the Instructions of the CD Changer Controller.
•Reproducción de CDs
Esta unidad no tiene botones de operación para reproducción de CD. Las operaciones de CD pueden ser ejecutadas utilizando el controlador cambiador de CD de JVC, etc., conectado a esta unidad.
Para las operaciones de CD refiérase a las instrucciones del controlador cambiador de CD.
•Ecoute des disques compacts
Cet appareil n’a pas de touches de fonctionnement pour lire les disques. Les opérations CD peuvent être effectuées en utilisant le contrôleur de changeur CD JVC, etc. raccordé à cet appareil.
Pour les opérations CD, se reporter au manuel d’instructions du contrôleur de changeur CD.

