Serial No
For customer Use
About burning-in of the D-ILA device
Safety Precautions
Do not allow any unqualified person to install the unit
Safety Precautions
Contents
Information on separately sold items
Accessories
Projection lens
Video board
Front Side / Top Surface / Right Side
Controls and Features
Exhaust vents
Left-hand side / Back Side
Vents for cooling fans through which warm air comes out
Control panel
Control Panel
Setting button
When a menu is shown
AV button
RGB button
Connector Panel
Remote Control Unit
Preset button
Lens Lock Ô Unlock switch
AV button Quick ALIGN. Quick Alignment button
AV Hide button
Install the batteries
Installing Batteries
Menu / Enter Menu Operation Button
Open the back cover
Precautions for Installation
Installing the Projector
When installing the projector, observe the followings
Allowable minimum space required
Reflected light
Relationship relative to Glass Surface
Or more
Change of projection screen according to aspect ratio
Lens Shift Function
Screen
Center line of the lens
Maximum amount of shift
Relational table for maximum shift amounts aspect ratio 4
Projection Distances and Screen Sizes
Adjustable range of the lens
Relationship of screen size vs. projection distance
Signals that Can Be Input to the Projector
Connecting to Various Devices
Video signals
Computer signals
RGB switcher Projector Computer
Examples of System Configuration
Example of a basic system
Also, read the manuals which came with the equipment
Desktop type
Connecting to Computer Devices
RGB output devices
Remote control when remote control cable is used
Connecting to Devices which Control the Projector
To remote control
Remote control cable
Remove the power input terminal cover
Connecting the Power Cord Supplied
To use the projector
Remove the lens cap
When Turning On the Devices Connected to the Projector
Turning off the Power
Turning on the Power
Basic Operations
Stopped running
When you press Video
Adjust the screen size
When you press Computer
For setting the source, see
Adjust focus with the remote control’s Focus +/- buttons
Adjust focus
When using the projector
¶ For Operating Other Functions
Projector’s button
To display the Setting menu
To display the Main menu
To clear the main menu
Press AV Hide on the remote control
To use the remote control’s Preset button
To display Channel on the screen
To temporarily erase video image
Making Basic Settings
Operating the Setting Menu
Press the Setting button of the projector
Press the Setting button to select the desired item
Operating the Main Menu
Configuration of the Main Menu Computer-related input
Set adjust the item
Remote control unit
Operating the Main Menu Basic Operation of the Main Menu
Press the MENU/ENTER button
Press the MENU/ENTER button
Changing the Color System
Press the MENU/ENTER button
Changing the Language Display
Language display
About language display
Adjustment item Button Adjustment content
Adjusting the Pixel Clock
Main menu appears on the screen
Adjusting the Screen Position
When AV signals are input
Adjusting Picture Quality
When computer-related signals are input
Submenu items
To adjust multiple items, repeat steps 4
For video system input
For computer system input
Button Adjustment content
Following optional functions can be set adjusted
Setting and Adjusting Other Functions Options
Submenu items of the Options menu are displayed
Submenu item Options
Options menu
Display, the video image resolution becomes coarse
Aspect
Input mode Factory setting
Changing Setting the Source
Selected item displayed in text is shown in magenta color
Selected item text display is shown in magenta color
Source setup menu
When a source setting Dedica TED Source is
Submenu
Press MENU/ENTER to set fix
User Source setup menu is displayed
When a source setting User is selected
Press MENU/ENTER toward the 5 or ∞ mark to
Select a user area
Press the MENU/ENTER button to set
Setting Up Channels
Press MENU/ENTER to set
When Line is selected
Setting Up Channels Line setup
Line selection menu screen appears
Line selection menu
When Source is selected
Setting Up Channels Source setup
Source registration screen appears
Press the MENU/ENTER button
Switcher number setup menu is displayed
Setting Up Channels SWNo. setup
Switcher No. setting menu
Press the page Back button to set
Changing Channels CH Change
To switch channels using aDIRECT Channel
Press page Back while no menu is
Displayed
Line input, source and switcher number registered to
Want to switch to
Mark to select the channel CH you
Channel are selected
Submenu item User Source SET UP
Setting Up or Changing User Sources
Connection
Submenu item, User Source Setup menu , appears on
User Source setup menu
Press MENU/ENTER toward the 3mark to select the User Name
Screen
To delete a user name, overwrite the user name with spaces
Repeat steps 1 and 2 to enter the user name
Press MENU/ENTER toward the 2or 3 mark to adjust the item
Setting Up or Changing the Display Size
Display Size adjustment menu
To adjust other items, repeat steps 4
Adjustment item Contents of adjustment
Remove the filter cover screws
Cleaning and Replacing the Filter
Remove the filters
There are two filters used
Reinstall the filters
Clean the filters
About Light-Source Lamp Replacement
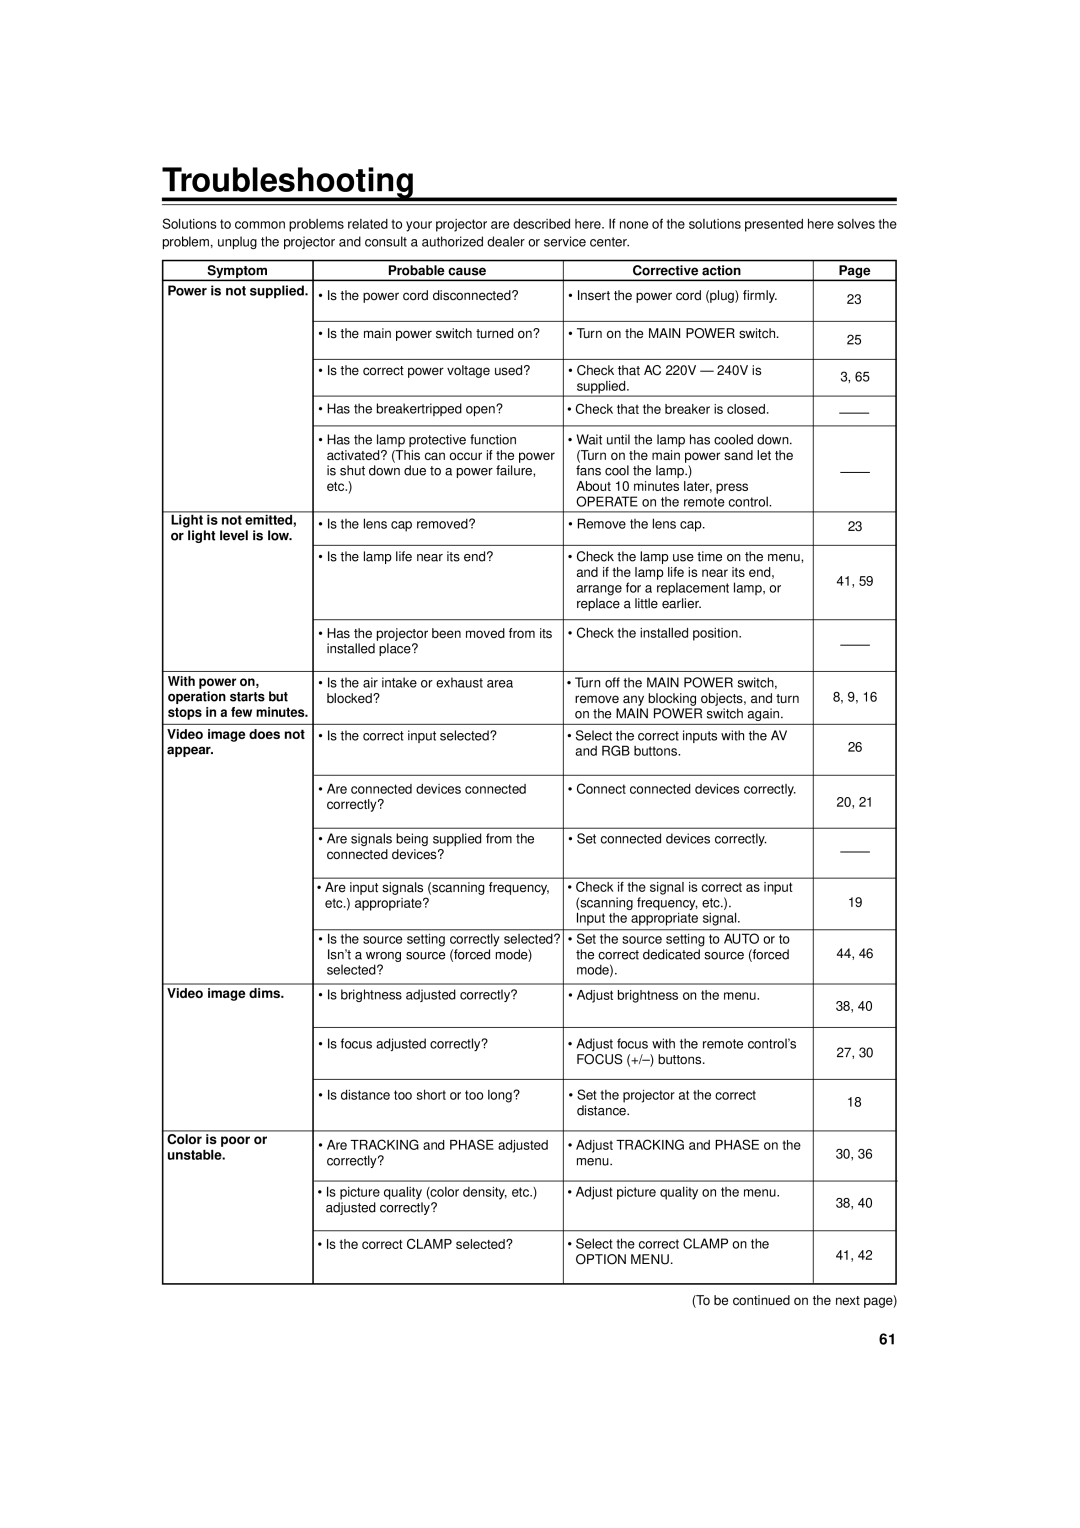
Troubleshooting
Troubleshooting
Remote control unit
When the emergency indicator starts blinking
Is not possible
Does not work
EXT. in AV in input
Specifications
RGB in RGB input
Vertical sync signal
Horizontal sync/composite sync signal H/Cs
Line, D-sub 3-row 15-pin ⋅
7Vp-p, 75Ω
DTV-format signals
Outside dimensions
Top
Front
Terminal
Pin assignment Specifications for terminals
RS-232C terminal
Computer IN-1 PC / Computer OUT Terminal
V-Ni
LCT0634-001D