12EN | GETTING STARTED (cont.) |
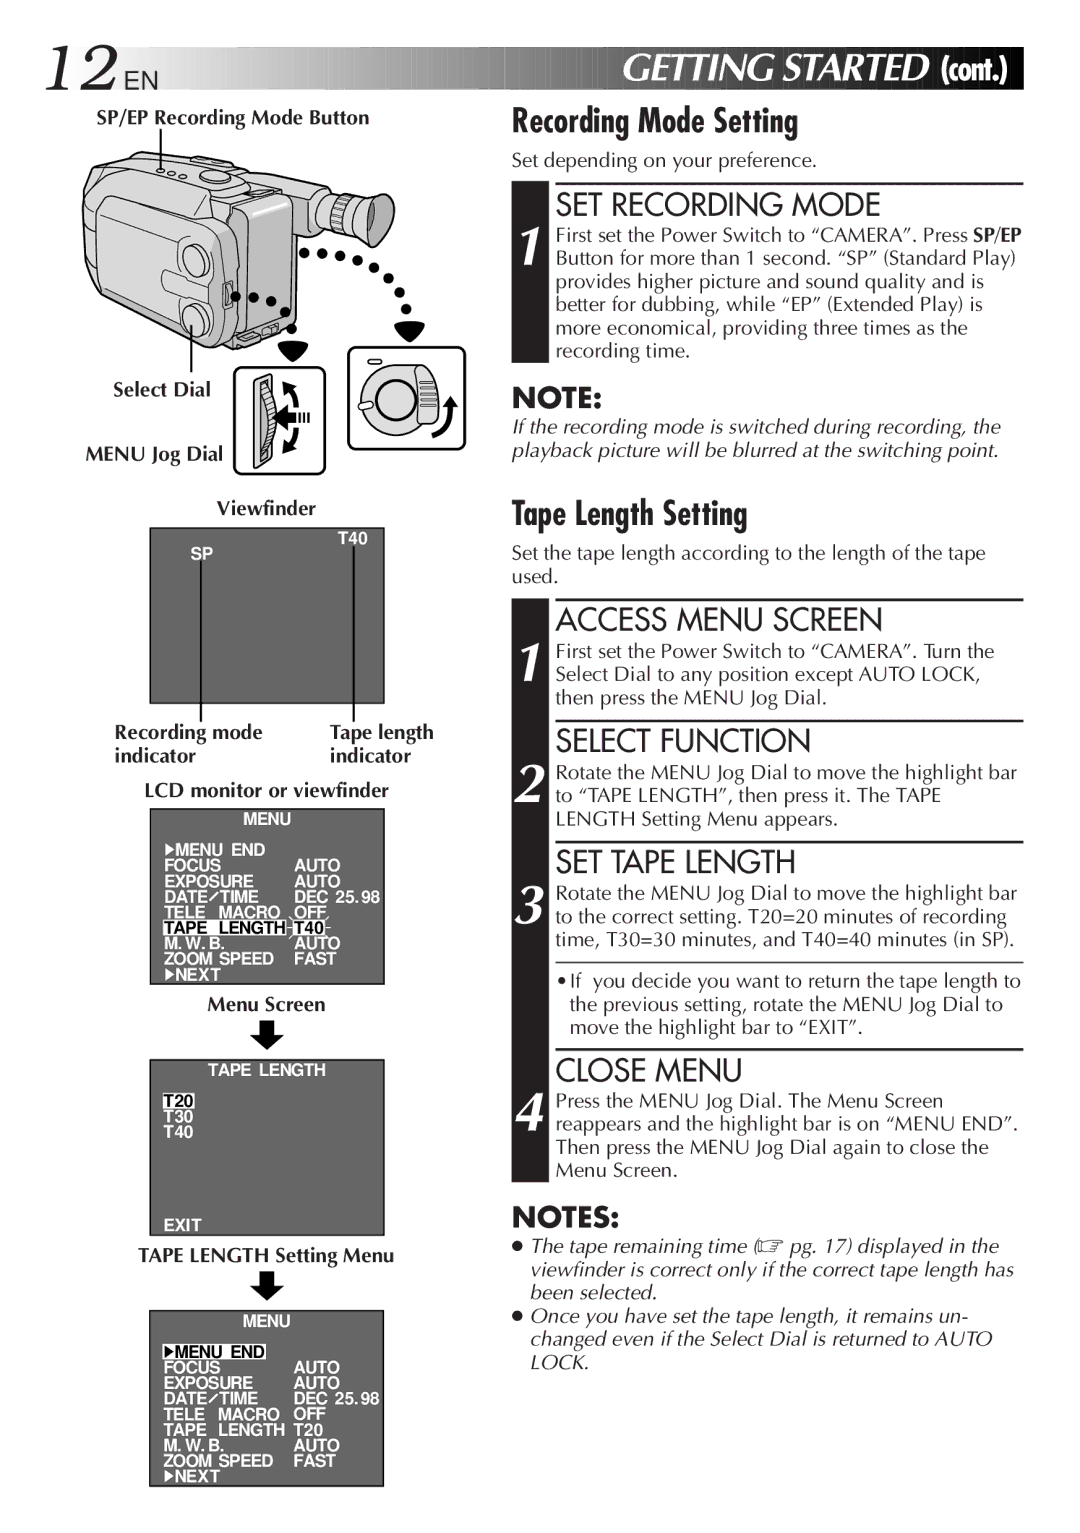
SP/EP Recording Mode Button | Recording Mode Setting |
Select Dial
MENU Jog Dial
Viewfinder
T40
SP
Recording mode |
| Tape length | |||||
indicator |
| indicator | |||||
LCD monitor or viewfinder | |||||||
|
|
|
|
|
|
|
|
|
|
| MENU |
|
|
| |
|
| 4MENU END | AUTO |
| |||
|
| FOCUS |
| ||||
|
| EXPOSURE | AUTO |
| |||
|
| DATE TIME | DEC 25. 98 |
| |||
|
| TELE MACRO | OFF |
| |||
|
| TAPE LENGTH | T40 |
|
| ||
|
| M. W. B. | AUTO |
| |||
|
| ZOOM SPEED | FAST |
| |||
|
| 4NEXT |
|
|
| ||
|
|
| Menu Screen | ||||
|
|
|
|
| |||
|
|
| TAPE LENGTH |
| |||
|
|
|
|
|
|
| |
|
| T20 |
|
|
| ||
|
| T30 |
|
|
|
| |
|
| T40 |
|
|
| ||
|
| EXIT |
|
|
| ||
TAPE LENGTH Setting Menu | |||||||
|
|
|
|
|
|
|
|
|
|
| MENU |
|
|
| |
|
|
|
|
|
|
|
|
|
| 4MENU END | AUTO |
| |||
|
| FOCUS |
|
| |||
|
| EXPOSURE | AUTO |
| |||
|
| DATE TIME | DEC 25. 98 |
| |||
|
| TELE MACRO | OFF |
| |||
|
| TAPE LENGTH T20 |
| ||||
|
| M. W. B. | AUTO |
| |||
|
| ZOOM SPEED | FAST |
| |||
|
| 4NEXT |
|
|
| ||
Set depending on your preference.
SET RECORDING MODE
1 First set the Power Switch to “CAMERA”. Press SP/EP Button for more than 1 second. “SP” (Standard Play) provides higher picture and sound quality and is better for dubbing, while “EP” (Extended Play) is more economical, providing three times as the recording time.
NOTE:
If the recording mode is switched during recording, the playback picture will be blurred at the switching point.
Tape Length Setting
Set the tape length according to the length of the tape used.
ACCESS MENU SCREEN
1 First set the Power Switch to “CAMERA”. Turn the Select Dial to any position except AUTO LOCK, then press the MENU Jog Dial.
SELECT FUNCTION
2 Rotate the MENU Jog Dial to move the highlight bar to “TAPE LENGTH”, then press it. The TAPE LENGTH Setting Menu appears.
SET TAPE LENGTH
3 Rotate the MENU Jog Dial to move the highlight bar to the correct setting. T20=20 minutes of recording time, T30=30 minutes, and T40=40 minutes (in SP).
•If you decide you want to return the tape length to the previous setting, rotate the MENU Jog Dial to move the highlight bar to “EXIT”.
CLOSE MENU
4 Press the MENU Jog Dial. The Menu Screen reappears and the highlight bar is on “MENU END”. Then press the MENU Jog Dial again to close the Menu Screen.
NOTES:
●The tape remaining time (☞ pg. 17) displayed in the viewfinder is correct only if the correct tape length has been selected.
●Once you have set the tape length, it remains un- changed even if the Select Dial is returned to AUTO LOCK.