Manuals
/
Brands
/
Photography
/
Camcorder
/
JVC
/
Photography
/
Camcorder
JVC
GR-AX760, GR-AXM230, GR-SX960, GR-SXM330 specifications
- page 5
1
5
56
56
Download
56 pages, 1.35 Mb
EN
5
13
2
How To
Attach The Lens Cap
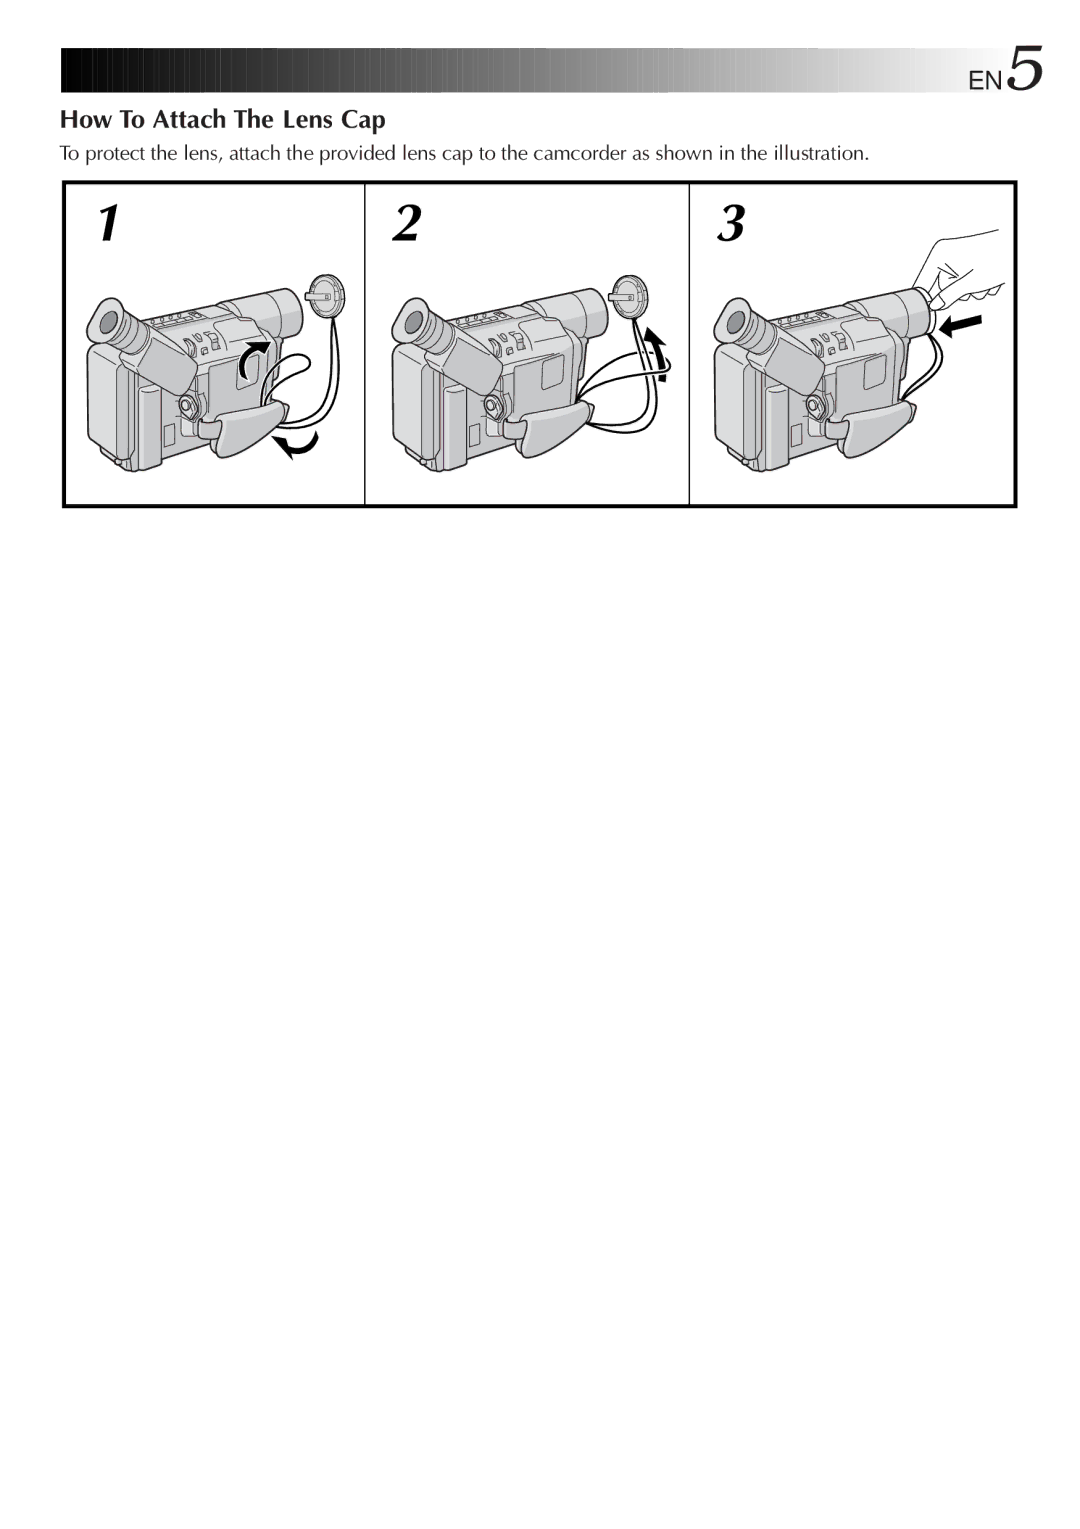
To protect the lens, attach the provided lens cap to the camcorder as shown in the illustration.
Contents
Main
EN
INSTRUCTIONS
GR-SXM330 GR-SX960 GR-AXM230 GR-AX760
COMPACT VHS CAMCORDER
ENGLISH
CONTENTS
SAFETY PRECAUTIONS
CAUTION
The rating information and safety caution of the AC Adapter are on its upper and lower sides.
Dear Customer,
IMPORTANT SAFETY INSTRUCTIONS
AUTOMATIC DEMONSTRATION
Automatic Demonstration takes place when DEMO MODE is set to ON (factory-preset).
PROVIDED ACCESSORIES
Page
2
1
3
4
Power
CHARGING THE BATTERY PACK
To Detach The Battery Pack . . .
During charging or discharging, the camcorder cannot be operated.
Charging and discharging is not possible if the wrong type of battery is used.
USING AC POWER
The provided AC Adapter features automatic voltage selection in the AC range from 110 V to 240 V.
For other notes,
pg. 42.
ATTENTION:
(cont.)
1
2 43
Shoulder Strap Attachment
CAUTION:
Date/Time Settings
Set the Power Switch to . The power lamp comes on.
Rotate the MENU Wheel to select DATE/TIME and press it. The DATE/TIME Menu appears.
Press the MENU Wheel in to close the Menu Screen. NOTE:
pg. 25).
Recording Format Setting
(cont.)
Set the Power Switch to . The power lamp comes on.
Rotate the MENU Wheel to select TO SYSTEM MENU and press it to display SYSTEM MENU.
If a VHS cassette is loaded . . .
NOTES about S-VHS and S-VHS ET
Compatibility Between S-VHS And VHS
Recording Mode Setting
The tape remaining time (
Tape Length Setting
pg. 14) is correct only if the correct tape length has been selected.
Loading/Unloading A Cassette
Shooting While Watching The Viewfinder
Basic Recording
Power Switch Position
Shooting While Watching The LCD Monitor
JOURNALISTIC SHOOTING
equipped with LCD monitor only)
SELF-RECORDING
LCD monitor only)
Basic Features
Zooming:
Picture Stabilizer:
5Sec. Rec (5-Sec. Recording)
Quick Review:
Retake:
DANGER
Video Light
Advanced Features Snapshot
Night-Alive
ANIGHT AUTO
1 NIGHT 10X*
2NIGHT 60X*
Fade/Wipe Effects
FADER
MOSAIC (Fader)
SHUTTER (Wipe)
SLIDE (Wipe)
Program AE With Special Effects
Advanced Features (cont.)
SPORTS
Z
ND : ND EFFECT
Digital Effects
Using Menus For Detailed Adjustment
Normal Screen
Set the Power Switch to .
Press the MENU Wheel in to display the Setting Menu and rotate it to select the desired setting.
reappears with the highlight bar on RETURN.
CAMERA MENU
SYSTEM MENU
MENU SCREEN EXPLANATIONS
SYSTEM MENU (cont.)
DISPLAY
The selected display can be recorded.
If you do not want to record the display, select the OFF mode before shooting. AUTO DATE
After changing the date.
Instant Titles
The selected title will remain until OFF is selected in the TITLE Menu.
Date/Time Insert
Advanced Features (cont.)
Animation
Animation and Time-Lapse are canceled when the power is shut off or when the cassette is ejected.
Before performing the following steps, make sure that:
The Power Switch is set to .
Exposure Control
When shooting using reverse lighting or when the background is too bright.
When shooting on a reflective natural background such as at the beach or when skiing.
When the background is overly dark or the subject light.
To return to the factory setting, select AUTO in step 4.
Advanced Features (cont.)
AUTO FOCUS
MANUAL FOCUS
White Balance Adjustment
Manual White Balance Operation
Basic Playback
LCD Monitor Brightness Adjustment (models equipped with LCD monitor only):
Speaker Volume Control (models equipped with LCD monitor only): Slide the Power
Still Playback:
Shuttle Search:
Features
Tracking:
TBC (Time Base Corrector):
Counter Memory Function:
Connections And Tape Dubbing
B. Connection to a TV or VCR equipped only with A/V input connectors
Basic Connections
Tape Dubbing
Using The Cassette Adapter
Cassette Adapter (VHS Playpak)
USING THE REMOTE CONTROL UNIT
Buttons
1
2 3 4 5 6 7
8 9 0 ! @
USING THE REMOTE CONTROL UNIT
(cont.)
(GR-SXM330 only)
Installing The Batteries
Z
Animation And Time-Lapse
Animation
Time-Lapse
USING THE REMOTE CONTROL UNIT
(cont.)
(GR-SXM330 only)
Insert Editing
Use the remote control unit to perform this procedure.
Audio Dubbing
TROUBLESHOOTING
SYMPTOM POSSIBLE CAUSE(S)
TAPE TRANSPORT
POWER
RECORDING
OTHER
I T E M S N O T E S
DETAILS
(Z pg. 14, 15)
Settings (Z pg. 9)
(Z pg. 6)
(Time Base Corrector) (Z pg. 31)
Terms
Controls, Connectors And Indicators
Controls
Connectors
Indicators
Other Parts
Indications
+
&
+
7 90 ! @ $ %
^
Warning Indications
Indications During Playback
0 9
+
2 8 3 5 1 4 76
CAUTIONS
Video Light
DANGER:
General Battery Precautions
Battery Packs
Main Unit
About moisture condensation . . .
Serious malfunctioning
LCD Monitor
CAUTIONS
For Your Maintenance
1
2
3
SPECIFICATIONS
Camcorder
General
(with the LCD monitor* closed and with the view- finder fully tilted downward)
(GR-SXM330/SX960 only)
ESPAOL
Alimentacin
CARGA DE LA BATERIA
Para la extraccin de la batera . . .
ATENCION:
GUIA PARA OPERACION RAPIDA
1 2
1
2
3
FOR SERVICING (Only in U.S.A.)
HOW TO LOCATE YOUR JVC SERVICE CENTER
Dear customer:
Dont service it yourself.
JVC
WARRANTY (Only in U.S.A.)
LIMITED WARRANTY
CONSUMER VIDEO 1-90
EN