GR-AXM99UM English
Safety Precautions
Requirements for the grounding electrode
Installation
Antenna Installation Instructions
To avoid personal injury
USE
Servicing
Cassettes marked can be used with this camcorder
Zoom-in
Zoom-out
Hook on 2Push
BATT. Release
Push Eject
Open
Switch
Button Power Switch Set to Play
System Select Switch Set to D.S.C
Hook on Snapshot Button 2Push
Contents
AC Power Adapter Cassette Adapter
Charger AA-V15U
BN-V18U
Software programs
Power
Supply Power
Attach Battery Pack
Detach Battery Pack
To 240
Close the compartment cover until it clicks in place
Insert Battery
Close Cover
Jog Dial LCD monitor or viewfinder
Select Dial
Menu
Grip Adjustment
Viewfinder Adjustment
Adjust Length
Shoulder Strap Attachment
Tripod Mounting
Attach Strap
Recording Mode Setting
Tape Length Setting
Loading/Unloading a Cassette
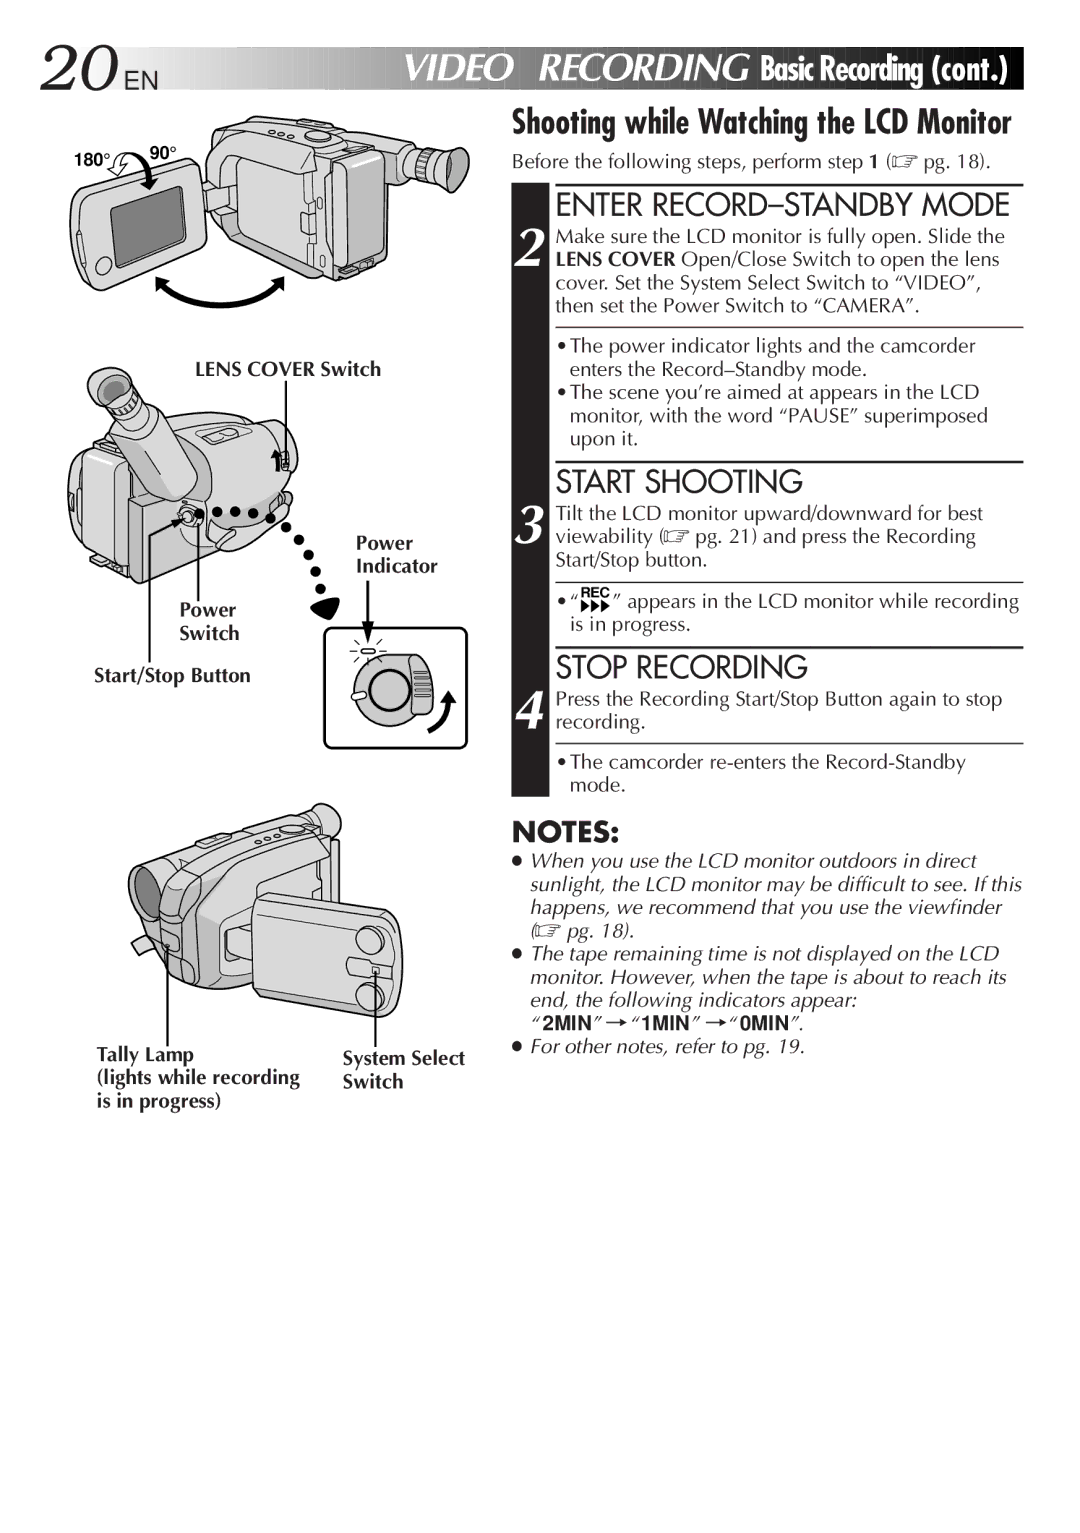
Enter RECORD-STANDBY Mode
Basic Recording
Load a Cassette
Start Shooting
Tape Remaining Time Indicator
Stop Recording
Now calculating
Blinking
Lens Cover Switch Power Indicator Start/Stop Button
Lights while recording Switch Is in progress
Brightness Control
Journalistic Shooting
Interface Shooting
Basic Features
Zoom Speed Setting Menu Zooming Speed 1 4 in order of speed
When the Select Dial is set to Auto Lock
Menu Screen
Feature
Purpose
Operation
Retake
Video Recording Basic Features
Feature Purpose Operation
DATE/TIME
Display Select Dial
To brighten the scene when natural lighting is too dim
Set the Light OFF/AUTO/ON switch as required
Mode when you use the video light
Video Light
Take Snapshot
Select Snapshot Mode
Snapshot
Full
Pictrue Mode Display Fine or STD standard Pin-Up
LCD monitor or viewfinder Fine 12Remaining Number Shots
EN Video Recording Advanced Features
Second later, the mode is activated After 1 sec
Program AE With Special Effects
LCD monitor or viewfinder Mark
Viewfinder indication
Dial
Mode
Advanced Features
Engage FADE- or Wipe Standby Mode
To Cancel FADE- or WIPE- Standby Mode
Fade/Wipe
Engage Wide Mode
Select Super Lolux Mode
Wide
Super LoLuxGain Up
Select Preset Title
Instant Titles
LCD monitor or viewfinder Title display
Title
END Setting
Using Menu For Detailed Adjustment
Make Setting
Adjusts focus automatically
Allows you to adjust focus manually pg
Adjusts exposure automatically
Allows you to adjust exposure manually pg
Tally lamp comes on to signal the start of recording
Functions are disabled
Setting is
Etc. When Demo Mode is set to on and the Menu Screen
Focusing
Patterns that are regularly repeated
END Adjustment of Focus
Focus Menu Screen
To nearer subject
Manual Focus Screen
Manual Exposure Screen To brighten the image
To darken the image
Manual White Balance Adjustment M.W.B
INT. Time Menu
REC Time Menu
INT. Time
REC Time
Release Animation Mode
Time-Lapse
SET Interval Between Recordings
SET Recording Time
Basic Playback
Rewind or Fast-Forward the Tape
Play Back
REW
Features EN
Speaker Volume Control
Adjust Volume
Tracking
Video Playback Features
Counter R/M REW
Forward Search
Reverse Search
Using The Cassette Adapter EN
Cassette Adapter VHS Playpak
Insert Cassette in Adapter
Play Back on Connected VCR
When connecting the cables, open the jack cover
Connect Camcorder to VCR
Connect Camcorder to TV
Turn on the camcorder, the VCR and the TV
To Audio Video OUT connectors Video in connectors
PLAY/PAUSE
Select Picture Mode
To select in the Full Auto mode
To shoot using various functions
Basic Shooting
Picture Mode Setting Menu
Picture Mode Setting
SET Picture Mode
Select Function
C. Shooting Advanced Features
Focusing pg
Captures faster action than Sports mode pg
High shutter speed clearly captures fast-moving action pg
Colors of a picture are reversed pg
Setting Menu ex. INT. Time
If you select FOCUS, Exposure or DATE/ Time
Mode when you wish to shoot many still images
Is better than STANDARD, Fine is more suitable for post
Production on a PC
On Next
Setting is impossible
Titles etc. When Demo Mode is set to on and the Menu
By turning off the camcorder, Demo Mode is set to OFF
Disabled
C. Playback
Basic Playback EN
C. Playback Advanced Features
If you select Index
Protect or Delete
Normal Screen
ALL
Images you shot beforehand pg
Select
View Index Images
Access Index Menu Screen
Index
Switch to D.S.C
Protect
SET Protect
Set the System Select Menu Jog Dial
Access Delete Menu Screen
Select Delete Mode
To quit the Delete Mode
Delete
Access Delete Execute Menu Screen
Case of Select
Slide Show
If you select Slide Show
Close the software, then switch off the camcorder
Connect to Personal Computer
RUN Image Transfer SOFT- Ware
END Transferring
Pull OUT Battery Holder
Replace Battery Holder
RM-V705URM-V700U Providedoptional
Functions
Transmitted beam effective area
Interval Timer Indicator
Rec Time Indicator
Random Assemble Editing R.A.Edit
SET Remote to Operate VCR
Operate VCR
MBR SET
Connect to
Prepare Camcorder
Prepare VCR
RM-V700U optional
Cont
Engage VCR’S RECORD-PAUSE Mode
Begin Automatic Editing
END Automatic Editing
ON/OFF VCR REC Stby
RM-V700URM-V705U Optional or provided
LCD monitor or viewfinder System Select Switch
START/STOP REW Play Pause Insert
Select Still Image
Begin Insert Editing
END Insert Editing
To insert still images in sequential order onto the tape
Audio Dubbing Indicator
REW Play Pause DUB
Open/Close Switch Set to Power OFF
Lens Cover
BATT. Release Push Eject
Remove Marks
74EN
Recording Mode SP/EP
Displayed when any of the buttons located
Tape Length Indicator
@ Picture Stabilizer Indicator
76EN
Diopter Adjustment
Select Dial
DATE/TIME Button
Picture Stabilizer Button REW Button
Charging the Battery Pack
Discharge The Battery Pack
High Speed Shutter Mode
Delete Select Menu Screen
Random Assemble Editing
Recording, Start/Stop Video
Remove Cassette
Pg , 51
No power is supplied
Some functions are not available
Playback
Recording cannot be performed Recording does not start
Troubleshooting
Format Menu Screen
To avoid hazard
Using Household AC Plug Adapter
Plug adapter
For safety, do not
Avoid using the unit
During use
Store cassettes
To prolong service life
To prevent damage to the LCD monitor, do not
About moisture condensation
Serious malfunctioning
Specifications
Page
GR-AXM99UM