Press 4 to play back the source tape.
Make sure the camcorder’s power is off.

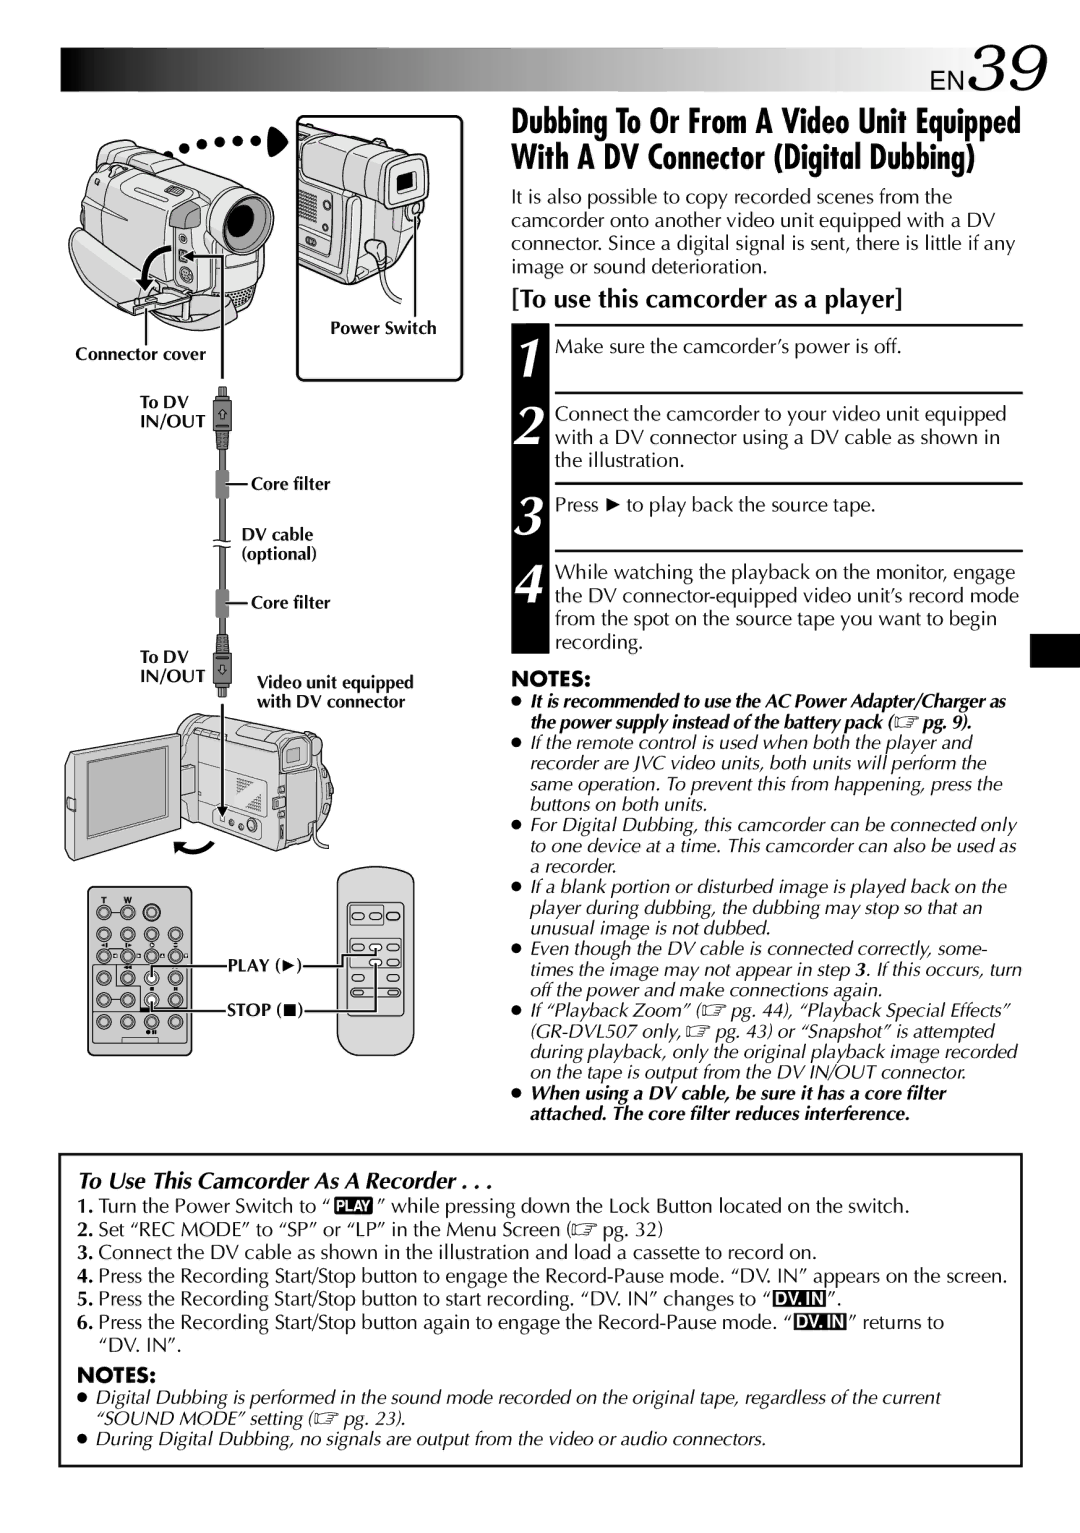
Power Switch Connector cover

To DV

IN/OUT


Core filter


DV cable


(optional)


Core filter

To DV


IN/OUT

Video unit equipped


with DV connector

PLAY (4)

STOP (5)

EN39

Dubbing To Or From A Video Unit Equipped With A DV Connector (Digital Dubbing)

It is also possible to copy recorded scenes from the camcorder onto another video unit equipped with a DV connector. Since a digital signal is sent, there is little if any image or sound deterioration.

[To use this camcorder as a player]

1

2 Connect the camcorder to your video unit equipped with a DV connector using a DV cable as shown in the illustration.

3

4 While watching the playback on the monitor, engage the DV connector-equipped video unit’s record mode from the spot on the source tape you want to begin recording.

NOTES:

It is recommended to use the AC Power Adapter/Charger as the power supply instead of the battery pack (  pg. 9).

If the remote control is used when both the player and recorder are JVC video units, both units will perform the same operation. To prevent this from happening, press the buttons on both units.

For Digital Dubbing, this camcorder can be connected only to one device at a time. This camcorder can also be used as a recorder.

If a blank portion or disturbed image is played back on the player during dubbing, the dubbing may stop so that an unusual image is not dubbed.

Even though the DV cable is connected correctly, some- times the image may not appear in step 3. If this occurs, turn off the power and make connections again.

If “Playback Zoom” (  pg. 44), “Playback Special Effects” (GR-DVL507 only,  pg. 43) or “Snapshot” is attempted during playback, only the original playback image recorded on the tape is output from the DV IN/OUT connector.

When using a DV cable, be sure it has a core filter attached. The core filter reduces interference.

To Use This Camcorder As A Recorder . . .

1.Turn the Power Switch to “ ” while pressing down the Lock Button located on the switch.

2.Set “REC MODE” to “SP” or “LP” in the Menu Screen ( pg. 32)

3.Connect the DV cable as shown in the illustration and load a cassette to record on.

4.Press the Recording Start/Stop button to engage the Record-Pause mode. “DV. IN” appears on the screen.

5.Press the Recording Start/Stop button to start recording. “DV. IN” changes to “ DV. IN ”.

6.Press the Recording Start/Stop button again to engage the Record-Pause mode. “ DV. IN ” returns to “DV. IN”.

NOTES:

Digital Dubbing is performed in the sound mode recorded on the original tape, regardless of the current “SOUND MODE” setting (  pg. 23).

During Digital Dubbing, no signals are output from the video or audio connectors.

Page 39
Image 39
JVC GR-DVL507, GR-DVL307 specifications EN39, To use this camcorder as a player

GR-DVL507, GR-DVL307 specifications

The JVC GR-DVL307 and GR-DVL507 are both compact and user-friendly mini DV camcorders that have made a significant impact in the world of home video recording. Launched in the early 2000s, these models are celebrated for their ease of use, solid build quality, and a range of features that appeal to both novice and experienced videographers.

The GR-DVL307 is equipped with a 680,000-pixel pixel CCD sensor, which ensures that videos captured are of good quality, with vibrant colors and decent resolution. Its 16x optical zoom and 800x digital zoom capabilities allow users to capture distant subjects with clarity. The camera is designed with a 2.5-inch LCD screen that provides a clear view for composing shots and monitoring recordings. The built-in LED light is particularly useful for low-light situations, giving users the flexibility to shoot in various lighting conditions.

In terms of connectivity, the GR-DVL307 offers USB and FireWire ports, enabling seamless transfer of video to a computer for editing and sharing. The camera also supports various record modes, including long play and standard play, allowing users to optimize recording time based on their needs. The inclusion of digital image stabilization reduces the chances of shaky footage, enhancing the quality of the final product.

On the other hand, the GR-DVL507 builds upon the features of the 307 with some advanced capabilities. It features a larger, 1.33-megapixel CCD sensor that significantly improves image quality, ensuring sharper images and more detailed video. The GR-DVL507 also includes a more advanced optical zoom of 20x, providing greater versatility for capturing dynamic scenes. This model features a 3.5-inch LCD monitor, which enhances the viewing experience and simplifies frame composition.

Both models incorporate JVC's innovative Video Stabilization technology which further reduces unwanted motion blur. The GR-DVL507 additionally provides options for manual control over focus and exposure, appealing to more experienced users who want greater creative control over their recordings.

In summary, JVC's GR-DVL307 and GR-DVL507 camcorders represent excellent choices for those looking to capture video memories without compromising on quality or ease of use. With their combination of user-oriented features, solid technology, and portability, these camcorders continue to be valued by those who appreciate the art of home video making.