8 EN

GETTING STARTED

Power

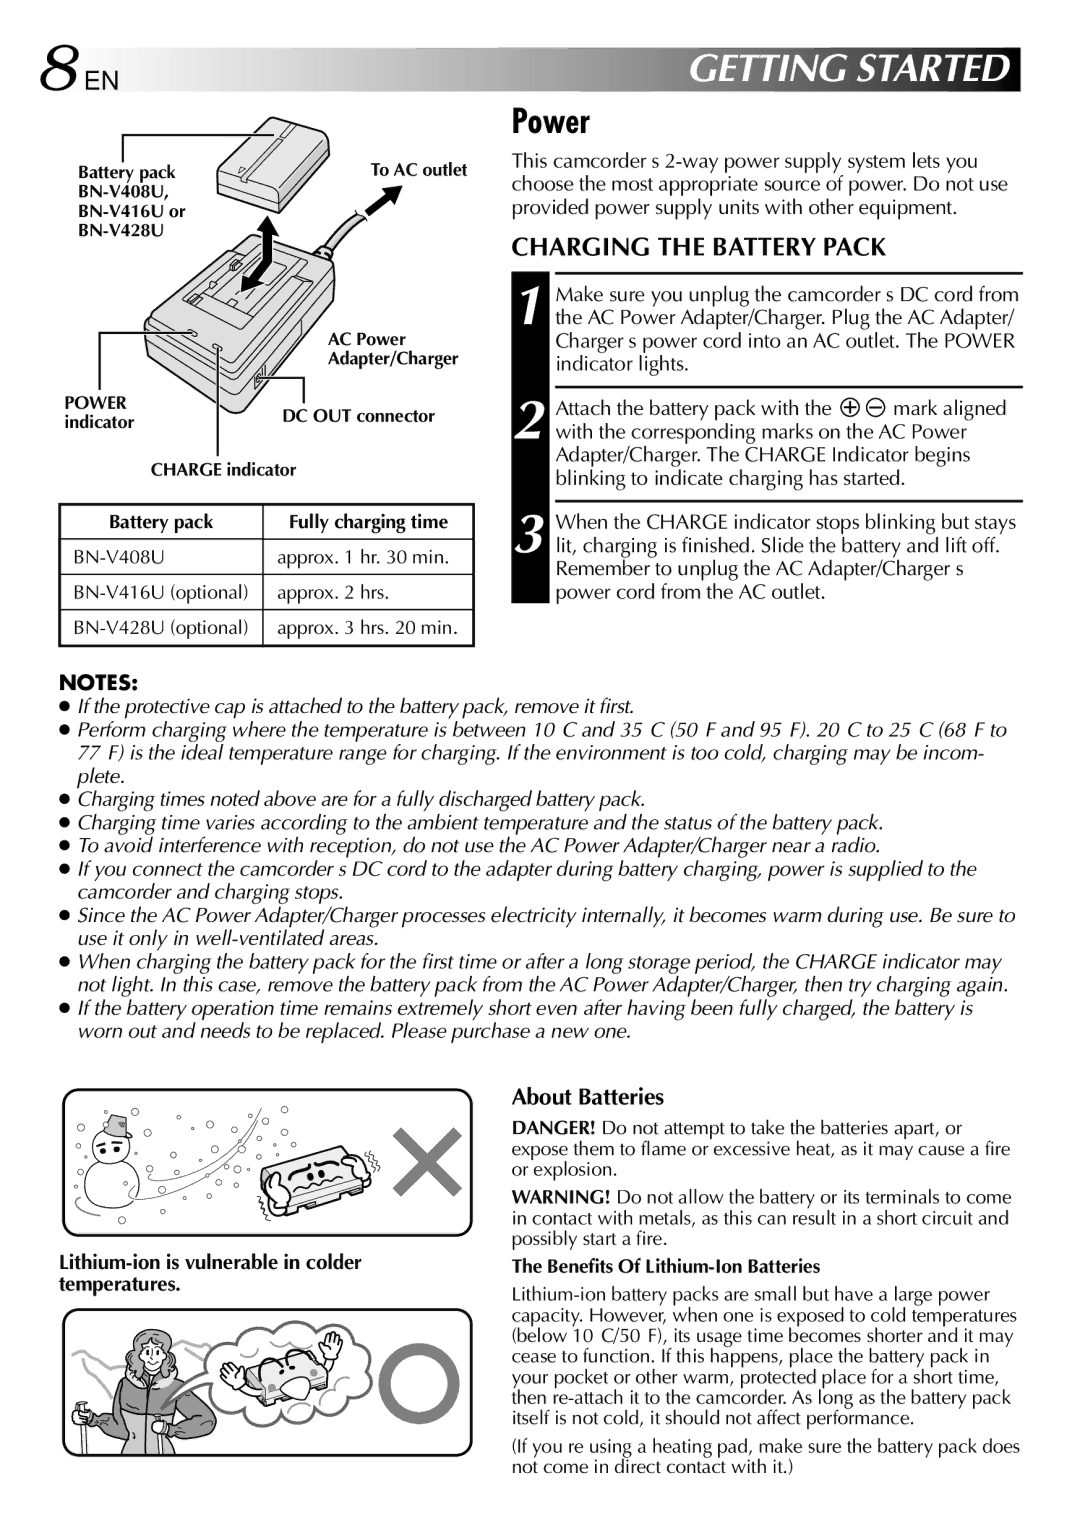
Battery pack BN-V408U, BN-V416U or BN-V428U

POWER indicator

To AC outlet

AC Power

Adapter/Charger

DC OUT connector

This camcorder’s 2-way power supply system lets you choose the most appropriate source of power. Do not use provided power supply units with other equipment.

CHARGING THE BATTERY PACK

1 Make sure you unplug the camcorder’s DC cord from the AC Power Adapter/Charger. Plug the AC Adapter/ Charger’s power cord into an AC outlet. The POWER indicator lights.

2 Attach the battery pack with the mark aligned with the corresponding marks on the AC Power Adapter/Charger. The CHARGE Indicator begins

CHARGE indicator

Battery pack

Fully charging time


BN-V408U

approx. 1 hr. 30 min.


BN-V416U (optional)

approx. 2 hrs.


BN-V428U (optional)

approx. 3 hrs. 20 min.


blinking to indicate charging has started.

3 When the CHARGE indicator stops blinking but stays lit, charging is finished. Slide the battery and lift off. Remember to unplug the AC Adapter/Charger’s power cord from the AC outlet.

NOTES:

If the protective cap is attached to the battery pack, remove it first.

Perform charging where the temperature is between 10°C and 35°C (50°F and 95°F). 20°C to 25°C (68°F to 77°F) is the ideal temperature range for charging. If the environment is too cold, charging may be incom- plete.

Charging times noted above are for a fully discharged battery pack.

Charging time varies according to the ambient temperature and the status of the battery pack.

To avoid interference with reception, do not use the AC Power Adapter/Charger near a radio.

If you connect the camcorder’s DC cord to the adapter during battery charging, power is supplied to the camcorder and charging stops.

Since the AC Power Adapter/Charger processes electricity internally, it becomes warm during use. Be sure to use it only in well-ventilated areas.

When charging the battery pack for the first time or after a long storage period, the CHARGE indicator may not light. In this case, remove the battery pack from the AC Power Adapter/Charger, then try charging again.

If the battery operation time remains extremely short even after having been fully charged, the battery is worn out and needs to be replaced. Please purchase a new one.

Lithium-ion is vulnerable in colder temperatures.

About Batteries

DANGER! Do not attempt to take the batteries apart, or expose them to flame or excessive heat, as it may cause a fire or explosion.

WARNING! Do not allow the battery or its terminals to come in contact with metals, as this can result in a short circuit and possibly start a fire.

The Benefits Of Lithium-Ion Batteries

Lithium-ion battery packs are small but have a large power capacity. However, when one is exposed to cold temperatures (below 10°C/50°F), its usage time becomes shorter and it may cease to function. If this happens, place the battery pack in your pocket or other warm, protected place for a short time, then re-attach it to the camcorder. As long as the battery pack itself is not cold, it should not affect performance.

(If you’re using a heating pad, make sure the battery pack does not come in direct contact with it.)

Page 8
Image 8
JVC GR-DVL307 Power, Charging the Battery Pack, About Batteries, Lithium-ion is vulnerable in colder temperatures

GR-DVL507, GR-DVL307 specifications

The JVC GR-DVL307 and GR-DVL507 are both compact and user-friendly mini DV camcorders that have made a significant impact in the world of home video recording. Launched in the early 2000s, these models are celebrated for their ease of use, solid build quality, and a range of features that appeal to both novice and experienced videographers.

The GR-DVL307 is equipped with a 680,000-pixel pixel CCD sensor, which ensures that videos captured are of good quality, with vibrant colors and decent resolution. Its 16x optical zoom and 800x digital zoom capabilities allow users to capture distant subjects with clarity. The camera is designed with a 2.5-inch LCD screen that provides a clear view for composing shots and monitoring recordings. The built-in LED light is particularly useful for low-light situations, giving users the flexibility to shoot in various lighting conditions.

In terms of connectivity, the GR-DVL307 offers USB and FireWire ports, enabling seamless transfer of video to a computer for editing and sharing. The camera also supports various record modes, including long play and standard play, allowing users to optimize recording time based on their needs. The inclusion of digital image stabilization reduces the chances of shaky footage, enhancing the quality of the final product.

On the other hand, the GR-DVL507 builds upon the features of the 307 with some advanced capabilities. It features a larger, 1.33-megapixel CCD sensor that significantly improves image quality, ensuring sharper images and more detailed video. The GR-DVL507 also includes a more advanced optical zoom of 20x, providing greater versatility for capturing dynamic scenes. This model features a 3.5-inch LCD monitor, which enhances the viewing experience and simplifies frame composition.

Both models incorporate JVC's innovative Video Stabilization technology which further reduces unwanted motion blur. The GR-DVL507 additionally provides options for manual control over focus and exposure, appealing to more experienced users who want greater creative control over their recordings.

In summary, JVC's GR-DVL307 and GR-DVL507 camcorders represent excellent choices for those looking to capture video memories without compromising on quality or ease of use. With their combination of user-oriented features, solid technology, and portability, these camcorders continue to be valued by those who appreciate the art of home video making.