GR-DVM5
Dear Customer
It is recommended that you
Connection to the mains supply in the United Kingdom
This unit is produced to comply with Standard IEC Publ
Some DO’S and DON’TS on the Safe USE of Equipment
Safety Precautions
Sub-Code Area
Video Area Audio Area
ITI Insert and Tracking Information Area
Grip/Hand strap
DC cord
VIDEO/AUDIO cable
RCA plug 4 RCA plug Ø3.5 mini-plug 4RCA plug Video cable
Lithium battery CR2025
RM-V712U Min DVM-30
DV30ME
Charging The Battery Pack
Open Battery Cover
Installing The Battery Pack
Insert Charged Battery
Close Battery Cover
Indoor Use
Using The Battery Holder
Select Operation Mode
Date/Time Settings
Input Date and Time
LCD monitor
Open Cassette Cover
Loading/Unloading a Cassette
INSERT/REMOVE Tape
To protect valuable recordings
SET Recording Mode
Recording Mode Setting
Set depending on your preference
Select Dial
Grip Strap Attachment
Adjust Length
Attach Grip Strap to Hand Strap Eyelet
Attach Grip Strap to SUB Hand Strap Eyelet
Adjust Dioptre
Dioptre Adjustment
Tripod Mounting
Turn on Camcorder
Installing The Battery
Remote Control Unit
Pull OUT Battery Holder
Insert Battery in Holder
Power Dial Position
Operation Mode
Self-Timer Playback Play
Function
IND. ON/OFF button Display
EN Recording
Pull OUT Viewfinder or Open LCD Monitor
Record-Standby mode is engaged
Start Recording
Stop Recording
Power lamp comes on
Engage Still Mode
Recording From The Middle Of a Tape
Start Search
Time Code
When blank portion is recorded on a tape
Proper recording
During shooting
Adjust Brightness
Tape Remaining Indicator
Brightness Control
LCD Monitor/Viewfinder Indications
Interface Shooting
Journalistic shooting
Open LCD Monitor
Tilt LCD Monitor
Zoom
EN Recording
Displaying The Date And Time During Recording
Select Function
Menu button IND. ON/OFF button Select Dial
Engage 5S Mode
END 5-SECOND Mode Recording
Scene 5-second recording
Engage SELF-TIMER Mode
Self-Timer
Stop SELF-TIMER Recording
END SELF-TIMER Recording
Select Snapshot Mode
Access System Menu
Snapshot
Take Snapshot
Snapshot mode Pin-Up mode With frame
Motor Drive mode
Close Recording Menu
Menus
Recording Menu allows you to set these functions
Please refer to pages 31, 32 for details
Wide Mode
REC Mode Recording mode
DIS Digital Image Stabilizer
Zoom Zoom magnification
Close System Menu
System Menu
See pages 28
Photo Mode
Access FADER/WIPE Menu
Accessmenu Manual Mode Item
To Cancel FADE/WIPE Effects
FADE/WIPE Effects
Example WH Fader White
Fades and Wipes
Example Wipe Scroll
WH , BK , , B W
Picture Wipe/Dissolve
Resume Recording
P and P of the Fader/Wipe Menu
Random Variations
Fade in or out with a black screen
Fade in or out with a white screen
Fade in or out with a full-screen mosaic effect
Fade out from colour to black and white
Fader and Wipe Menu
Disable P.AE/EFFECT
AE/Effects
Press START/STOP. The image begins with the selected effect
Slow Slow Shutter
Access Manual Focus
Manual Focus Adjustment
Adjust Focus
To Change To Auto Focus
Exposure Control
Adjust Exposure
Brightness control of the display
To Return To Automatic Exposure Control
Iris Lock
After , adjust the exposure rotating
To Return To Automatic Iris Control
Iris
Accessment White Balance Adjust
White Balance Adjustment
Closement White Balance Adjust
To Return To Automatic White Balance
Exit Manual White Balance Adjustment
Enter Setting
Manual White Balance Operation
To Change The Tint For Recording
Rewind Tape
Volume switch
Viewing Recording
END Playback
To Perform High-Speed Search
Press 2 or 3after pressing 6/4. The tape
High-Speed Search. This is not a malfunction
Activate Zoom
Playback Zoom
Locatescene Portion of Magnified
END Zoom
Playback Effects
Accessmenu Playback Effect Select
Playback Menu
Access Playback Menu
Close Menu
Playback Menu allows you to set the following functions
Playback Sound
Displaying the Date During Playback
Displaying The Time Code During Playback
VCR/TV Connection when connecting directly to the camcorder
Turn on Power
Select TV’S Video Mode
Attach and Lock
VCR/TV Connection using AC Charger Station
Basic Connections
VCR/TV connection using the AC Charger Station
Connect as shown in the illustration 1, 2 or 3 pg
Connect AC Charger Station to TV or VCR
Connector
Connection To a Video Unit Equipped With a DV Connector
To DV
Digital Printer
Plug the AC Charger Station’s power cord into an AC outlet
Supply Power
Attach Camcorder to AC Charger Station
While pressing down the lock
Make Connections Start Playback
Dubbing
Pause Recording
Recording deck
Make Connections
Digital Dubbing
Pg 65, or control the VCR using
Brand Setting
Remote control, you must set the VCR brand
Operate VCR
Execute FADE/WIPE in if Necessary
Random Assemble Editing
SET EDIT-IN Point
SET EDIT-OUT Point
USE P.AE/EFFECT if Necessary
Engagemode Vcrs RECORD-PAUSE
Start Editing
Stop Editing
Prepare for R.A. Edit Play Back Dubbed Scene
For More Accurate Editing
Choose a Scene
Random Assemble Editing Menu appears
Input Correction Data
Adjustment of VCR‘s against Camcorder Timing
Find EDIT-IN Point
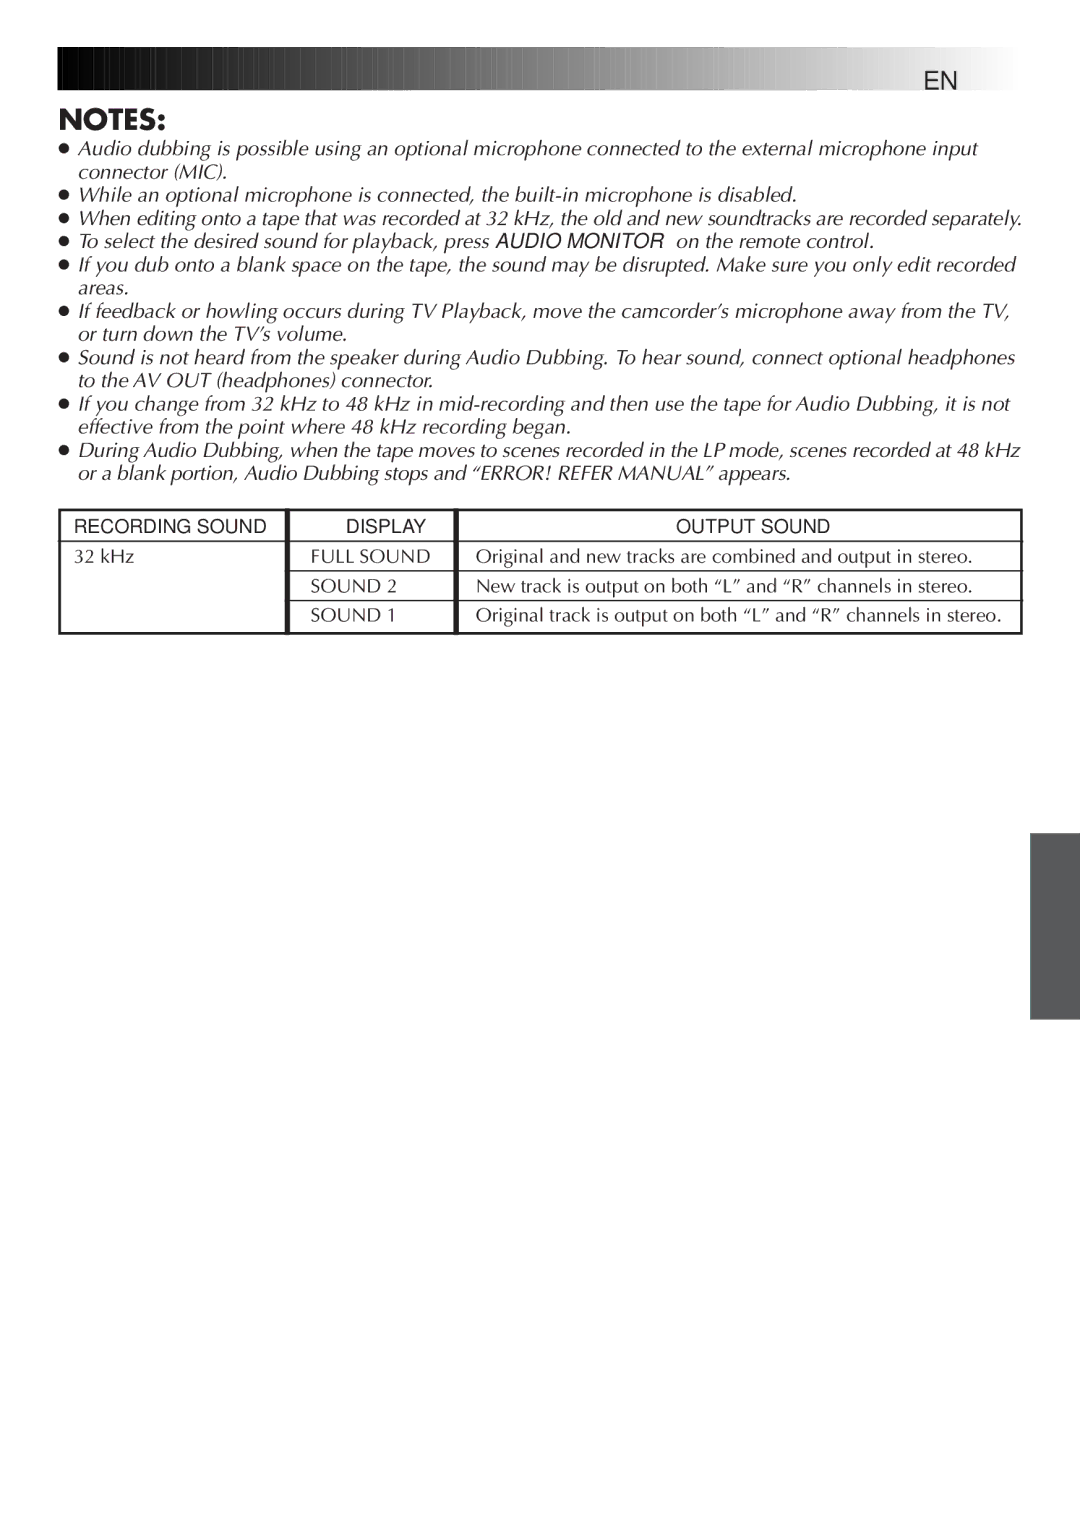
Audio Dubbing
Begin Dubbing
Pause During Dubbing
Recording Sound Display Output Sound
Troubleshooting
Video mode
Snapshot mode cannot be used Digital Zoom doesn’t work
Selected Mode pg
Mode recording Pg , there is a delay
Troubleshooting
When the LCD monitors Fluorescent light reaches
LCD monitor. When This happens, the displayed
Angle of the LCD monitor
Whitish
LCD monitor or Camcorder’s functions
LCD monitor Certain FADE/WIPE, P.AE Indications blink
Two or three times
Please consult your nearest
Cleaning The Camcorder
Camcorder
Volume switch Volume pg
Power dial pg
Zoom switch T/W pg
Viewfinder pg
AC Charger Station
Function
LCD Monitor/Viewfinder Indications During Recording
LCD Monitor/Viewfinder Indications During Playback
Indications Function
To avoid hazard
To prolong service life
During use
Store cassettes
Avoid using the unit
For safety, do not
Dirty heads can cause the following problems
Do not leave the unit
General
Video
Audio
Output power
Connectors
Video
Audio
AC Charger Station
Colour temperature
Auto focus
On-screen display
Pg 35, 41, 51
Pg , 54
Pg , 42
Iris Iris Lock LCD monitor/Viewfinder Indications
GR-DVM5


 EN
EN 69
69