Manuals
/
JVC
/
Photography
/
Camcorder
JVC
GZ-MG650, GZ-MG680
manuel dutilisation
Index
Models:
GZ-MG680
GZ-MG650
1
12
44
44
Download
44 pages
23.53 Kb
9
10
11
12
13
14
15
16
Troubleshooting
Install
Format Error
Self-Timer Indicator
When connecting to
Access lamp
Connectors
Remote Control Lithium Battery
Make backup on the PC
Date/Time Setting
Page 12
Image 12
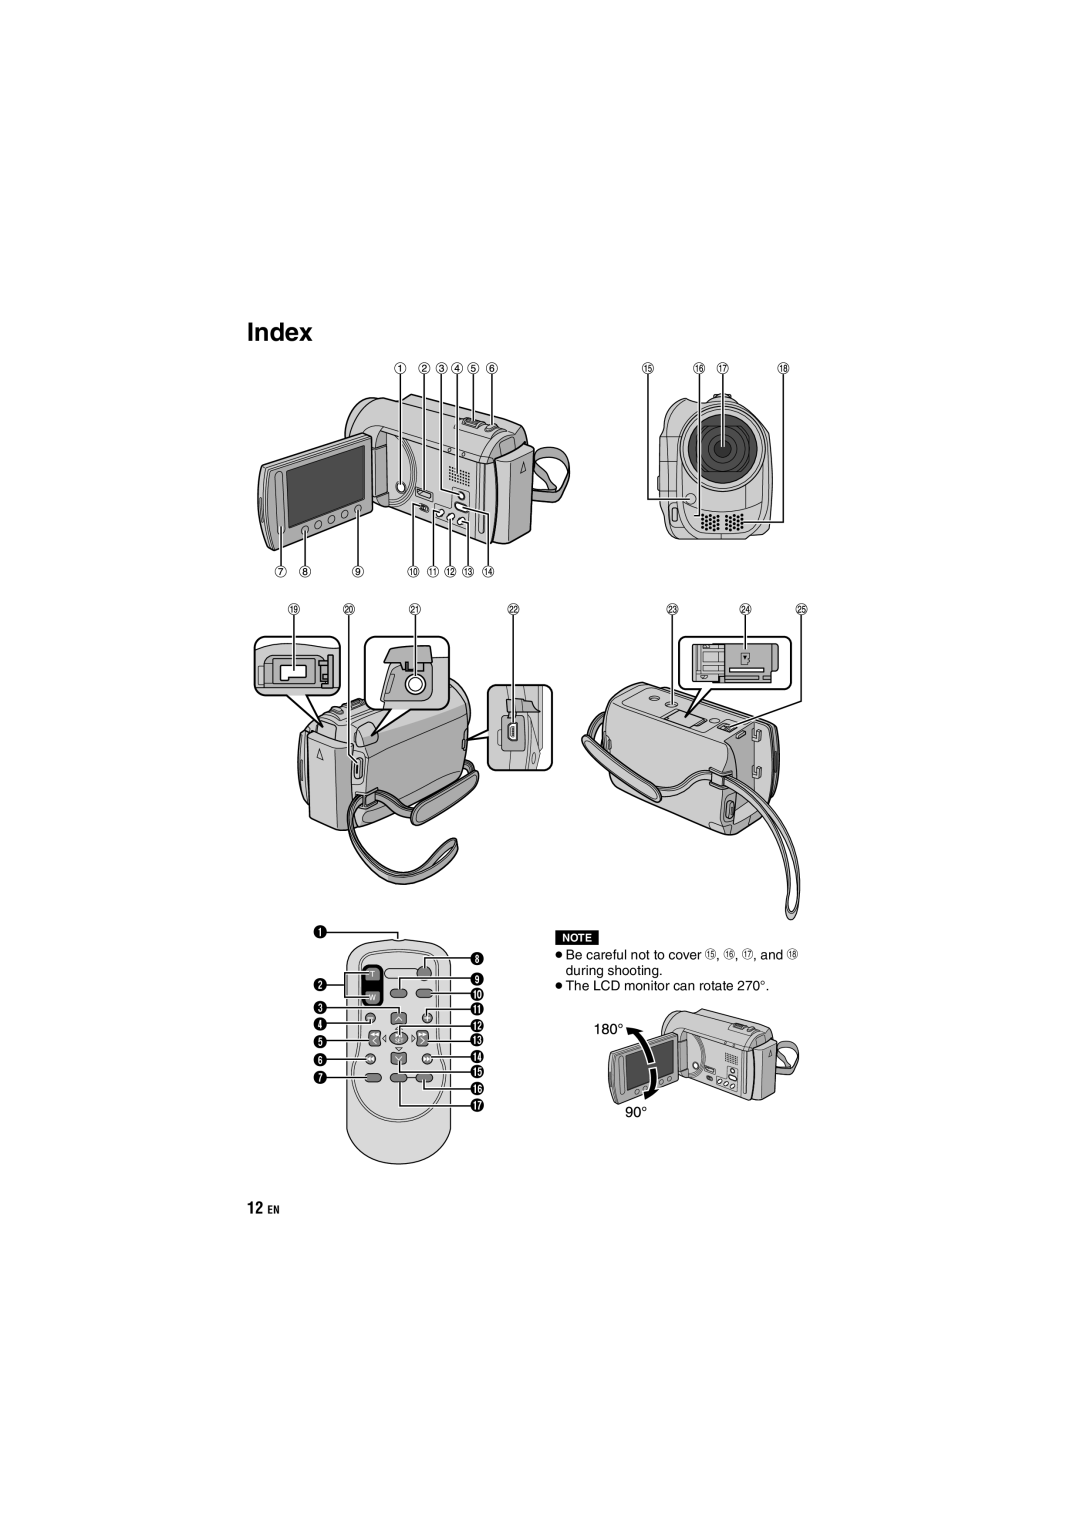
Index
NOTE
•
Be careful not to cover
1
,
2
,
3
, and
4
during shooting.
•
The LCD monitor can rotate 270°.
12
EN
Page 11
Page 13
Page 12
Image 12
Page 11
Page 13
Contents
For Future Reference
Pour consultation ultérieure
Model No Serial No
De modèle De série
Safety Precautions
For USA-California Only
Important Safety Instructions
Trademarks
Easy Start Guide Charge the battery before recording
Grip Adjustment
Access lamp
Power/charge lamp blinks Charging
Date/Time Setting
Power button LCD monitor
Slide your fi nger up and down on the sensor. Then touch OK
Video recording
Start recording
Playing back
Do not forget to make copies after recording
Index screen Playback screen
Contents
Reset the camcorder if it does not operate correctly
Precautions on handling batteries
Accessories
Remote Control Lithium Battery
AC Adapter
AV Cable
Preparing the Remote Control
To Reinsert the Battery
Lock Tab Lithium Battery CR2025
Attaching the Core Filter to the USB Cable
Index
Remote Control
Camcorder
Tripod Mounting
+ Shooting Indicator p , Wind Cut Indicator Event Indicator
Self-Timer Indicator
GZ-MG680 GZ-MG650 Analog Input Indicator
Indications on LCD Monitor
Switching indication modes on LCD monitor
During Video Playback During Still Image Playback
GZ-MG680Output with 1080p
Necessary Settings before Use
Charging the Battery Pack
Date/Time Setting
Language Setting
To reset the setting, select Quit
Select Save
Language on the display can be changed
Other Settings
Using a microSD Card
Set REC Media for Video and REC Media for Image to SD
Select Format SD Card to format the card
Slide the mode switch to select Video mode
Press PLAY/REC to select the recording mode
Recording Files
Video Recording
Slide the mode switch to select
Still Image Recording
Press Snapshot fully to take a still image
Touch Menu Select Light Select the desired setting
Checking the Remaining Battery Power
Zooming
LED Light
Video mode Playback mode
Playing Back Files
Video Playback
Select the desired file
Slide the mode switch to select #
Still image mode Playback mode
Still Image Playback
Operations during Still Image Playback On-screen buttons
Changing to Manual Recording Mode
Manual Setting in Menu
Manual Recording
Backlight Compensation
Viewing Files on TV
Connection with TV
Playback Operation
Press Snapshot when playback is paused
Managing Files
Capturing a Still Image from a Video
Deleting Files
Using a DVD Burner
Copying Files
Select Create from ALL Select the desired menu
Select the desired disc number
Select YES or no
Select Execute
Creating a DVD using a PC
Click Easy Installation
Click Next Click Finish
Click All volume in camcorder and click Next
Making Backup on the PC Preparation
Click Start
To disconnect the camcorder from
Make backup on the PC
Drag the file and drop into the user list
Making User Lists to Arrange the Files
fi les recorded on the day are displayed
Copying Files to a DVD Preparation
Folder Structure and Extensions Recording medium
Customer Support Information
= number
Region Language Phone #
To connect using the AV connectors analog dubbing
GZ-MG680 GZ-MG650 Set Switch to Analog I/O to Output
Dubbing Files to a VCR/DVD Recorder
Create a playlist
Using with a Portable Media Player
Turning on the Export Mode
Changing the Export Setting
Transferring the Files to PC
Turning on the Upload Mode
Uploading Files to Websites
Press Upload twice
Uploading Files
Changing the Menu Settings
Troubleshooting
During battery pack
When connecting to
To reset the camcorder when it does not operate normally
Recording cannot be
Format Error
MicroSD card
Connectors
Remote Control
Specifications
General
HDD can record up to 9999 still images in either mode
Hour/m minute Approximate recordable time for video
Approximate number of images for still image
Required charging/recording time approx Hour/m minute
Battery Pack
AC Adapter
Recording Medium
Hard Disk
Main Unit
Terms
CD-ROM
Top
Page
Image
Contents