INITIAL![]()
![]() SETTINGS
SETTINGS![]()
![]()
![]()
![]()
![]()
![]()
![]()
![]()
![]()
![]()
![]()
![]()
![]()
![]()
![]()
![]()
![]()
![]()
![]()
![]()
![]()
![]()
![]()
![]()
![]()
![]()
![]()
![]()
![]()
![]()
![]()
![]()
![]()
![]()
![]()
![]()
![]()
![]()
![]()
![]()
![]()
![]()
![]()
![]()
![]()
![]()
![]()
![]()
![]()
![]()
On-Screen Displays
Turn on the TV and select the VIDEO channel (or AV mode).
2 ![]()
![]() 3
3
q ![]() 5/8
5/8 ![]() 6
6![]()
OPERATE
OPERATE
1 | 2 |
| 3 |
4 | 5 |
| 6 |
7 | 8 | OK | 9 |
| |||
| 0 |
|
|
OSD ( ![]() )
)
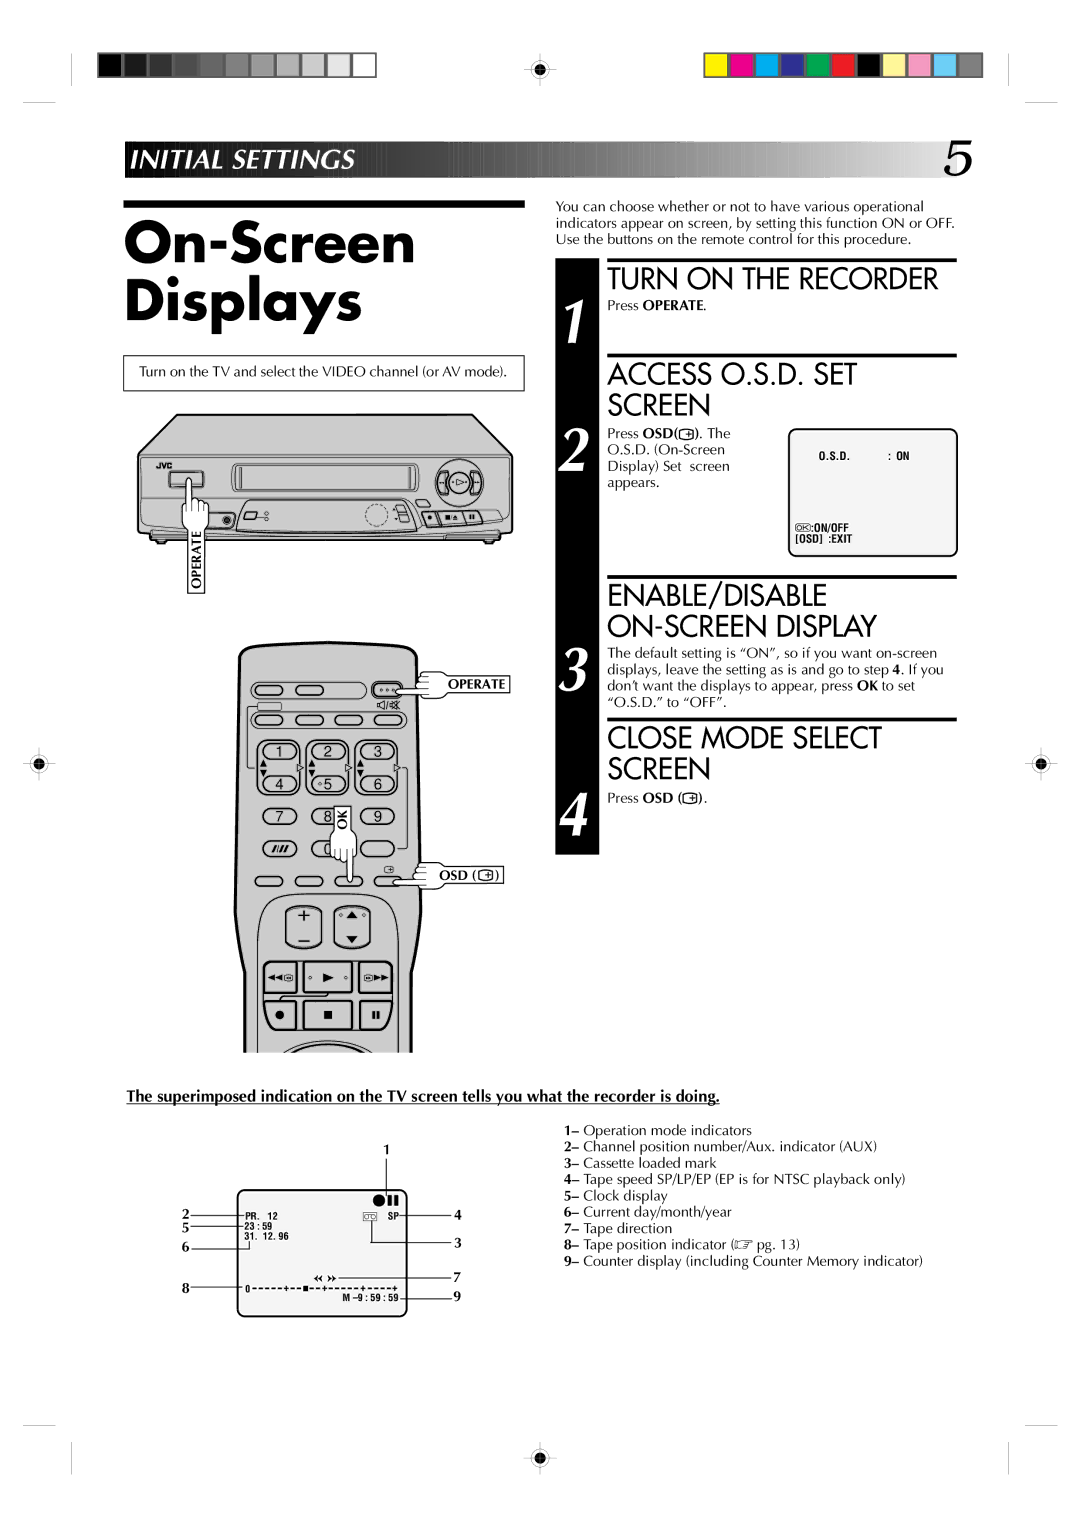
1 Press OPERATE. |
| ||
| ACCESS O.S.D. SET | ||
2 | SCREEN |
| |
Press OSD( ). The |
| ||
O.S.D. | O.S.D. : ON | ||
Display) Set screen | |||
| |||
| appears. |
| |
|
| :ON/OFF | |
|
| [OSD] :EXIT | |
ENABLE/DISABLE
ON-SCREEN DISPLAY
3 The default setting is “ON”, so if you want
CLOSE MODE SELECT
SCREEN
4 Press OSD (![]() ).
).
The superimposed indication on the TV screen tells you what the recorder is doing.
1
|
|
|
|
|
|
|
|
|
|
|
|
|
|
2 |
|
|
|
|
|
|
| q6 | 4 | ||||
|
| PR. | 12 |
| ] SP |
| |||||||
|
|
|
| ||||||||||
5 |
| 23 : 59 |
|
|
|
|
|
|
|
| |||
|
|
|
|
|
|
|
|
| |||||
6 | 31. | 12. 96 |
|
|
|
|
|
| 3 | ||||
|
|
|
|
|
|
|
|
|
|
| |||
|
|
|
|
|
|
|
|
|
|
| |||
8 |
|
|
|
|
|
|
|
|
|
|
| 7 | |
| 0 | + | + | + | + |
|
| ||||||
|
|
|
| 9 | |||||||||
|
|
|
|
|
|
| M |
|
| ||||
|
|
|
|
|
|
|
|
| |||||
1– Operation mode indicators
2– Channel position number/Aux. indicator (AUX) 3– Cassette loaded mark
4– Tape speed SP/LP/EP (EP is for NTSC playback only) 5– Clock display
6– Current day/month/year 7– Tape direction
8– Tape position indicator (☞ pg. 13)
9– Counter display (including Counter Memory indicator)
